Sign up for the latest Speech AI news from NVIDIA.
Recently, NVIDIA achieved GPU-accelerated speech-to-text inference with exciting performance results. That post described the general process of the Kaldi ASR pipeline and indicated which of its elements the team accelerated, that is, implementing the decoder on the GPU and taking advantage of Tensor Cores in the acoustic model.
Now with the latest Kaldi container on NGC, the team has accelerated an additional element, feature extraction, resulting in even faster transcription of audio recordings for Pascal and newer GPUs.
This post is about how to get up and running. We walk you through reproducing our most recent performance benchmark with the GPU-accelerated LibriSpeech and ASpIRE automatic speech recognition (ASR) models, which transcribe audio recordings of speech into text. We also show you how to perform ASR on your own audio recordings using the accelerated model.
Quick background
Kaldi is an open-source software framework for speech processing, the first stage in the conversational AI pipeline, that originated in 2009 at Johns Hopkins University with the intent to develop techniques to reduce both the cost and time required to build speech recognition systems. Kaldi has since grown to become the default speech recognition toolkit in the community, helping enable speech services used by millions of people each day.
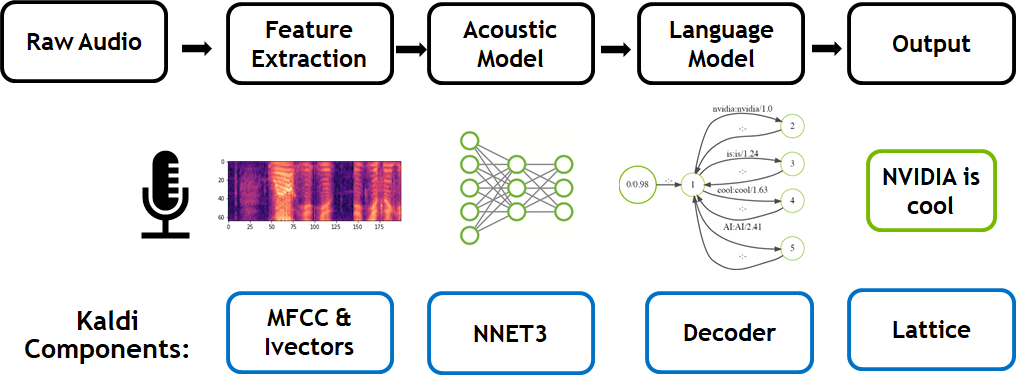
The traditional speech-to-text workflow (Figure 1) takes place in the following primary phases:
- Feature extraction (converts a raw audio signal into spectral features suitable for machine learning tasks)
- Acoustic modeling
- Language modeling
Today’s acoustic models in Kaldi replace Gaussian Mixture Models (GMMs) and Hidden Markov Models (HMMs) with both recurrent and convolutional neural networks to predict states efficiently, resulting in state-of-the-art performance.
Walk-through: Three Use Cases
We’re going to cover three use cases to help you start using GPU-accelerated Kaldi in a Linux environment with at least one NVIDIA GPU installed. First, as a baseline, we show you how to reproduce our results using the LibriSpeech model. Next, we demonstrate how to swap out the LibriSpeech model for another model, ASpIRE. Lastly, we guide you through the steps to run your own speech audio through the LibriSpeech model to produce a text transcript.
Setup
For each use case, you must have an NGC account. It’s free and only takes a few minutes to set-up.
Accelerated Kaldi is hosted on an NGC as a container, so the first step is to pull it.
Launch a terminal or shell, and at the command line, enter the following:
nvidia-smi |
The output should resemble the following, and you should see your GPUs listed. In DGX Station, we see four V100 GPUs.
+-----------------------------------------------------------------------------+| NVIDIA-SMI 418.87.00 Driver Version: 418.87.00 CUDA Version: 10.1 ||-------------------------------+----------------------+----------------------+| GPU Name Persistence-M| Bus-Id Disp.A | Volatile Uncorr. ECC || Fan Temp Perf Pwr:Usage/Cap| Memory-Usage | GPU-Util Compute M. ||===============================+======================+======================|| 0 Tesla V100-DGXS... On | 00000000:07:00.0 Off | 0 || N/A 37C P0 38W / 300W | 8MiB / 16128MiB | 0% Default |+-------------------------------+----------------------+----------------------+| 1 Tesla V100-DGXS... On | 00000000:08:00.0 Off | 0 || N/A 38C P0 37W / 300W | 0MiB / 16128MiB | 0% Default |+-------------------------------+----------------------+----------------------+| 2 Tesla V100-DGXS... On | 00000000:0E:00.0 Off | 0 || N/A 38C P0 36W / 300W | 0MiB / 16128MiB | 0% Default |+-------------------------------+----------------------+----------------------+| 3 Tesla V100-DGXS... On | 00000000:0F:00.0 Off | 0 || N/A 38C P0 36W / 300W | 0MiB / 16128MiB | 0% Default |+-------------------------------+----------------------+----------------------++-----------------------------------------------------------------------------+| Processes: GPU Memory || GPU PID Type Process name Usage ||=============================================================================|| 0 2511 G /usr/lib/xorg/Xorg 6MiB |+-----------------------------------------------------------------------------+ |
Next, grab the NGC container that contains GPU-accelerated Kaldi:
docker login nvcr.iodocker pull nvcr.io/nvidia/kaldi:<xx.xx>-py3 |
<xx.xx>-py3 varies with the latest release, but use 19.09-py3 for this post.
After a few moments, the pull operation completes, and you’re ready to try the use cases for yourself. Let’s start by having you reproduce our results.
Reproducing our results with the accelerated LibriSpeech model
It’s time to run the Kaldi container in nvidia-docker to reproduce our results using the accelerated LibriSpeech model.
nvidia-docker run -it --rm nvcr.io/nvidia/kaldi:<xx.xx>-py3 |
At this point, you’re presented with a command prompt inside the container. That is, any commands you issue are handled by the container, not the shell from which you launched the container. It should look like the following when you run the container:
============= Kaldi =============NVIDIA Release new-run-scripts (build 7601331)Kaldi Version 5.5Container image Copyright (c) 2019, NVIDIA CORPORATION.? All rights reserved.Copyright 2015-2019, Kaldi contributors.? All rights reserved.Various files include modifications (c) NVIDIA CORPORATION.? All rights reserved.NVIDIA modifications are covered by the license terms that apply to the underlying project or file.root@da56dd4e3852:/workspace# |
The first step is to run the command to download example audio recordings, pre-process them by converting them to WAV files, and download the trained LibriSpeech model. We’ve made a shell script for that. Run the commands:
cd /workspace/nvidia-examples/librispeech/./prepare_data.sh |
Depending on the speed of your internet connection, this step should take up to 15 minutes.
In this benchmark, we’re using the LibriSpeech model, trained on 1K hours of recordings of people reading English. When the download and setup are complete, your next step executes a script to run the speech-to-text pipeline on the example audio recordings, accelerated by the GPU. At the command line, run the following:
./run_benchmark |
Understanding the Output
The first portion of text that pops out shows several of the parameters used in the benchmark. For example, you see the flag to use the GPU at the beginning. The batch size for GPU processing and the beam width for the Viterbi search are other notable parameters.
USE_GPU: 1NUM_PROCESSES: 1GPU_FEATURE: trueCPU_THREADS: 40cuda-control-threads: 2cuda-worker-threads: 38batch_size: 300batch_drain_size: 40iterations: 10file-limit: -1main-q-capacity=30000aux-q-capacity=400000beam=10lattice-beam=7max-active=10000WORKSPACE=/workspace/MODEL_PATH=/workspace//models/LibriSpeech/MODEL_NAME=LibriSpeechDATASET=/workspace/datasets/LibriSpeech/test_clean/DECODER=/opt/kaldi//src/cudadecoderbin/batched-wav-nnet3-cudaOUTPUT_PATH=/tmp/results/LibriSpeech… …?All tests PASSEDProcess 0:~Group 0 completed Aggregate Total Time: 9.08942 Audio: 19452.5 RealTimeX: 2140.12~Group 1 completed Aggregate Total Time: 13.5072 Audio: 38905 RealTimeX: 2880.31~Group 2 completed Aggregate Total Time: 18.0279 Audio: 58357.4 RealTimeX: 3237.06~Group 3 completed Aggregate Total Time: 22.3097 Audio: 77809.9 RealTimeX: 3487.72~Group 4 completed Aggregate Total Time: 26.5666 Audio: 97262.4 RealTimeX: 3661.07~Group 5 completed Aggregate Total Time: 30.8791 Audio: 116715 RealTimeX: 3779.74~Group 6 completed Aggregate Total Time: 34.9199 Audio: 136167 RealTimeX: 3899.42~Group 7 completed Aggregate Total Time: 39.4025 Audio: 155620 RealTimeX: 3949.49~Group 8 completed Aggregate Total Time: 43.6977 Audio: 175072 RealTimeX: 4006.44~Group 9 completed Aggregate Total Time: 44.4936 Audio: 194525 RealTimeX: 4371.97Overall:? Aggregate Total Time: 44.4937 Total Audio: 194525 RealTimeX: 4371.96??%WER 5.52 [ 2904 / 52576, 389 ins, 231 del, 2284 sub ]??%SER 51.37 [ 1346 / 2620 ]??Scored 2620 sentences, 0 not present in hyp.??Expected: 2620, Actual: 2620??Decoding completed successfully.Total RTF: 4371.96 Average RTF: 4371.9600All WER and PERF tests passed. |
Each Group is a separate iteration that we use for timing calculations. At the end of the output, we calculate RealTimeX by dividing the number of seconds of Total Audio by the Aggregate Total Time.
By the way, you can see GPU 0 being exercised in this output from running the nvidia-smi command again in a different shell while the benchmark was running:
+-----------------------------------------------------------------------------+| NVIDIA-SMI 418.67 ? ??? Driver Version: 418.67 ? ??? CUDA Version: 10.1 ??? ||-------------------------------+----------------------+----------------------+| GPU? Name ? ? Persistence-M| Bus-Id ??? ? Disp.A | Volatile Uncorr. ECC || Fan? Temp Perf? Pwr:Usage/Cap| ? ? ??? Memory-Usage | GPU-Util? Compute M. ||===============================+======================+======================|| ? 0 Tesla V100-DGXS...? On | 00000000:07:00.0 Off | ??? ? ? ? ? ? ? ? 0 || N/A ? 47C P0 ? 257W / 300W |? 14229MiB / 16128MiB | ??? 90%? ? ? Default |+-------------------------------+----------------------+----------------------+| ? 1 Tesla V100-DGXS...? On | 00000000:08:00.0 Off |? ? ? ? ? ? ? ? ??? 0 || N/A ? 42C P0??? 38W / 300W |? ??? 0MiB / 16128MiB |? ??? 0%? ? ? Default |+-------------------------------+----------------------+----------------------+| ? 2 Tesla V100-DGXS...? On | 00000000:0E:00.0 Off |? ? ? ? ? ? ? ? ??? 0 || N/A ? 42C P0??? 37W / 300W |? ??? 0MiB / 16128MiB |? ??? 0%? ? ? Default |+-------------------------------+----------------------+----------------------+| ? 3 Tesla V100-DGXS...? On | 00000000:0F:00.0 Off |? ? ? ? ? ? ? ? ??? 0 || N/A ? 42C P0??? 37W / 300W |? ??? 0MiB / 16128MiB |? ??? 0%? ? ? Default |+-------------------------------+----------------------+----------------------+ |
On the V100 16GB GPU in our DGX Station, this benchmark took nearly 75 seconds to complete. The throughput compared to real-time is about 4,372x. Not too shabby!
Benchmarking the Aspire ASR model
With our upcoming Kaldi container 19-10, you can also run the benchmark for the accelerated Automated Speech Recognition in Reverberant Environments (ASpIRE) model. ASpIRE was developed from recordings with far-field microphones of people talking on the phone in noisy, echoey rooms. If you think about how your own speech changes between reading a book out loud and conversing with someone interactively, you’ll get the gist of the difference between ASpIRE and LibriSpeech.
The procedure is the same as for LibriSpeech, but run from the ASpIRE directory. Here are the steps:
cd /workspace/nvidia-examples/aspire./run_benchmark.sh |
The output is in the format as with LibriSpeech benchmark, and the performance is about 2Kx real time.
Transcribing your own data using the accelerated LibriSpeech model
Applying Kaldi’s ASR to your own audio is straightforward. Here’s an example using the LibriSpeech model. First, keep in mind that the LibriSpeech model was generated from a corpus of clean, echo-free, high-SNR recordings. Make sure that your audio files were recorded with a headset or with a mic close to the speaking person’s mouth. Finally, ensure that the files are in the format required by the LibriSpeech model:
- .WAV format
- 16 kHz sampling rate (8 kHz for ASpIRE)
- Mono
- 32-bit float
You can use Audacity, a free audio-processing application for Windows, Mac, and Linux, or a command-line tool such as flac2wav to convert your audio, if necessary. Here’s how my correctly formatted audio file named DT2.wav looked in Audacity. Check the format info at the bottom left.
Second, copy or move your audio files into a single folder, such as /home/user/audio. You could’ve done this step first as the order doesn’t matter in this case.
Next, create a symbolic link from inside the Kaldi container to your audio directory, while also starting up the container. In the shell command, replace /home/user/audio with your own path to your directory of .wav files.
nvidia-docker run -v /home/user/audio:/root/audio? --rm -it nvcr.io/nvidia/kaldi:23.11-py3 |
In the container, next change directories to the /librispeech directory:
cd /workspace/nvidia-examples/librispeech |
Almost there! Run the data preparation step:
./prepare_data.sh |
This step takes around 5 to 15 minutes to finish, as there are several large files to pull down. When it finishes, point the ./run_benchmark.sh script to your audio folder:
DATASET=/root/audio ./run_benchmark.sh |
If you have only a few audio files to transcribe, the speedup won’t reach the same scale as running thousands of files. However, you can simulate having thousands of files by changing the number of iterations to run with your few files. Depending on your audio, you may want to adjust the batch size down from 300 to avoid an out-of-memory error.
DATASET=/root/audio ITERATIONS=500 MAX_BATCH_SIZE=200 ./run_benchmark.sh |
In this specific case, with these audio files, the resulting throughput was 3,684.
For the best word error rate and speedup, it’s important to consider which speech model, LibriSpeech or ASpIRE, is appropriate for your audio. LibriSpeech was trained on low-noise recordings of reading aloud, while ASpIRE was trained on slightly echoey recordings while people conversed on the telephone.
When the script is complete, the resulting transcripts are in the /tmp/results/LibriSpeech directory, starting with a directory named 0. Each time you run the benchmark, this directory name increments by one. For example, here’sthe result of my reading aloud from a technical publication, stored in /root/audio/DT1.wav:
more /tmp/results/LibriSpeech/0/0/trans_root_audio_DT1 this paper is part of a larger effort to detect the manipulations of video by searching for it and combining evidences of multiple types of inconsistencies between the audio and visual channels |
The file trans contains multiple transcriptions if more files are in the audio directory.
What’s next
Now that you’ve tried the GPU-accelerated Kaldi speech recognition toolkit for yourself, you may want to learn more about how NVIDIA drastically increased its throughput. For more information about thought process and considerations behind the accelerated implementation, see the Kaldi GPU Acceleration GTC session.
What’s the NVIDIA team working on next? One item is optimizing even more stages of Kaldi’s processing flow, now that the feature extractor is complete. Another task is testing Kaldi on smaller GPUs, such as the NVIDIA Jetson Xavier and NVIDIA Jetson Nano development boards. Stay tuned!