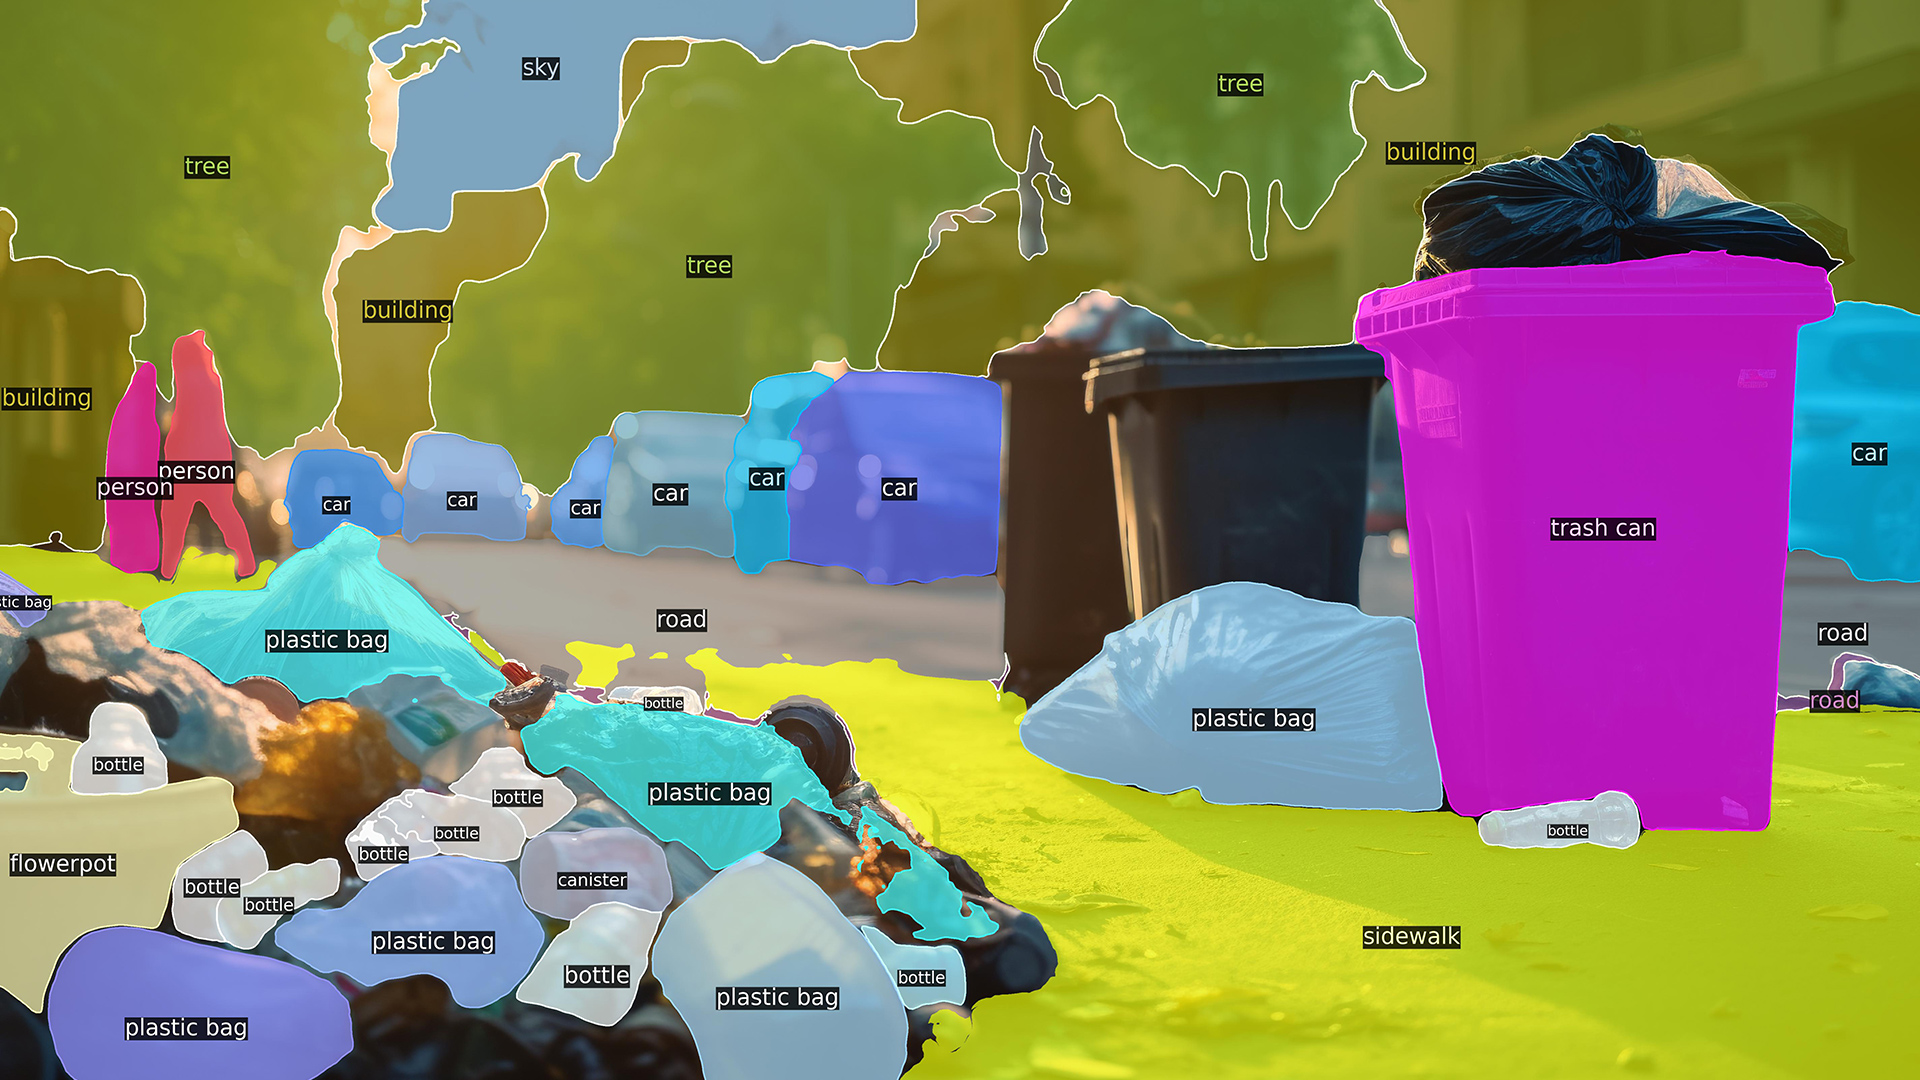
The long, cumbersome slog of data procurement has been slowing down innovation in AI, especially in computer vision, which relies on labeled images and video for training. But now you can jumpstart your machine learning process by quickly generating synthetic data using AI.Reverie.
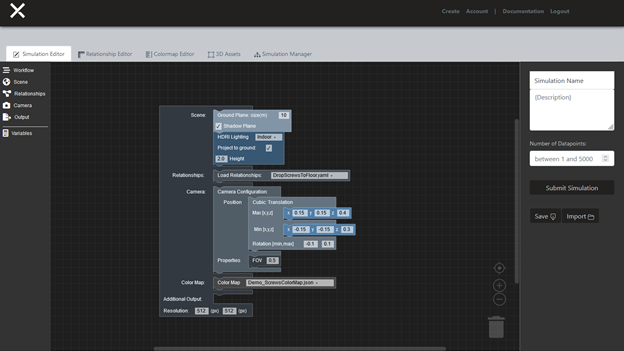
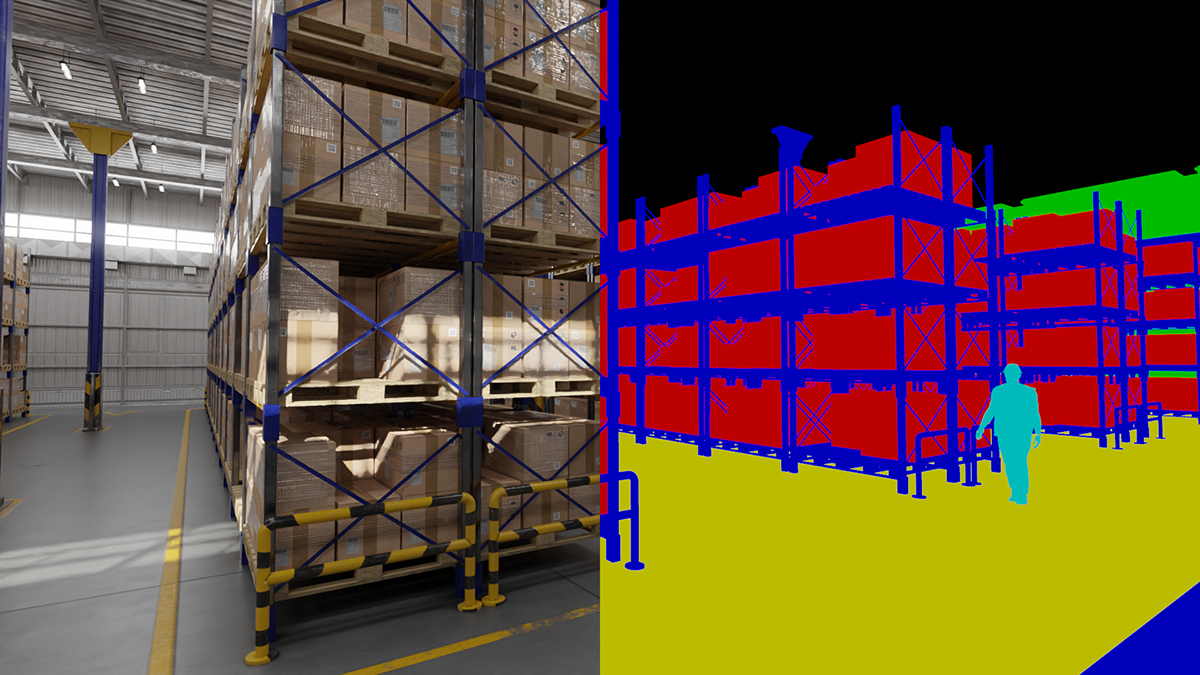
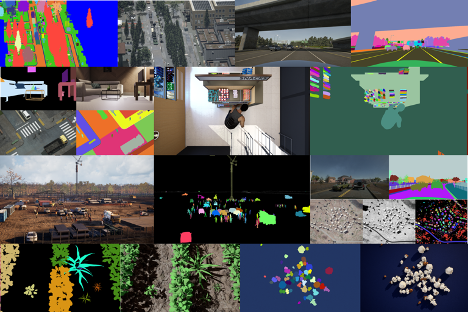
With the AI.Reverie synthetic data platform, you can create the exact training data that you need in a fraction of the time it would take to find and label the right real photography. In AI.Reverie’s photorealistic 3D environments, you can generate data for all possible scenarios, including hard to reach places, unusual environmental conditions, and rare or unique events.
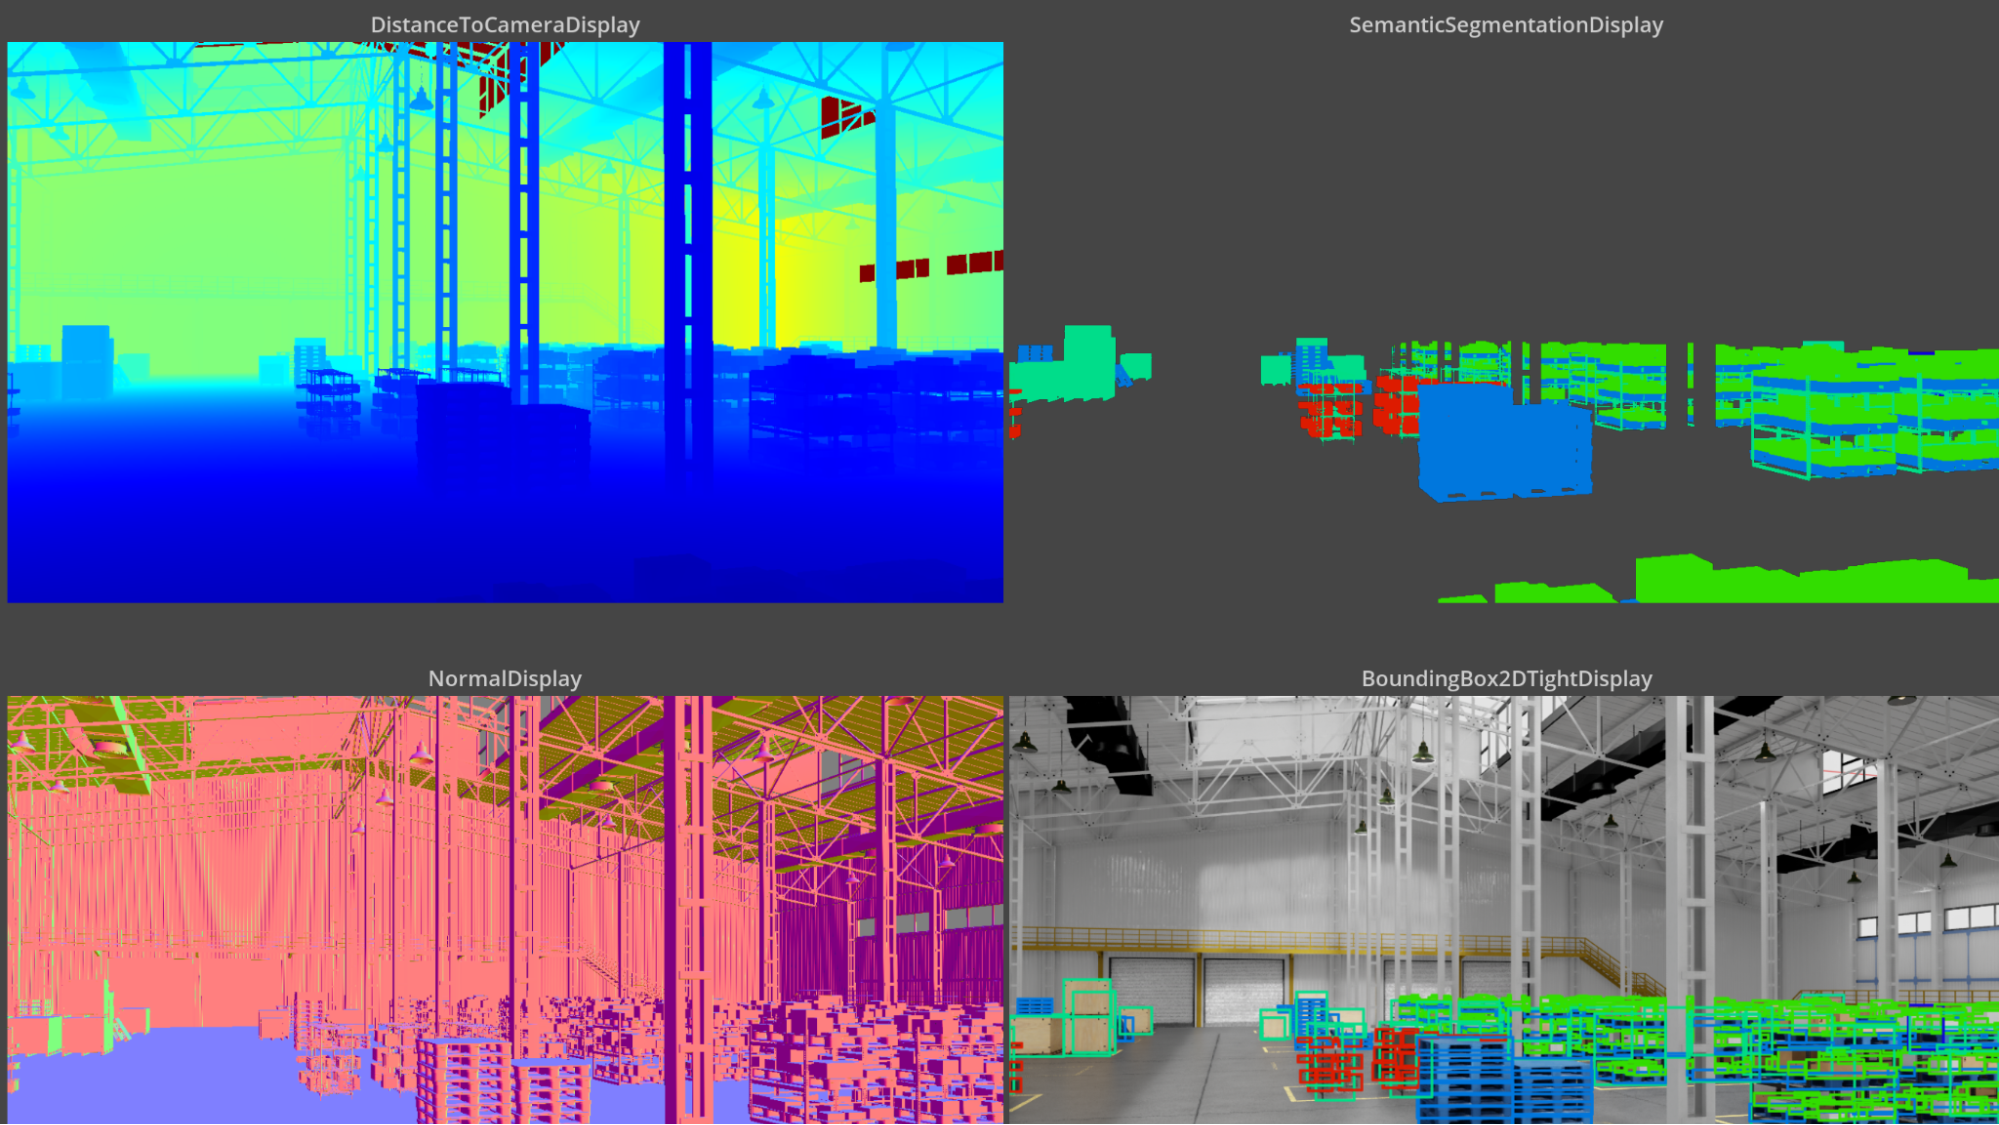
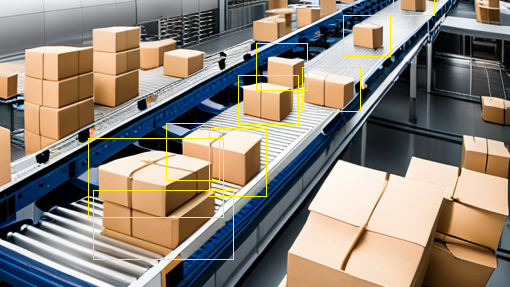
Training data generation includes labels. Choose the needed types, such as 2D or 3D bounding boxes, depth masks, and so on. After you test your model, you can return to the platform to quickly generate additional data to improve accuracy. Test and repeat in quick, iterative cycles.
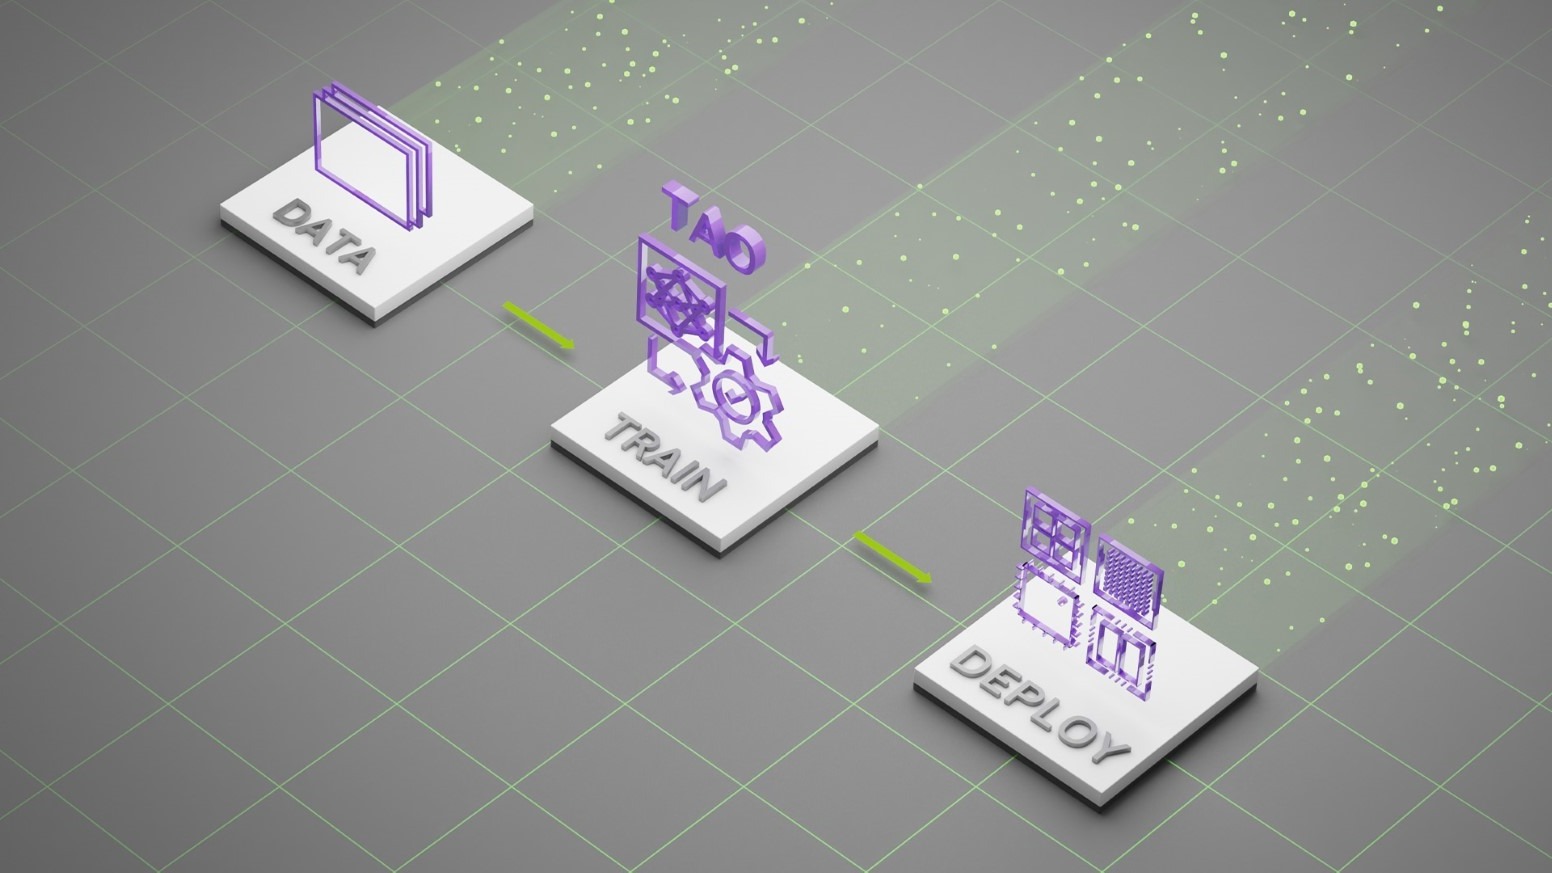
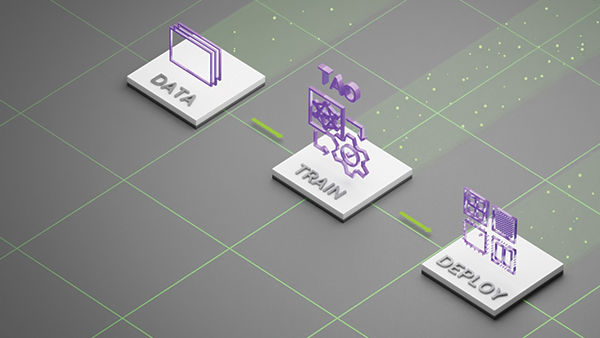
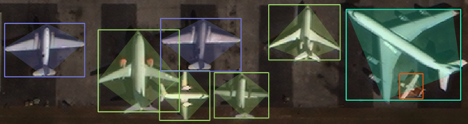
We wanted to test performance of AI.Reverie synthetic data in NVIDIA TAO Toolkit 3.0. Originally, we set out to replicate the results in the research paper RarePlanes: Synthetic Data Takes Flight, which used synthetic imagery to create object detection models. We discovered new tools in TAO Toolkit that made it possible to create more lightweight models that were as accurate as, but much faster than, those featured in the original paper.
In this post, we show you how we used the TAO Toolkit quantized-aware training and model pruning to accomplish this, and how to replicate the results yourself. We show you how to create an airplane detector, but you should be able to fine-tune the model for various satellite detection scenarios of your own.
Access the satellite detection model
To replicate these results, you can clone the GitHub repository and follow along with the included Jupyter notebook.
Clone the following repo:
git clone git@github.com:aireveries/rareplanes-tao.git ~/Code/rareplanes-tao
Create a conda environment:
conda create -f env.yaml
Activate the model:
source activate rareplanes-tao
Start Jupyter:
jupyter notebook
Learning objectives
- Generate synthetic data using the AI.Reverie platform and use it with TAO Toolkit.
- Train highly accurate models using synthetic data.
- Optimize a model for inference using the toolkit.
Prerequisites
We tested the code with Python 3.8.8, using Anaconda 4.9.2 to manage dependencies and the virtual environment. The code may work with different versions of Python and other virtual environment solutions, but we haven’t tested those configurations. We used Ubuntu 18.04.5 LTS and NVIDIA driver 460.32.03 and CUDA Version 11.2. TAO Toolkit requires driver 455.xx or later.
- Set up the NVIDIA Container Toolkit / nvidia-docker2. For more information, see the NVIDIA Container Toolkit Installation Guide.
- Set up NGC to be able to download NVIDIA Docker containers. Follow steps 4 and 5 in the TAO Toolkit User Guide. For more information about the NGC CLI tool, see CLI Install.
- Have available at least 250 GB hard disk space to store dataset and model weights.
Downloading the datasets
For more information about the contents of the RarePlanes dataset, see RarePlanes Public User Guide.
For this tutorial, you need only download a subset of the data. The following code example is meant to be executed from within the Jupyter notebook. First, create the folders:
!mkdir -p data/real/tarballs/{train,test}
 !mkdir -p data/synthetic
Now use this function to download the datasets from Amazon S3, extract them, and verify:
def download(s3_path, out_folder, out_file_count):
     rel_file_path = Path('data') / Path(s3_path.replace('s3://rareplanes-public/', ''))
     rel_folder = rel_file_path.parent / out_folder
     num_files = !ls $rel_folder | wc -l
     try:
         if int(num_files[0]) == out_file_count:
             print(f'{s3_path} already downloaded and extracted')
         else:
             raise Exception
     except:
         if not rel_file_path.exists():
             print('Starting download')
             !aws s3 cp $s3_path $rel_file_path;
         else:
             print(f'{s3_path} already downloaded')
         print('Extracting...')
         !cd {rel_folder.parent}; pv {rel_file_path.name} | tar xz;
         print('Removing compressed file.')
         !rm $rel_file_path
Then download the dataset:
download('s3://rareplanes-public/real/tarballs/metadata_annotations.tar.gz',
          'metadata_annotations', 9)
 download('s3://rareplanes-public/real/tarballs/train/RarePlanes_train_PS-RGB_tiled.tar.gz',
          'PS-RGB_tiled', 11630)
 download('s3://rareplanes-public/real/tarballs/test/RarePlanes_test_PS-RGB_tiled.tar.gz',
           'PS-RGB_tiled', 5420)
 !aws s3 cp --recursive s3://rareplanes-public/synthetic/ data/synthetic
Converting from COCO to KITTI format
TAO Toolkit uses the KITTI format for object detection model training. RarePlanes is in the COCO format, so you must run a conversion script from within the Jupyter notebook. This converts the real train/test and synthetic train/test datasets.
%run convert_coco_to_kitti.py
There should now be a folder for each dataset split inside of data/kitti that contains the KITTI formatted annotation text files and symlinks to the original images.
Setting up TAO Toolkit mounts
The notebook has a script to generate a ~/.tao_mounts.json file. For more information about the various settings, see Running the launcher.
{
     "Mounts": [
         {
             "source": "/home/patrick.rodriguez/Code/rareplanes-tao",
             "destination": "/workspace/tao-experiments"
         }
     ],
     "Envs": [
         {
             "variable": "CUDA_VISIBLE_DEVICES",
             "value": "0"
         }
     ],
     "DockerOptions": {
         "shm_size": "16G",
         "ulimits": {
             "memlock": -1,
             "stack": 67108864
         },
         "user": "1001:1001"
     }
 }
Processing datasets into TFRecords
You must turn the KITTI labels into the TFRecord format used by TAO Toolkit. The convert_split function in the notebook helps you bulk convert all the datasets:
 def convert_split(name):
     !tao detectnet_v2 dataset_convert --gpu_index 0 \
         -d /workspace/tao-experiments/specs/detectnet_v2_tfrecords_{name}.txt \
         -o /workspace/tao-experiments/data/tfrecords/{name}/{name}
 You can then run the conversions:
 convert_split('kitti_real_train')
 convert_split('kitti_real_test')
 convert_split('kitti_synthetic_train')
 convert_split('kitti_synthetic_test')
Download the ResNet18 convolutional backbone
Using your NGC account and command-line tool, you can now download the model:
Download the ResNet18 convolutional backbone
Using your NGC account and command-line tool, you can now download the model:
!ngc registry model download-version nvidia/tao_pretrained_detectnet_v2:resnet18
The model is now located at the following path:
./tao_pretrained_detectnet_v2_vresnet18/resnet18.hdf5
Run a benchmark experiment using real data
The following command starts training and logs results to a file that you can tail:
!tao detectnet_v2 train --key tao --gpu_index 0 \
     -e /workspace/tao-experiments/specs/detectnet_v2_train_resnet18_kitti_real.txt \
     -r /workspace/tao-experiments/detectnet_v2_outputs/resnet18_real_amp16 \
     -n resnet18_real_amp16 \
     --use_amp > out_resnet18_real_amp16.log
Follow along with the following command:
tail -f ./out_resnet18_real_amp16.log
After training is complete, you can use the functions defined in the notebook to get relevant statistics on your model:
 get_model_param_counts('./out_resnet18_real_amp16.log')
 best_epoch = get_best_epoch('./out_resnet18_real_amp16.log')
 best_epoch
You get something like the following output:
 Total params: 11,197,893
 Trainable params: 11,188,165
 Non-trainable params: 9,728
 Best epoch and map50 metric: (79, 94.2296)
To reevaluate your trained model on your test set or other dataset, run the following:
!tao detectnet_v2 evaluate --gpu_index 0 \
     -e /workspace/tao-experiments/specs/detectnet_v2_evaluate_real.txt \
     -m /workspace/tao-experiments/{best_checkpoint} \
     -k tao
The output should look something like this:
 Validation cost: 0.001133
 Mean average_precision (in %): 94.2563

 class name      average precision (in %)
 ------------  --------------------------
 aircraft                         94.2563

 Median Inference Time: 0.003877
 2021-04-06 05:47:00,323 [INFO] __main__: Evaluation complete.
 Time taken to run __main__:main: 0:00:27.031500.
 2021-04-06 05:47:02,466 [INFO] tao.components.docker_handler.docker_handler: Stopping container.
Running an experiment with synthetic data
  !tao detectnet_v2 train --key tao --gpu_index 0 \
     -e /workspace/tao-experiments/specs/detectnet_v2_train_resnet18_kitti_synth.txt \
     -r /workspace/tao-experiments/detectnet_v2_outputs/resnet18_synth_amp16 \
     -n resnet18_synth_amp16 \
     --use_amp > out_resnet18_synth_amp16.log
You can see the results for each epoch by running: !cat out_resnet18_synth_amp16.log | grep -i aircraft
Example output:
 aircraft                         58.1444
 aircraft                         65.1423
 aircraft                         64.3203
 aircraft                         68.1934
 aircraft                         71.5754
 aircraft                         68.5568
Fine-tuning the synthetic-trained model with real data
Now, fine-tune your best-performing synthetic-data-trained model with 10% of the real data. To do so, you must first create the 10% split.
 %run ./create_train_split.py
 convert_split('kitti_real_train_10')
You then use this function to replace the checkpoint in your template spec with the best performing model from the synthetic-only training.
 with open('./specs/detectnet_v2_train_resnet18_kitti_synth_finetune_10.txt', 'r') as f_in:
     with open('./specs/detectnet_v2_train_resnet18_kitti_synth_finetune_10_replaced.txt', 'w') as f_out:
         out = f_in.read().replace('REPLACE', best_checkpoint)
         f_out.write(out)
You can now begin a TAO Toolkit training. Start your fine-tuning with the best-performing epoch of the model trained on synthetic data alone, in the previous section.
!tao detectnet_v2 train --key tao --gpu_index 0 \
     -e /workspace/tao-experiments/specs/detectnet_v2_train_resnet18_kitti_synth_finetune_10_replaced.txt \
     -r /workspace/tao-experiments/detectnet_v2_outputs/resnet18_synth_finetune_10_amp16 \
     -n resnet18_synth_finetune_10_amp16 \
     --use_amp > out_resnet18_synth_finetune_10_amp16.log
After training has completed, you should see a best epoch of between 91-93% mAP50, which gets you close to the real-only model performance with only 10% of the real data.
In the notebook, there’s a command to evaluate the best performing model checkpoint on the test set:
 !tao detectnet_v2 evaluate --gpu_index 0 \
     -e /workspace/tao-experiments/specs/detectnet_v2_evaluate_real.txt \
     -m /workspace/tao-experiments/{best_checkpoint} \
     -k tao
You should see something like the following output:
2021-04-06 18:05:28,342 [INFO] iva.detectnet_v2.evaluation.evaluation: step 330 / 339, 0.05s/step
 Matching predictions to ground truth, class 1/1.: 100%|█| 14719/14719 [00:00<00:00, 15814.87it/s]

 Validation cost: 0.001368
 Mean average_precision (in %): 91.8094

 class name      average precision (in %)
 ------------  --------------------------
 aircraft                         91.8094

 Median Inference Time: 0.004137
 2021-04-06 18:05:30,327 [INFO] __main__: Evaluation complete.
 Time taken to run __main__:main: 0:00:30.677440.
 2021-04-06 18:05:32,469 [INFO] tao.components.docker_handler.docker_handler: Stopping container.
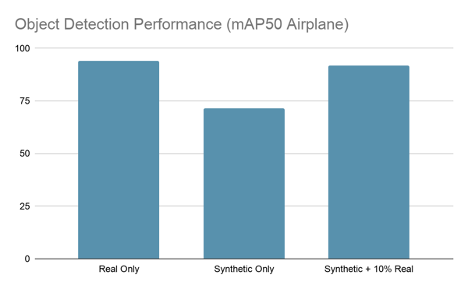
Data enhancement is fine-tuning a model training on AI.Reverie’s synthetic data with just 10% of the original, real dataset. As you can see, this technique produces a model as accurate as one trained on real data alone. That represents roughly 90% cost savings on real, labeled data and saves you from having to endure a long hand-labeling and QA process.
Pruning the model
Having trained a well-performing model, you can now decrease the number of weights to cut down on file size and inference time. TAO Toolkit includes an easy-to-use pruning tool.
The one argument to play with is -pth, which sets the threshold for neurons to prune. The higher you set this, the more parameters are pruned, but after a certain point your accuracy metric may drop too low. We found that a value of 0.5 worked for these experiments, but you may find different results on other datasets.
 !mkdir -p detectnet_v2_outputs/pruned

 !tao detectnet_v2 prune \
     -m /workspace/tao-experiments/{best_checkpoint} \
     -o /workspace/tao-experiments/detectnet_v2_outputs/pruned/pruned-model.tao \
     -eq union \
     -pth 0.5 \
     -k tao
You can now evaluate the pruned model:
!tao detectnet_v2 evaluate --gpu_index 0 \
     -e /workspace/tao-experiments/specs/detectnet_v2_evaluate_real.txt \
     -m /workspace/tao-experiments/detectnet_v2_outputs/pruned/pruned-model.tao \
     -k tao > out_pruned.txt
Now you can see how many parameters remain:
get_model_param_counts('./out_pruned.txt')
You should see something like the following outputs:
 Total params: 3,372,973
 Trainable params: 3,366,573
 Non-trainable params: 6,400
This is 70% smaller than the original model, which had 11.2 million parameters! Of course, you’ve lost performance by dropping so many parameters, which you can verify:
 !cat out_pruned.txt | grep -i aircraft

 aircraft                         68.8865
Luckily, you can recover almost all the performance by retraining the pruned model.
Retraining the models
As before, there is a template spec to run this experiment that only requires you to fill in the location of the pruned model:
 with open('./specs/detectnet_v2_train_resnet18_kitti_synth_finetune_10_pruned_retrain.txt', 'r') as f_in:
     with open('./specs/detectnet_v2_train_resnet18_kitti_synth_finetune_10_pruned_retrain_replaced.txt', 'w') as f_out:
         out = f_in.read().replace('REPLACE', 'detectnet_v2_outputs/pruned/pruned-model.tao')
         f_out.write(out)
You can now retrain the pruned model:
 !tao detectnet_v2 train --key tao --gpu_index 0 \
     -e /workspace/tao-experiments/specs/detectnet_v2_train_resnet18_kitti_synth_finetune_10_pruned_retrain_replaced.txt \
     -r /workspace/tao-experiments/detectnet_v2_outputs/resnet18_synth_finetune_10_pruned_retrain_amp16 \
     -n resnet18_synth_finetune_10_pruned_retrain_amp16 \
     --use_amp > out_resnet18_synth_finetune_10_pruned_retrain_amp16.log
On a run of this experiment, the best performing epoch achieved 91.925 mAP50, which is about the same as the original nonpruned experiment.
2021-04-06 19:33:39,360 [INFO] iva.detectnet_v2.evaluation.evaluation: step 330 / 339, 0.05s/step
 Matching predictions to ground truth, class 1/1.: 100%|█| 17403/17403 [00:01<00:00, 15748.62it/s]
 Validation cost: 0.001442
 Mean average_precision (in %): 91.9849

 class name      average precision (in %)
 ------------  --------------------------
 aircraft                         91.9849

 Median Inference Time: 0.003635
 2021-04-06 19:33:41,479 [INFO] __main__: Evaluation complete.
 Time taken to run __main__:main: 0:00:31.869671.
 2021-04-06 19:33:43,607 [INFO] tao.components.docker_handler.docker_handler: Stopping container.
Quantizing the models
The final step in this process is quantizing the pruned model so that you can achieve much higher levels of inference speed with TensorRT. We have a quantization aware training (QAT) spec template available:
with open('./specs/detectnet_v2_train_resnet18_kitti_synth_finetune_10_pruned_retrain_qat.txt', 'r') as f_in:
     with open('./specs/detectnet_v2_train_resnet18_kitti_synth_finetune_10_pruned_retrain_qat_replaced.txt', 'w') as f_out:
         out = f_in.read().replace('REPLACE', 'detectnet_v2_outputs/pruned/pruned-model.tao')
         f_out.write(out)
Run the QAT training:
!tao detectnet_v2 train --key tao --gpu_index 0 \
     -e /workspace/tao-experiments/specs/detectnet_v2_train_resnet18_kitti_synth_finetune_10_pruned_retrain_qat_replaced.txt \
     -r /workspace/tao-experiments/detectnet_v2_outputs/resnet18_synth_finetune_10_pruned_retrain_qat_amp16 \
     -n resnet18_synth_finetune_10_pruned_retrain_qat_amp16 \
     --use_amp > out_resnet18_synth_finetune_10_pruned_retrain_qat_amp16.log
Use the TAO Toolkit export tool to export to INT8 quantized TensorRT format:
!tao detectnet_v2 export \
   -m /workspace/tao-experiments/{best_checkpoint} \
   -o /workspace/tao-experiments/detectnet_v2_outputs/qat/resnet18_detector_qat.etao \
   -k tao  \
   --data_type int8 \
   --batch_size 64 \
   --max_batch_size 64\
   --engine_file /workspace/tao-experiments/detectnet_v2_outputs/qat/resnet18_detector_qat.trt.int8 \
   --cal_cache_file /workspace/tao-experiments/detectnet_v2_outputs/qat/calibration_qat.bin \
   --verbose
At this point, you can now evaluate your quantized model using TensorRT:
!tao detectnet_v2 evaluate -e /workspace/tao-experiments/specs/detectnet_v2_train_resnet18_kitti_synth_finetune_10_pruned_retrain_qat_replaced.txt \
                            -m /workspace/tao-experiments/detectnet_v2_outputs/qat/resnet18_detector_qat.trt.int8 \
                            -f tensorrt
Looking at the output:
2021-04-06 23:08:28,471 [INFO] iva.detectnet_v2.evaluation.tensorrt_evaluator: step 330 / 339, 0.33s/step
 Matching predictions to ground truth, class 1/1.: 100%|█| 21973/21973 [00:01<00:00, 16161.54it/s]

 Validation cost: 0.549463
 Mean average_precision (in %): 91.5516

 class name      average precision (in %)
 ------------  --------------------------
 aircraft                         91.5516

 Median Inference Time: 0.000840
 2021-04-06 23:08:33,182 [INFO] __main__: Evaluation complete.
 Time taken to run __main__:main: 0:02:13.453132.
 2021-04-06 23:08:34,768 [INFO] tao.components.docker_handler.docker_handler: Stopping container.
Conclusion
We were impressed by these results. AI.Reverie’s synthetic data platform, with just 10% of the real dataset, enabled us to achieve the same performance as we did when training on the full real dataset. That represents a cost savings of roughly 90%, not to mention the time saved on procurement. It now takes days, not months, to generate the needed synthetic data.
TAO Toolkit also produced a 25.2x reduction in parameter count, a 33.6x reduction in file size, a 174.7x increase in performance (QPS), while retaining 95% of the original performance. The toolkit’s capabilities were particularly valuable for pruning and quantizing.
Go to AI.Reverie, download the synthetic training data for your project, and start training with TAO Toolkit.