DX12 Raytracing tutorial - Part 1
NVIDIA DXR Sample
Welcome to Part 1 of the DirectX 12 DXR ray tracing tutorial. The focus of these documents and the provided code is to showcase a basic integration of raytracing within an existing DirectX 12 sample, using the new DXR API. Note that for educational purposes all the code is contained in a very small set of files. A real integration would require additional levels of abstraction.
Introduction
The recent integration of ray tracing into the DirectX 12 API, called DXR,?has spawned a great deal of excitement among game developers. This post, along with the provided code showcases a basic tutorial on integrating ray tracing within an existing DirectX 12 sample using the new DXR API. You’ll learn how to add ray tracing to an existing application so that the ray tracing and raster paths share the same geometry buffers.
This part one of a two-part tutorial, which deals with the initial setup of Windows 10 and DX12 for ray tracing. These two posts showcase basic intergration of ray tracing within an existing DirectX sample.?
Goal of the Tutorial
The goal of this tutorial is to add raytracing to an existing program, so that the raytracing and raster paths share the same geometry buffers.
Step-by-step, we will go through the major building blocks required to do raytracing. You will also be invited to add code snippets that will enable the ray-tracer step-by-step.
The following building blocks are required to add raytracing functionalities:
- Detecting and enabling raytracing features
- Creating the bottom- and top-level acceleration structures (BLAS and TLAS) providing high-performance ray-geometry intersection capabilities
- Creating and adding shaders: Ray Generation, Hit and Miss describing how to create new rays, and what to do upon an intersection or miss
- Creating a raytracing pipeline with the various programs: Ray Generation, Hit and Miss. This is used to pack together all the shaders used in the raytracing process
- Creating a shading binding table (SBT) associating the geometry with the corresponding shaders
In the Extras we will extend the minimal program by adding some more elements: See the Going Further section.
We will add the ability to switch between raster and raytracing, by pressing the SPACEBAR.
At any time you can go to the References section, providing external links to more resources around DXR.
Windows Version
Before going further: make sure you are running Windows 10 Version 1809 or later.
Starting point: Hello Triangle
There are many samples for DirectX 12 under Microsoft GitHub, but for this example, you only need HelloTriangle.
Download the HelloTriangle Zip
- Make sure that you have the latest Windows SDK installed
- Open the solution, build and run.

If you have a compilation issue, check that you have the latest Windows SDK installed. Right-Click the solution and select “Retarget solution” to the latest SDK.
DXR Utilities
In the following tutorial, we will use some utility functions that are abstracting some really verbose implementation. The implementation of those abstractions, available here, is fully documented and should help clarifying the concepts of DXR.
Download the utility classes and copy to the project directory.
- Add the utility files to the solution
- Select all
.cppand set the precompile flag toNot Using Precompiled Headers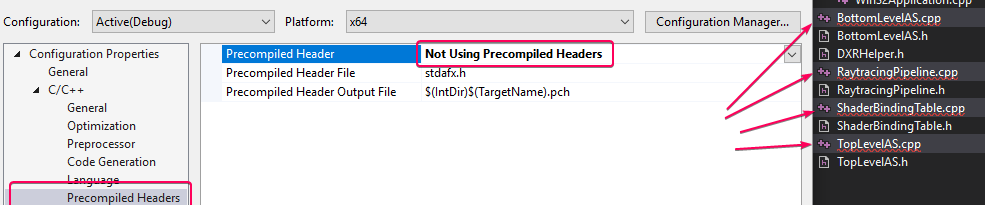
- Add
$(ProjectDir)to the project includeC/C++> General> Additional Include Directories
Enabling Raytracing Capabilities
Raytracing-enabled Device and Command List
Our sample uses the simplest APIs of DirectX12, exposed in the ID3D12Device and ID3D12GraphicsCommandList classes.
The raytracing APIs are much more advanced and recent, and were included in the ID3D12Device5 and ID3D12GraphicsCommandList4 classes.
In D3D12HelloTriangle.h, we replace the declaration of m_device and m_commandList accordingly:
ComPtr<id3d12device5> m_device;ComPtr<id3d12graphicscommandlist4> m_commandList;Checking for Raytracing Support
In D3D12HelloTriangle.h, we add a method for checking whether the device supports raytracing:
void CheckRaytracingSupport();
The body of the function is added to the D3D12HelloTriangle.cpp file. The raytracing features are part of the
D3D12_FEATURE_DATA_D3D12_OPTIONS5 feature set:
void D3D12HelloTriangle::CheckRaytracingSupport() {
    D3D12_FEATURE_DATA_D3D12_OPTIONS5 options5 = {};
    ThrowIfFailed(m_device->CheckFeatureSupport(D3D12_FEATURE_D3D12_OPTIONS5,
                                                &options5, sizeof(options5)));
    if (options5.RaytracingTier < D3D12_RAYTRACING_TIER_1_0)
      throw std::runtime_error("Raytracing not supported on device");
}
We then add a call to this method at the end of OnInit:
    // Check the raytracing capabilities of the device
    CheckRaytracingSupport();
We will also add the ability to switch between Raster and RayTracing by pressing the SPACEBAR.
In D3D12HelloTriangle.h, for convenience, we also introduce a function to switch between raytracing and raster at runtime.
    virtual void OnKeyUp(UINT8 key);
    bool m_raster = true;
OnInit()
In the original D3D12HelloTriangle sample, the LoadAssets method creates, initializes and closes the command list.
The raytracing setup will require an open command list, and for clarity we prefer adding the methods initializing the
raytracing in the OnInit method.
Therefore we need to move the following lines from LoadAssets() and put them at the end of the OnInit() function.
// Command lists are created in the recording state, but there is
// nothing to record yet. The main loop expects it to be closed, so
// close it now.
ThrowIfFailed(m_commandList->Close());
LoadPipeline()
This is not required, but for consistency you can change the feature level to D3D_FEATURE_LEVEL_12_1.
PopulateCommandList()
Find the block clearing the buffer and issuing the draw commands:
const float clearColor[] = { 0.0f, 0.2f, 0.4f, 1.0f };
m_commandList->IASetPrimitiveTopology(D3D_PRIMITIVE_TOPOLOGY_TRIANGLELIST);
m_commandList->ClearRenderTargetView(rtvHandle, clearColor, 0, nullptr);
m_commandList->IASetVertexBuffers(0, 1, &m_vertexBufferView);
m_commandList->DrawInstanced(3, 1, 0, 0);
and replace it by the following, so that we will execute this block only in rasterization mode. In the raytracing path we will simply clear the buffer with a different color for now.
// Record commands.
// #DXR
if (m_raster)
{
    const float clearColor[] = { 0.0f, 0.2f, 0.4f, 1.0f };
    m_commandList->IASetPrimitiveTopology(D3D_PRIMITIVE_TOPOLOGY_TRIANGLELIST);
    m_commandList->ClearRenderTargetView(rtvHandle, clearColor, 0, nullptr);
    m_commandList->IASetVertexBuffers(0, 1, &m_vertexBufferView);
    m_commandList->DrawInstanced(3, 1, 0, 0);
}
else
{
    const float clearColor[] = { 0.6f, 0.8f, 0.4f, 1.0f };
    m_commandList->ClearRenderTargetView(rtvHandle, clearColor, 0, nullptr);
}
OnKeyUp()
Add the following function for toggling between raster and ray-traced modes.
//-----------------------------------------------------------------------------
//
//
void D3D12HelloTriangle::OnKeyUp(UINT8 key)
{
    // Alternate between rasterization and raytracing using the spacebar
    if (key == VK_SPACE)
    {
    m_raster = !m_raster;
    }
}
WindowProc()
The following is not required, but it adds the convenience to quit the application by pressing the ESC key.
In the Win32Application.cpp file, in WindowProc, add the following code to the WM_KEYDOWN case to quit the application.
if (static_cast<uint8>(wParam) == VK_ESCAPE)
    PostQuitMessage(0);
Result
If everything went well, you should be able to compile, run and when pressing the spacebar, toggle between raster and raytracing mode. We are not doing any raytracing yet, but this will be our starting point.


Overview of the System
Raytracing using DXR requires 3 main building blocks. The acceleration structures store the geometric information to optimize the search for ray intersection points, and are separated into the bottom-level (BLAS) and top-level (TLAS). The raytracing pipeline contains the compiled programs along with the function names associated to each shader program, as well as a description of how those shaders exchange data. Finally, the shader binding table is linking all of those pieces together by indicating which shader programs are executed for which geometry, and which resources are associated with it.

To facilitate the first contact with DXR, the helper classes we added previously directly map to those main blocks.
Acceleration Structure
To be efficient, raytracing requires putting the geometry in an acceleration structure (AS) that will reduce the number of ray-triangle intersection tests during rendering. In DXR this structure is divided into a two-level tree. Intuitively, this can directly map to the notion of an object in a scene graph, where the internal nodes of the graph have been collapsed into a single transform matrix for each bottom-level AS objects. Those BLAS then hold the actual vertex data of each object. However, it is also possible to combine multiple objects within a single bottom-level AS: for that, a single BLAS can be built from multiple vertex buffers, each with its own transform matrix. Note that if an object is instantiated several times within a same BLAS, its geometry will be duplicated. This can particularly be useful to improve performance on static, non-instantiated scene components (as a rule of thumb, the fewer BLAS, the better).
For each BLAS, the top-level AS that will contain the object instances, each one with its own transformation matrix. We will start with a single bottom-level AS containing the vertices of the triangle and a top-level AS instancing it once with an identity transform.

In D3D12HelloTriangle.h, add those includes to access the API of the DirectX compiler, the top-level acceleration
structure helper, and the standard vectors.
#include <dxcapi.h>
#include <vector>

#include "nv_helpers_dx12/TopLevelASGenerator.h"
We will also need to add the following declarations at the end of the class definition. First, building an acceleration structure (AS) requires up to 3 buffers: some scratch memory used internally by the acceleration structure builder, the actual storage of the structure, and descriptors representing the instance matrices for top-level acceleration structures.
// #DXR
struct AccelerationStructureBuffers
{
    ComPtr<id3d12resource> pScratch;      // Scratch memory for AS builder
    ComPtr<id3d12resource> pResult;       // Where the AS is
    ComPtr<id3d12resource> pInstanceDesc; // Hold the matrices of the instances
};
This tutorial will only use a single bottom-level AS, for which we only store the pResult buffer.
For the top-level AS, we anticipate the possibility of implementing dynamic changes, and keep track
of the generator helper class and all the AccelerationStructureBuffers structure.
We also anticipate the possibility of having several instances, and store a vector whose entries associate
a bottom-level AS to a transform matrix.
ComPtr<id3d12resource> m_bottomLevelAS; // Storage for the bottom Level AS

nv_helpers_dx12::TopLevelASGenerator m_topLevelASGenerator;
AccelerationStructureBuffers m_topLevelASBuffers;
std::vector<:pair>, DirectX::XMMATRIX>> m_instances;
We also introduce 3 methods:
CreateBottomLevelAS, which generates the bottom-level AS from avectorof vertex buffers in GPU memory and vertex countCreateTopLevelAS, which generates the top-level AS from avectorof bottom-level AS and transform matrixCreateAccelerationStructuresbinding the above methods together
/// Create the acceleration structure of an instance
///
/// \param     vVertexBuffers : pair of buffer and vertex count
/// \return    AccelerationStructureBuffers for TLAS
AccelerationStructureBuffers
CreateBottomLevelAS(std::vector<:pair>, uint32_t>> vVertexBuffers);

/// Create the main acceleration structure that holds
/// all instances of the scene
/// \param     instances : pair of BLAS and transform
void CreateTopLevelAS(
    const std::vector<:pair>, DirectX::XMMATRIX>>& instances);

/// Create all acceleration structures, bottom and top
void CreateAccelerationStructures();
In D3D12HelloTriangle.cpp, we will add the implementation of those methods. First,
include the following to access some helper functions and the bottom-level AS helper class:
#include "DXRHelper.h"
#include "nv_helpers_dx12/BottomLevelASGenerator.h"
CreateBottomLevelAS
To create the bottom level acceleration structure (BLAS), we are calling CreateBottomLevelAS and passing an array of two elements (pair).
The first element is the pointer to the resource holding the vertices of the geometry, the second is the
number of vertices. Note that we are assuming that the resource contains Vertex structures. For the sake of simplicity,
we do not use indexing: triangles are described by 'Vertex' triplets. Indexing is supported by the helper class, though, please see
the Going Further section for the details.
The function CreateBottomLevelAS is divided into 3 main steps. First , it combines all the vertex buffers into the BLAS
builder helper class.
The BLAS generation is performed
on GPU, and the second step computes the storage requirements to hold the final BLAS as well as some temporary space by calling ComputeASBufferSizes.
This maps to the actual DXR API, which requires the application
to allocate the space for the BLAS as well as the temporary (scratch) space. This scratch space can be freed as soon as the
build is complete, ie. after the execution of the command list containing the build request is completed.
Internally, the ComputeASBufferSizes method calls ID3D12Device5::GetRaytracingAccelerationStructurePrebuildInfo which will
give a conservative estimate of the memory requirements. The buffers can then be allocated directly in GPU memory on the default heap.
Finally, the BLAS can be generated by calling the Generate method. It will
create a descriptor of the acceleration structure building work with a D3D12_RAYTRACING_ACCELERATION_STRUCTURE_TYPE_BOTTOM_LEVEL type,
and call ID3D12GraphicsCommandList4::BuildRaytracingAccelerationStructure()
with that descriptor.
The resulting BLAS contains the full definition of the geometry, organized in a way suitable for efficiently finding ray intersections with that geometry.
//-----------------------------------------------------------------------------
//
// Create a bottom-level acceleration structure based on a list of vertex
// buffers in GPU memory along with their vertex count. The build is then done
// in 3 steps: gathering the geometry, computing the sizes of the required
// buffers, and building the actual AS
//
D3D12HelloTriangle::AccelerationStructureBuffers
D3D12HelloTriangle::CreateBottomLevelAS(
    std::vector<:pair>, uint32_t>> vVertexBuffers) {
  nv_helpers_dx12::BottomLevelASGenerator bottomLevelAS;

  // Adding all vertex buffers and not transforming their position.
  for (const auto &buffer : vVertexBuffers) {
    bottomLevelAS.AddVertexBuffer(buffer.first.Get(), 0, buffer.second,
                                  sizeof(Vertex), 0, 0);
  }

  // The AS build requires some scratch space to store temporary information.
  // The amount of scratch memory is dependent on the scene complexity.
  UINT64 scratchSizeInBytes = 0;
  // The final AS also needs to be stored in addition to the existing vertex
  // buffers. It size is also dependent on the scene complexity.
  UINT64 resultSizeInBytes = 0;

  bottomLevelAS.ComputeASBufferSizes(m_device.Get(), false, &scratchSizeInBytes,
                                     &resultSizeInBytes);

  // Once the sizes are obtained, the application is responsible for allocating
  // the necessary buffers. Since the entire generation will be done on the GPU,
  // we can directly allocate those on the default heap
  AccelerationStructureBuffers buffers;
  buffers.pScratch = nv_helpers_dx12::CreateBuffer(
      m_device.Get(), scratchSizeInBytes,
      D3D12_RESOURCE_FLAG_ALLOW_UNORDERED_ACCESS, D3D12_RESOURCE_STATE_COMMON,
      nv_helpers_dx12::kDefaultHeapProps);
  buffers.pResult = nv_helpers_dx12::CreateBuffer(
      m_device.Get(), resultSizeInBytes,
      D3D12_RESOURCE_FLAG_ALLOW_UNORDERED_ACCESS,
      D3D12_RESOURCE_STATE_RAYTRACING_ACCELERATION_STRUCTURE,
      nv_helpers_dx12::kDefaultHeapProps);

  // Build the acceleration structure. Note that this call integrates a barrier
  // on the generated AS, so that it can be used to compute a top-level AS right
  // after this method.
  bottomLevelAS.Generate(m_commandList.Get(), buffers.pScratch.Get(),
                         buffers.pResult.Get(), false, nullptr);

  return buffers;
}
CreateTopLevelAS
The top level acceleration structure (TLAS) can be seen as an acceleration structure over acceleration structures, which aims at optimizing the search for ray intersections in any of the underlying BLAS. A TLAS can instantiate the same BLAS multiple times, using per-instance matrices to render them at various world-space positions.
In the example, we call CreateTopLevelAS and pass an array of two elements (pair). The first element is the
resource pointer to the BLAS, the second is the matrix to position the object. In the Going Further section we will use those
matrices to animate the scene by only updating the TLAS and keeping the BLAS fixed, making it useful for rigid-body
animations.
This method is very similar in structure to CreateBottomLevelAS, with the same 3 steps: gathering the input data,
computing the AS buffer sizes, and generating the actual TLAS.
However, the TLAS requires an additional buffer holding the descriptions of each instance. The ComputeASBufferSizes method
provides the sizes of the scratch and result buffers by calling ID3D12Device5::GetRaytracingAccelerationStructurePrebuildInfo,
and computes the size of the instance buffers from the size of the instance descriptor D3D12_RAYTRACING_INSTANCE_DESC and the number of instances.
As for the BLAS, the scratch and result buffers are directly allocated in GPU memory, on the default heap. The instance descriptors buffer will need to be mapped within the helper, and has to be allocated on the upload heap.
Once the buffers are allocated, the Generate call
fills in the instance descriptions buffer and a descriptor of the building work to be done, with a
D3D12_RAYTRACING_ACCELERATION_STRUCTURE_TYPE_TOP_LEVEL type. This descriptor is then
passed to ID3D12GraphicsCommandList4::BuildRaytracingAccelerationStructure which builds an
acceleration structure holding all the instances.
//-----------------------------------------------------------------------------
// Create the main acceleration structure that holds all instances of the scene.
// Similarly to the bottom-level AS generation, it is done in 3 steps: gathering
// the instances, computing the memory requirements for the AS, and building the
// AS itself
//
void D3D12HelloTriangle::CreateTopLevelAS(
    const std::vector<:pair>, DirectX::XMMATRIX>>
        &instances // pair of bottom level AS and matrix of the instance
) {
  // Gather all the instances into the builder helper
  for (size_t i = 0; i < instances.size(); i++) {
    m_topLevelASGenerator.AddInstance(instances[i].first.Get(),
                                      instances[i].second, static_cast<uint>(i),
                                      static_cast<uint>(0));
  }

  // As for the bottom-level AS, the building the AS requires some scratch space
  // to store temporary data in addition to the actual AS. In the case of the
  // top-level AS, the instance descriptors also need to be stored in GPU
  // memory. This call outputs the memory requirements for each (scratch,
  // results, instance descriptors) so that the application can allocate the
  // corresponding memory
  UINT64 scratchSize, resultSize, instanceDescsSize;

  m_topLevelASGenerator.ComputeASBufferSizes(m_device.Get(), true, &scratchSize,
                                             &resultSize, &instanceDescsSize);

  // Create the scratch and result buffers. Since the build is all done on GPU,
  // those can be allocated on the default heap
  m_topLevelASBuffers.pScratch = nv_helpers_dx12::CreateBuffer(
      m_device.Get(), scratchSize, D3D12_RESOURCE_FLAG_ALLOW_UNORDERED_ACCESS,
      D3D12_RESOURCE_STATE_UNORDERED_ACCESS,
      nv_helpers_dx12::kDefaultHeapProps);
  m_topLevelASBuffers.pResult = nv_helpers_dx12::CreateBuffer(
      m_device.Get(), resultSize, D3D12_RESOURCE_FLAG_ALLOW_UNORDERED_ACCESS,
      D3D12_RESOURCE_STATE_RAYTRACING_ACCELERATION_STRUCTURE,
      nv_helpers_dx12::kDefaultHeapProps);

  // The buffer describing the instances: ID, shader binding information,
  // matrices ... Those will be copied into the buffer by the helper through
  // mapping, so the buffer has to be allocated on the upload heap.
  m_topLevelASBuffers.pInstanceDesc = nv_helpers_dx12::CreateBuffer(
      m_device.Get(), instanceDescsSize, D3D12_RESOURCE_FLAG_NONE,
      D3D12_RESOURCE_STATE_GENERIC_READ, nv_helpers_dx12::kUploadHeapProps);

  // After all the buffers are allocated, or if only an update is required, we
  // can build the acceleration structure. Note that in the case of the update
  // we also pass the existing AS as the 'previous' AS, so that it can be
  // refitted in place.
  m_topLevelASGenerator.Generate(m_commandList.Get(),
                                 m_topLevelASBuffers.pScratch.Get(),
                                 m_topLevelASBuffers.pResult.Get(),
                                 m_topLevelASBuffers.pInstanceDesc.Get());
}
CreateAccelerationStructures
The CreateAccelerationStructures function calls AS builders for the bottom and the top, and store
the generated structures. Note that while we only keep resulting BLAS of the triangle and discard the
scratch space, we store all buffers for the TLAS into m_topLevelASBuffers in anticipation of the handling of dynamic scenes, where
the scratch space will be used repeatedly.
This method first fills the command list with the build orders for the bottom-level acceleration structures. For each BLAS, the helper
introduces a resource barrier D3D12_RESOURCE_BARRIER_TYPE_UAV to ensure the BLAS can be queried within the same command list. This is
required as the top-level AS is also built in that command list. After enqueuing the AS build calls, we execute the command list
immediately by calling ExecuteCommandLists and using a fence to flush the command list before starting rendering.
//-----------------------------------------------------------------------------
//
// Combine the BLAS and TLAS builds to construct the entire acceleration
// structure required to raytrace the scene
//
void D3D12HelloTriangle::CreateAccelerationStructures() {
  // Build the bottom AS from the Triangle vertex buffer
  AccelerationStructureBuffers bottomLevelBuffers =
      CreateBottomLevelAS({{m_vertexBuffer.Get(), 3}});

  // Just one instance for now
  m_instances = {{bottomLevelBuffers.pResult, XMMatrixIdentity()}};
  CreateTopLevelAS(m_instances);

  // Flush the command list and wait for it to finish
  m_commandList->Close();
  ID3D12CommandList *ppCommandLists[] = {m_commandList.Get()};
  m_commandQueue->ExecuteCommandLists(1, ppCommandLists);
  m_fenceValue++;
  m_commandQueue->Signal(m_fence.Get(), m_fenceValue);

  m_fence->SetEventOnCompletion(m_fenceValue, m_fenceEvent);
  WaitForSingleObject(m_fenceEvent, INFINITE);

  // Once the command list is finished executing, reset it to be reused for
  // rendering
  ThrowIfFailed(
      m_commandList->Reset(m_commandAllocator.Get(), m_pipelineState.Get()));

  // Store the AS buffers. The rest of the buffers will be released once we exit
  // the function
  m_bottomLevelAS = bottomLevelBuffers.pResult;
}
OnInit()
We can now add the call to create the acceleration structures. The method should look like this
void D3D12HelloTriangle::OnInit() {

    LoadPipeline();
    LoadAssets();

    // Check the raytracing capabilities of the device
    CheckRaytracingSupport();

    // Setup the acceleration structures (AS) for raytracing. When setting up
    // geometry, each bottom-level AS has its own transform matrix.
    CreateAccelerationStructures();

    // Command lists are created in the recording state, but there is
    // nothing to record yet. The main loop expects it to be closed, so
    // close it now.
    ThrowIfFailed(m_commandList->Close());
}
This ends part 1 of the tutorial. Your Windows 10 programming environment should now be set up to write DXR ray tracing code. Part 2 covers all the details to implement ray tracing in this sample application.