cuNumeric 是一個庫,旨在為支持所有 indexing view 功能(如就地更新、 NumPy 和完整 indexing view 語義)的 NumPy API 提供分布式和加速插入替換。這意味著,當切換到使用 cuNumeric 時,任何使用 NumPy 在大型數據集上操作的 Python 代碼都可以自動并行化,以利用 CPU 和 GPU 的大型集群的功能。
NumPy 是科學計算中的基礎 Python 庫,用于執行基于陣列的數值計算。大多數程序員使用的 NumPy 的規范實現在單個 CPU 內核上運行,只有少數操作在內核之間并行化。對單個節點 CPU 執行的這種限制限制了可以處理的數據的大小和解決問題的速度。
到目前為止, NumPy 的幾個替換庫加速下降(例如 CuPy 和 NumS )。然而,它們中沒有一個在具有許多 CPU 和 GPU 的多節點機器上提供透明的分布式加速,同時仍然支持 NumPy 的所有重要功能。
在 cuNumeric 之前, NumPy 代碼必須進行顯著更改,才能在多個節點/ GPU 上執行。這些修改通常包括手動代碼并行化和分發邏輯,這些邏輯通常容易出錯,并且不總是性能良好,可能會導致功能損失。
cuNumeric 的創建旨在為開發人員提供 NumPy 的生產力以及加速和分布式 GPU 計算的性能,而不受影響。使用 cuNumeric ,計算和數據科學家可以在本地機器上的中等大小數據集上開發和測試程序。然后,可以使用相同的代碼立即擴展到部署在超級計算機上的多個節點上的更大數據集。
cuNumeric 于 GTC 2022 年首次發布。有關詳細信息,請參見 NVIDIA Announces Availability for cuNumeric Public Alpha 。此后的更新包括將 NumPy API 的 API 覆蓋率從 20% 提高到 60% ,支持 Jupyter 筆記本,并改進了性能。
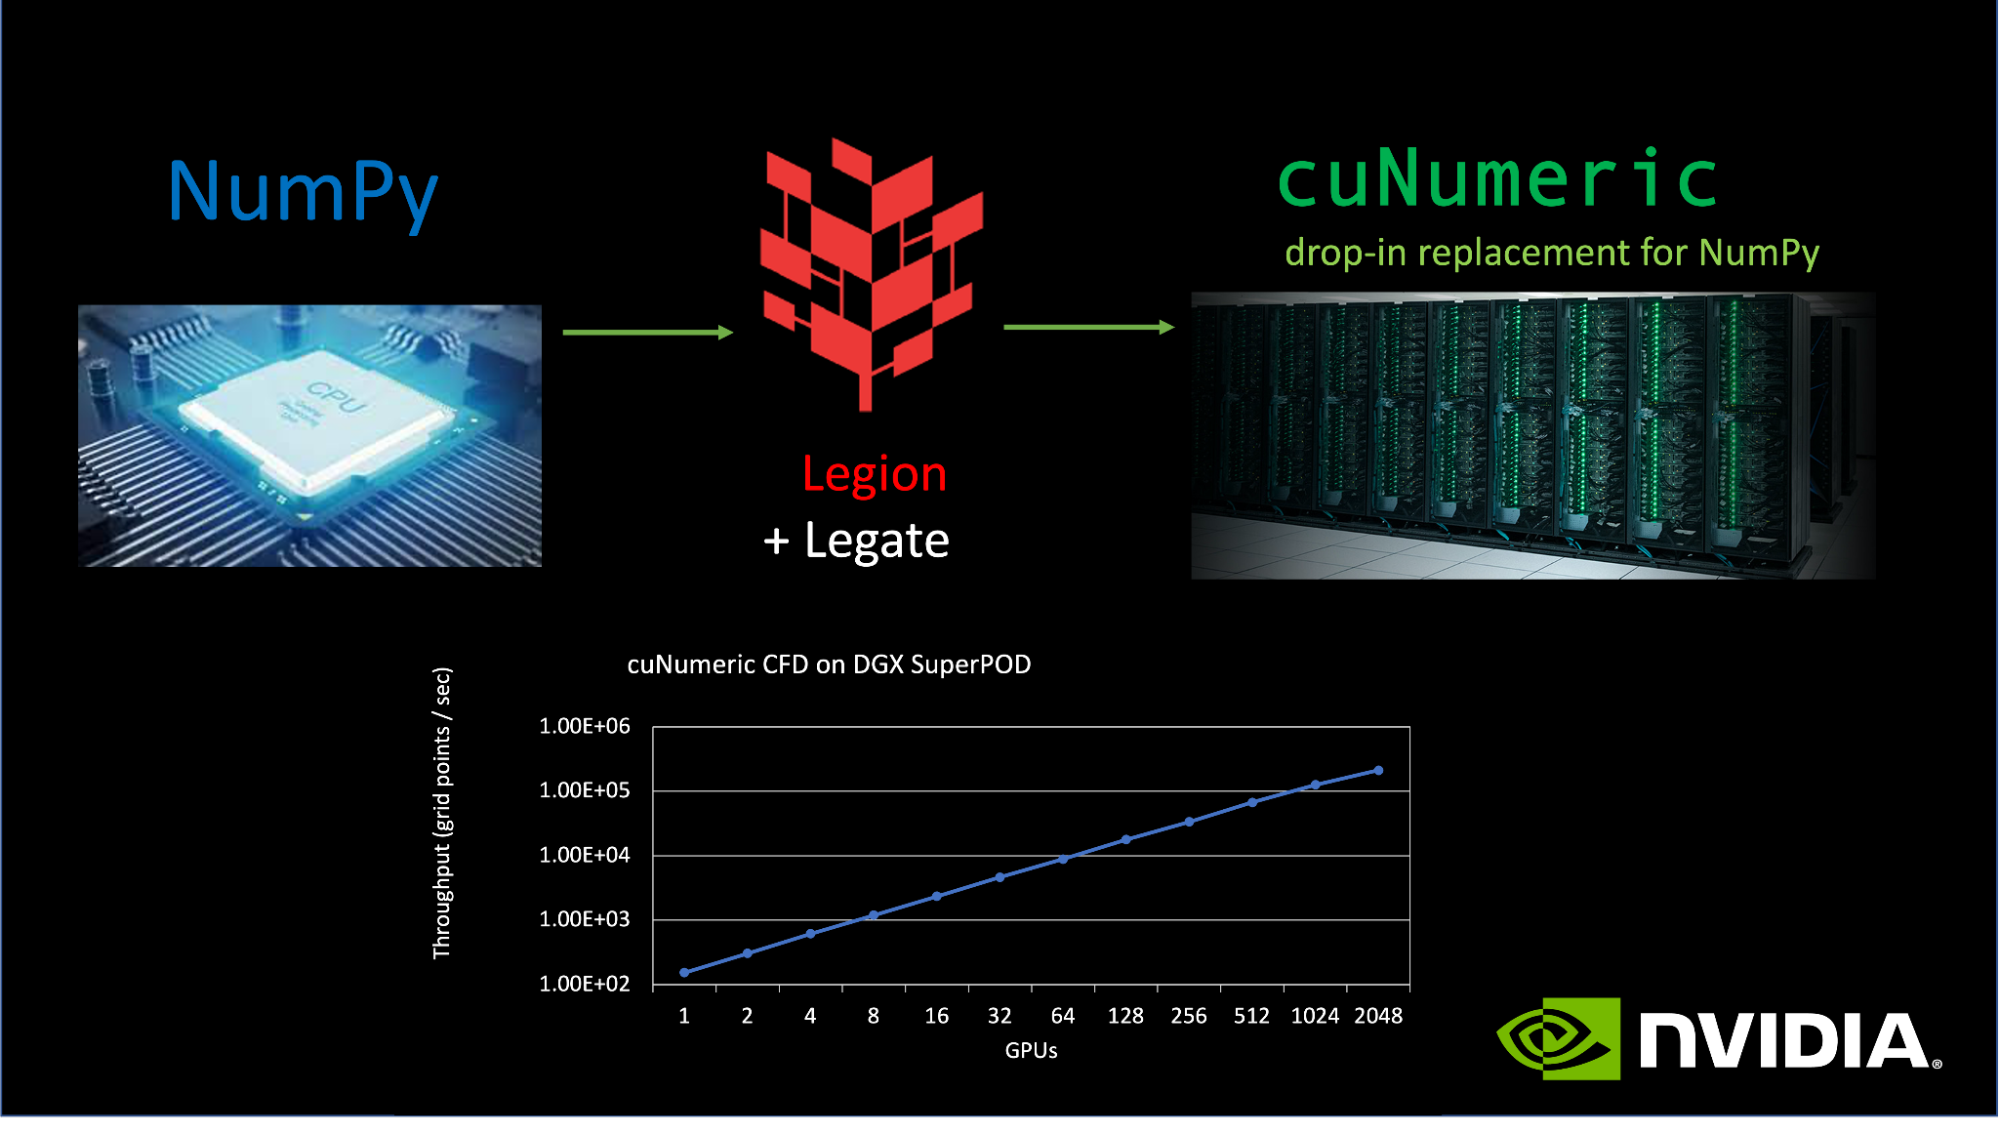
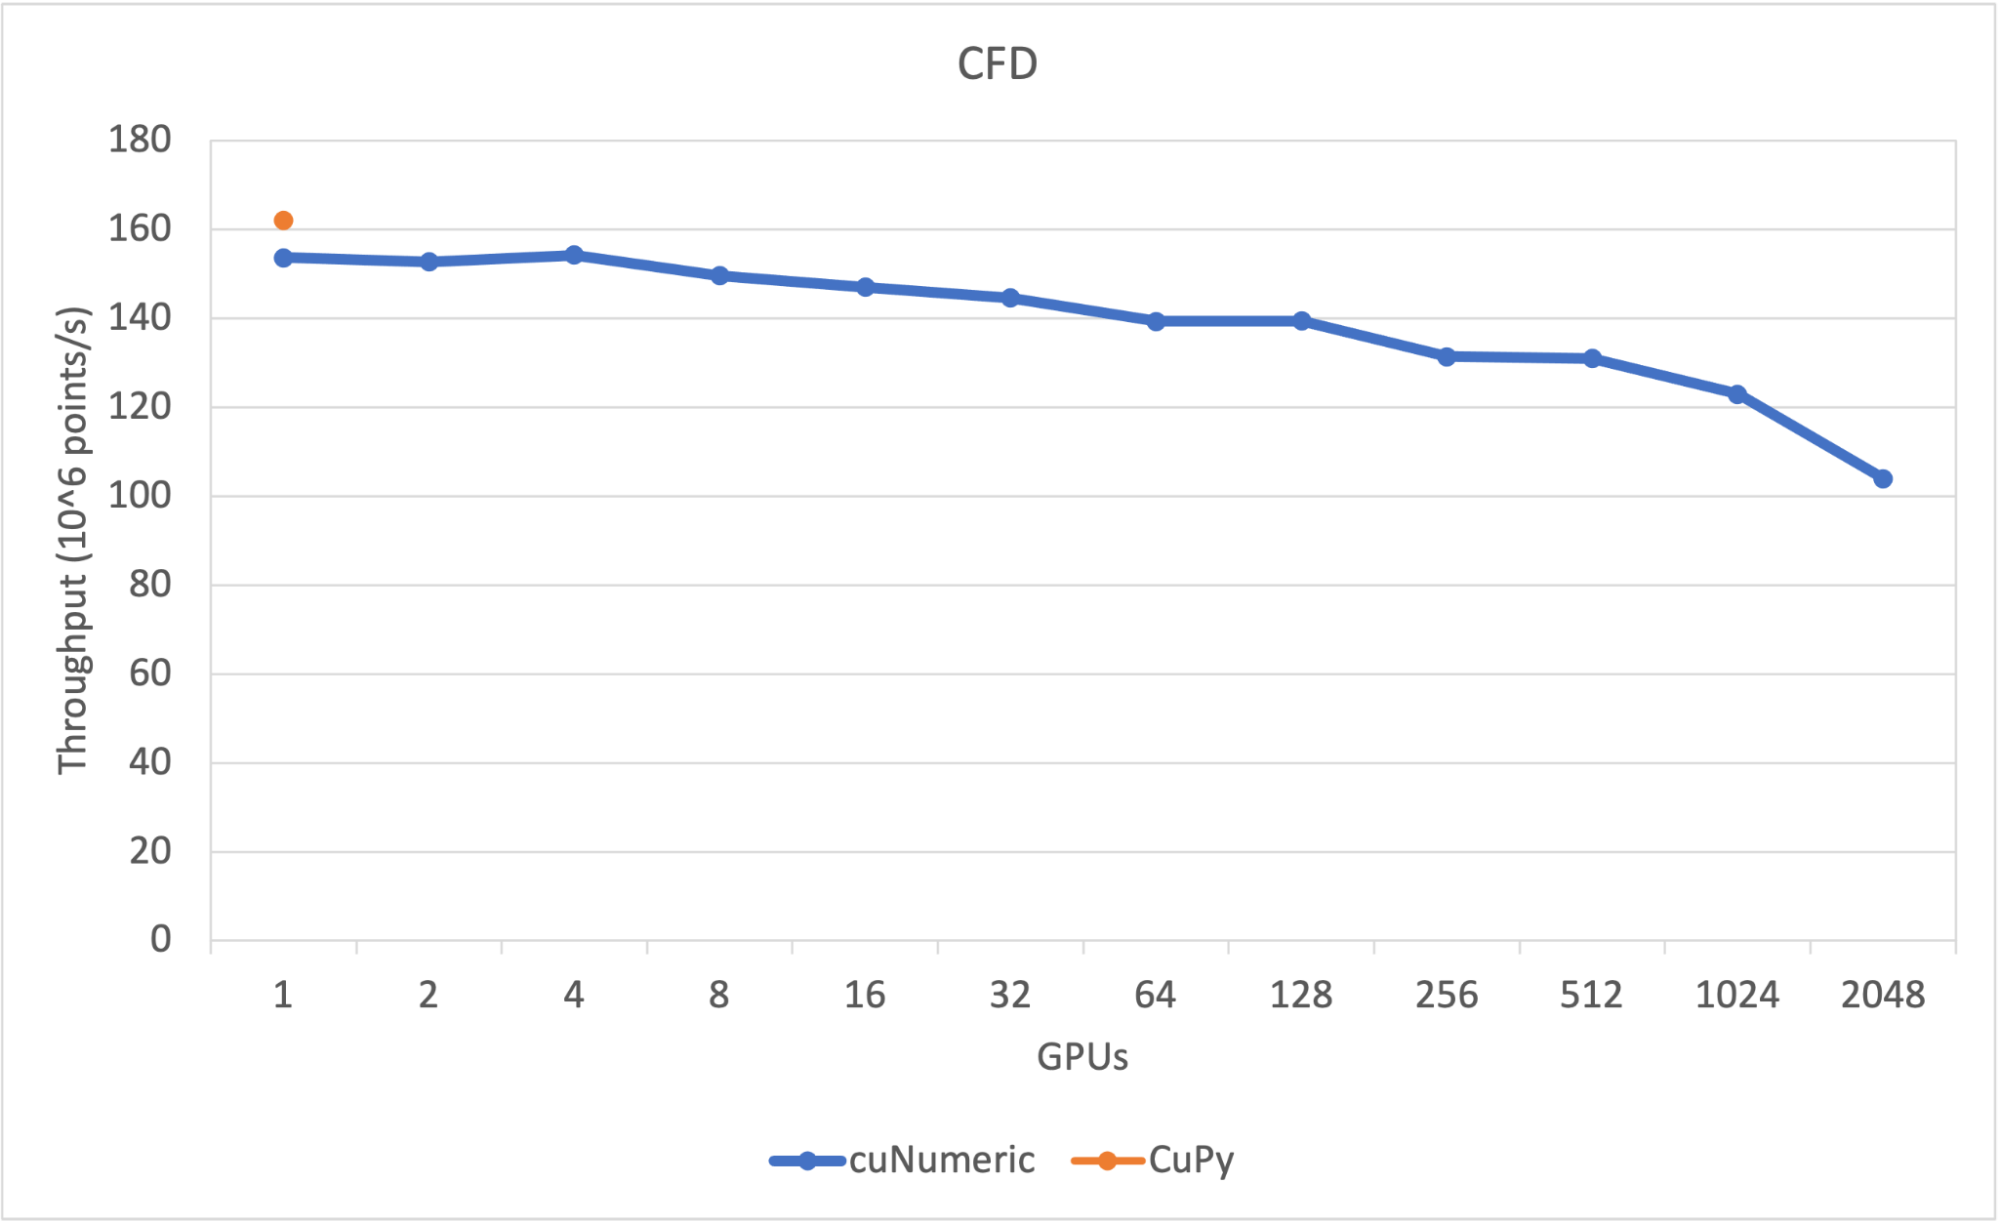
cuNumeric 已證明其可擴展至數千 GPU 。例如,從 GitHub 上的 CFDPython 摘錄的 CFD 代碼在切換到使用 cuNumeric 時顯示了良好的縮放結果(圖 1 )。
cuNumeric 中的隱式數據分布和并行化通過 Legate 實現。
Legate 是一個生產力層,使得在 Legion 運行時之上構建可組合的層更容易,以便在異構集群上執行。 cuNumeric 是 Legate 生態系統的一部分,這意味著 cuNumeric 程序可以透明地向生態系統中的其他庫傳遞對象,而不會導致不必要的同步或數據移動,即使在分布式環境中也是如此。
使用 cuNumeric
使用 cuNumeric 只需要在 NumPy 代碼中用import cunumeric as np替換import numpy as np,并使用 Legate 驅動程序腳本來執行程序。
cuNumeric 代碼的一個簡單示例如下:
import cunumeric as np
a = np.arange(10000, dtype =int)
a = a.reshape((100,100,))
b = np.arange(10000, dtype =int)
b = b.reshape((100,100,))
c = np.multiply(a, b)
print(c)
print(type(c))只有第一個import更改需要從 NumPy 遷移到 cuNumeric 。該代碼現在在多個 GPU 上執行。陣列a、b和c在 GPU 上進行分區,以便在import的不同碎片上異步執行arange、reshape和multiply操作。有關詳細信息,請參閱下面的 cuNumeric 自動數據分區部分。
cuNumeric 自動數據分區
cuNumeric 隱式地劃分其數據對象,考慮將訪問數據的計算、不同處理器類型所消耗的理想數據大小以及可用處理器數量。無論機器的規模如何,子分區的一致性都由 Legion 自動管理。
圖 3 顯示了四個進程之間 cuNumeric 2D 陣列的相等劃分的可視化。當執行數據并行操作(如add)時,不同顏色的區塊將由不同的任務異步處理。
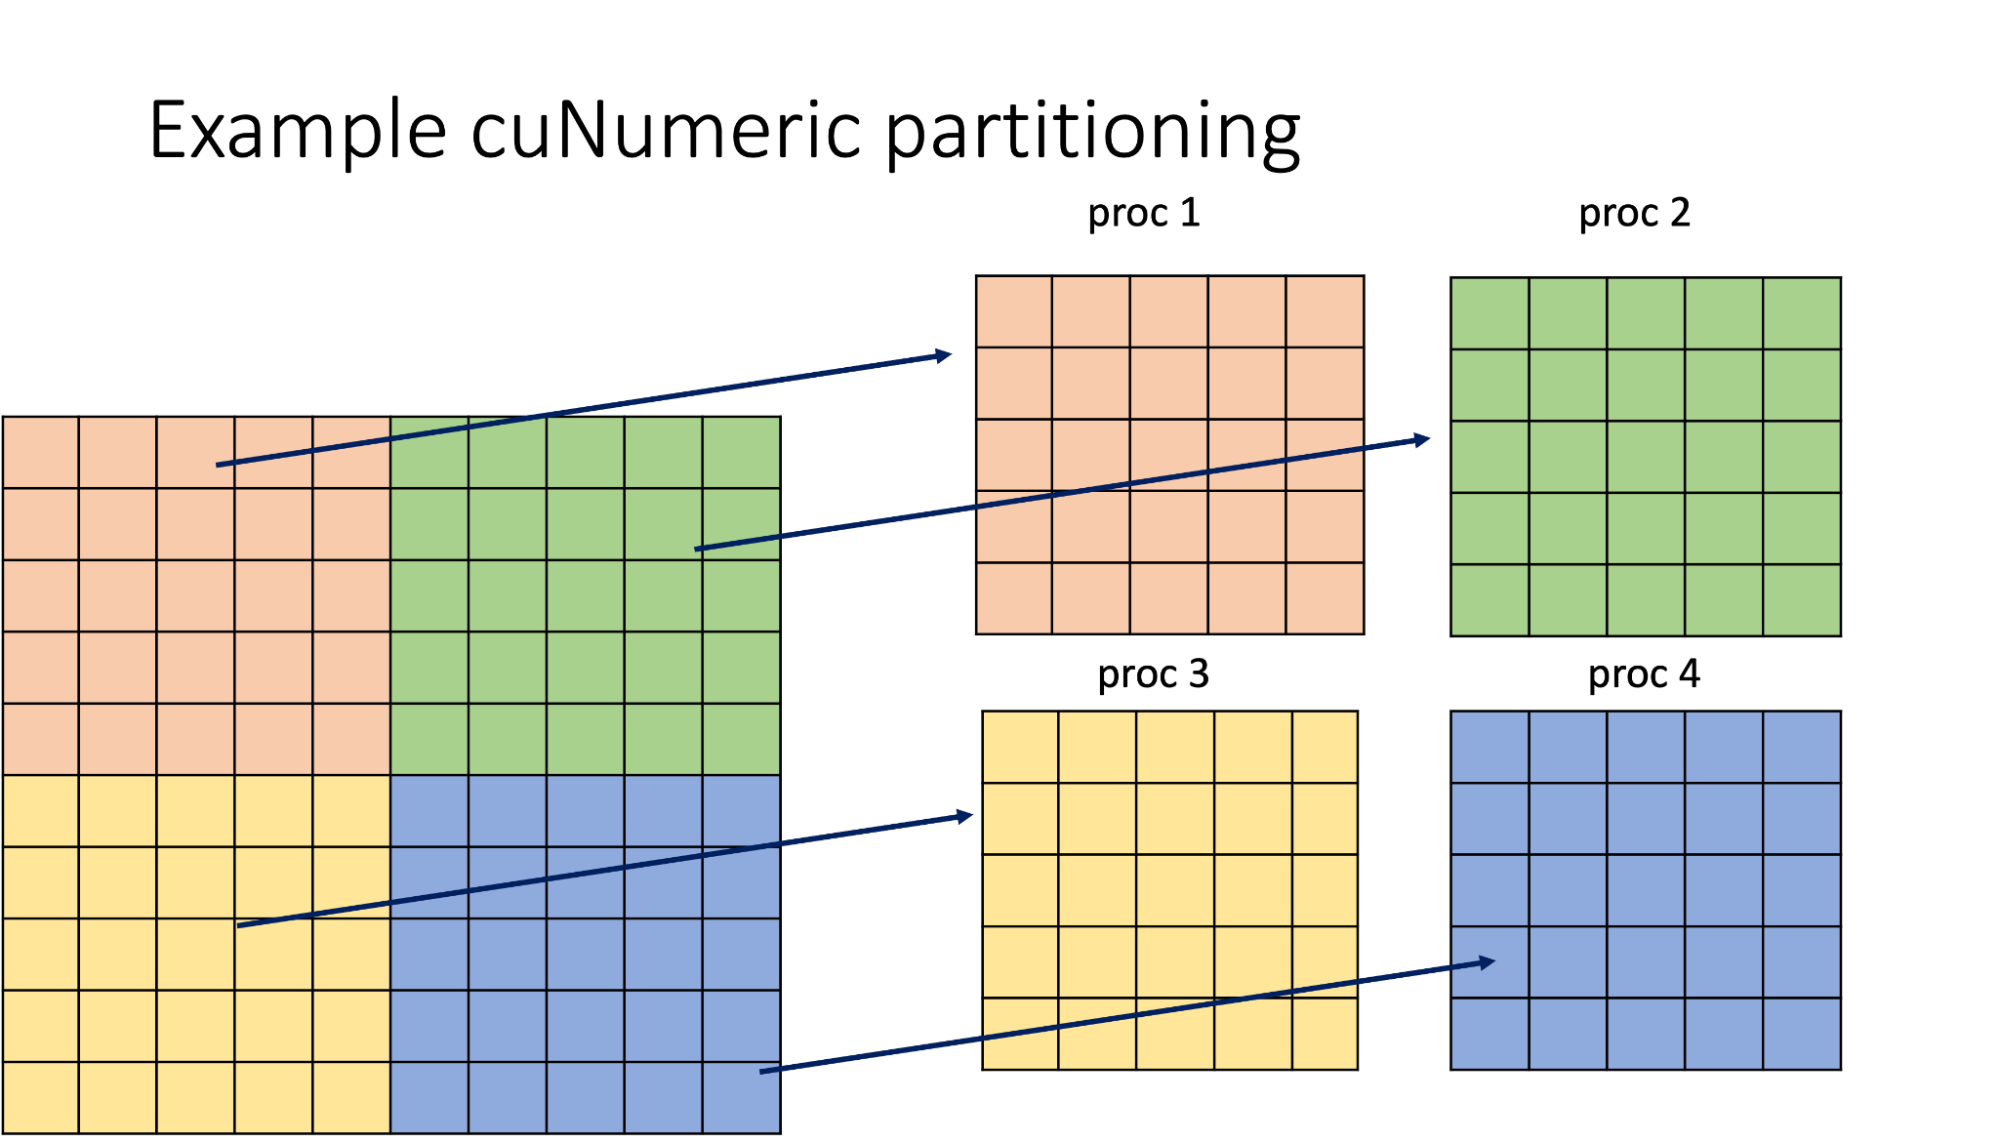
請注意,不同的 cuNumeric API 可以重用現有分區或請求不同的分區以滿足特定需求。允許多個分區共存,并自動保持同步。 Legion 將僅在需要時復制和重新格式化數據,并將盡可能以最有效的方式執行此操作。
使用 cuNumeric 異步執行
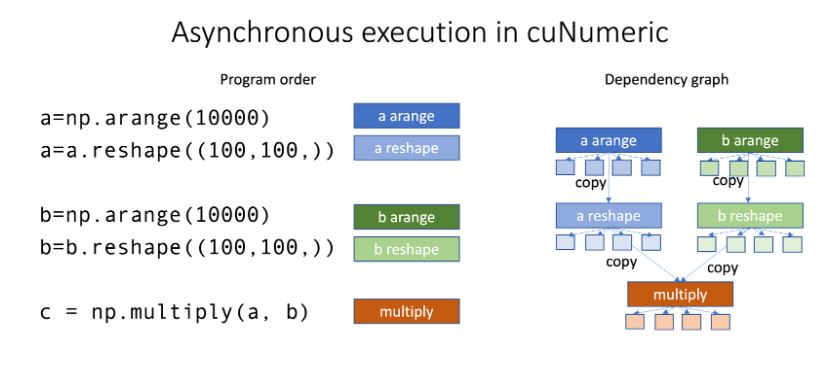
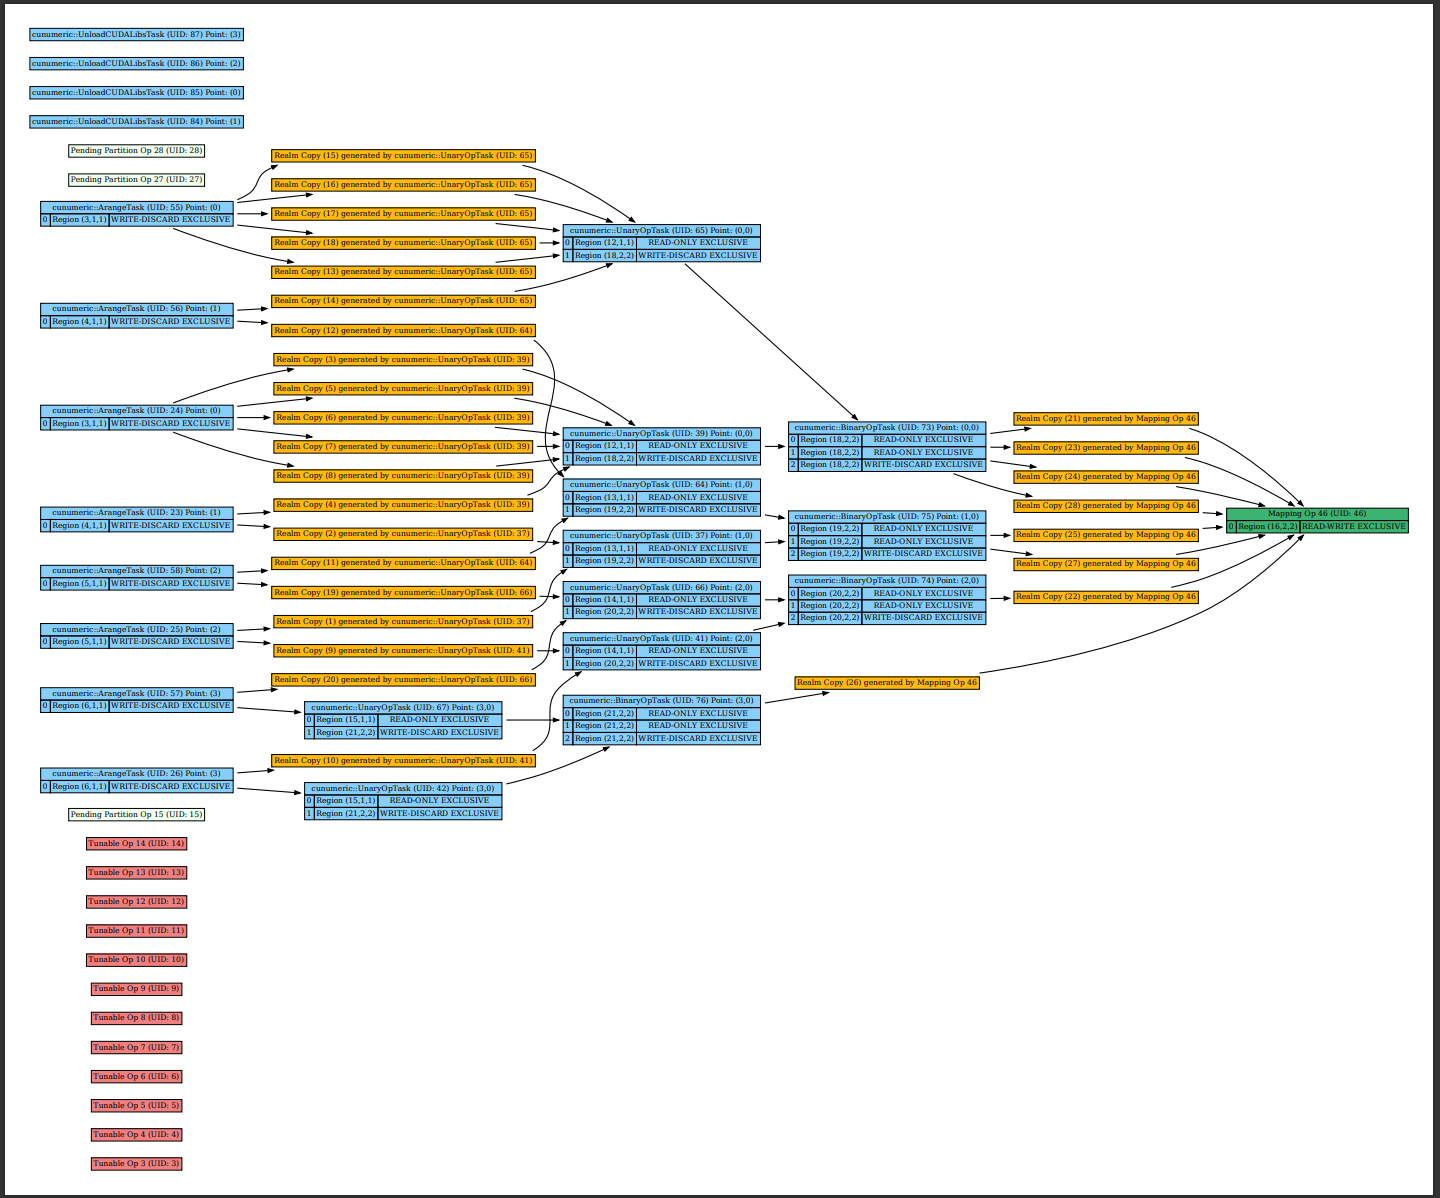
除了在每個任務的不同分區數組上異步執行計算之外,如果資源可用, cuNumeric 還可以執行異步任務和/或操作執行。底層運行時將創建依賴關系圖,然后以分布式無序方式執行操作,同時保留數據依賴關系。
圖 4 可視化了在四個 GPU (單個節點)上執行的第一個示例的依賴關系圖。這里,陣列arange的reshape、copy任務和a操作可以與陣列b的操作并行執行。請注意,陣列范圍內的每個操作也分為四個子操作。
單節點安裝和執行
cuNumeric 在 Anaconda 上可用。要安裝 cuNumeric ,請執行以下腳本:
conda install -c nvidia -c conda-forge -c legate cunumericconda 包與 CUDA >= 11.4 ( CUDA 驅動程序版本>= r470 )和 NVIDIA Volta 或更高版本 GPU 架構兼容。
請注意, cuNumeric conda 包目前不支持 Mac OS 。如果您是在 Mac OS 上安裝,請參閱下面的多節點安裝和執行部分,了解有關手動安裝 cuNumeric 的說明。 cuNumeric 程序使用 Legate 文檔中描述的 Legate 驅動程序腳本運行:
legate cunumeric_program.py以下運行時選項可用于控制設備的數量:
  --cpus CPUS                Number of CPUs to use per rank
  --gpus GPUS                Number of GPUs to use per rank
  --omps OPENMP              Number of OpenMP groups to use per rank
  --ompthreads               Number of threads per OpenMP group
您可以熟悉 Legate 文檔中描述的這些資源標志,也可以將--help傳遞給 Legate 驅動程序腳本。對基于 Legate 的代碼使用legate驅動程序腳本的要求應在不久的將來解除。( cuNumeric 代碼將與標準python解釋器一起使用。)
Jupyter 筆記本和 cuNumeric
cuNumeric 安裝在系統上時,也可以與 Jupyter 筆記本一起使用。應按如下方式配置和安裝特定的 Jupyter 內核:
legate-jupyter --name legate_cpus_2 --cpus 2使用– help 命令行選項可以查看內核的其他配置選項。
應使用以下腳本啟動 Jupyter 服務器:
jupyter notebook --port=888 --no-browser然后,應使用 Legion wiki 頁上提供的說明在瀏覽器中打開 Jupyter 筆記本。
多節點安裝和執行
為了支持多節點執行,必須手動安裝 cuNumeric 。手動執行包括以下步驟:
1 ) 使用以下代碼從 GitHub 克隆 Legate :
git clone git@github.com:nv-legate/legate.core.git
cd legate.core
2 ) 安裝 Legate 和 cuNumeric 依賴項。
檢索依賴項的主要方法是通過 conda 。使用 Legate 的 scripts/generate-conda-envs.py 腳本創建一個 conda 環境文件,列出構建、運行和測試 Legate Core 所需的所有包以及目標系統上的所有下游庫。例如:
$ ./scripts/generate-conda-envs.py --python 3.10 --ctk 11.7 --os linux --compilers --openmpi
--- generating: environment-test-linux-py310-cuda-11.7-compilers-openmpi.yaml
生成環境文件后,通過使用以下腳本創建新的 conda 環境來安裝所需的軟件包:
conda env create -n legate -f <env-file>.yaml3 ) 安裝 Legate
Legate Core 存儲庫在頂級目錄中附帶了一個助手install.py腳本,該腳本將構建庫的 C ++部分,并在當前活動的 Python 環境下安裝 C ++和 Python 組件。
要添加 GPU 支持,請使用--cuda標志:
./install.py --cuda如果在安裝過程中未找到 CUDA ,請將CUDA_PATH變量設置為正確的位置。例如:
CUDA_PATH=/usr/local/cuda-11.6/lib64/stubs ./install.py --cuda對于多節點執行, Legate 使用 GASNet ,可以使用--network標志請求。使用 GASNet 時,還需要使用--conduit標志指定目標計算機的互連網絡。例如,以下代碼將是 DGX SuperPOD 的安裝:
./install.py -–network gasnet1 --conduit ibv –cuda4 ) 使用以下調用克隆并安裝 cuNumeric :
git clone git@github.com:nv-legate/cunumeric.git
cd cunumeric
./install.py
有關 cuNumeric 安裝選項(包括多節點配置設置)的更多詳細信息,請訪問 GitHub 上的 nv-legate/cunumeri#build 。
如果 Legate 是使用允許多節點執行的網絡支持進行編譯的,則可以使用--nodes選項和要使用的節點數并行運行 Legate 。每當使用--nodes選項時, Legate 將使用mpirun啟動,即使使用--nodes 1。如果沒有--nodes選項,將不會使用啟動器。
Legate 目前支持 mpirun 、 srun 和 jsrun 作為啟動器,可能會添加其他啟動器類型。您可以使用– launcher 選擇啟動器的目標類型。例如,以下命令將在 64 個節點上執行 cuNumeric 代碼,每個節點執行 8 GPU :
legate cunumeric_program.py --nodes 64 --gpus 8cuNumeric 示例
cuNumeric 的存儲庫中有幾個 example codes ,可以用來熟悉庫。為了簡單起見,本文從 Stencil 示例開始。
使用 cuNumeric 進行模具計算
Stencil 代碼演示了如何以不同的比例編寫和執行 cuNumeric 代碼。模板代碼是許多數值求解器和物理模擬代碼的核心,因此對科學計算研究特別感興趣。本節介紹 cuNumeric 中一個簡單模板代碼示例的實現。
首先,使用以下腳本創建并初始化網格:
import cunumeric as np

N = 1000 # number of elements in one dimension
I = 100 # number of iterations

def initialize(N):
	print("Initializing stencil grid...")
	grid = np.zeros((N + 2, N + 2))
	grid[:, 0] = -273.15
	grid[:, -1] = -273.15
	grid[-1, :] = -273.15
	grid[0, :] = 40.0
	return grid
此“初始化”函數將分配( N + 2 ) x ( N + 2 個)二維零矩陣并填充邊界元素。
接下來,執行模具計算:
def run_stencil():
	grid = initialize(N)

	center = grid[1:-1, 1:-1]
	north = grid[0:-2, 1:-1]
	east = grid[1:-1, 2:]
	west = grid[1:-1, 0:-2]
	south = grid[2:, 1:-1]

	for i in range(I):
    	average = center + north + east + west + south
    	average = 0.2 * average
    	center[:] = average

run_stencil()
該代碼通過 cuNumeric 在所有可用資源上完全并行化。它可以使用以下調用在單個節點上執行:
legate examples/stencil.py --gpus 8它可以使用以下調用在多個節點上執行:
legate examples/stencil.py --nodes 128 --gpus 8要查看此示例的原始代碼,請訪問 GitHub 上的 nv-legate/cunumeric 。
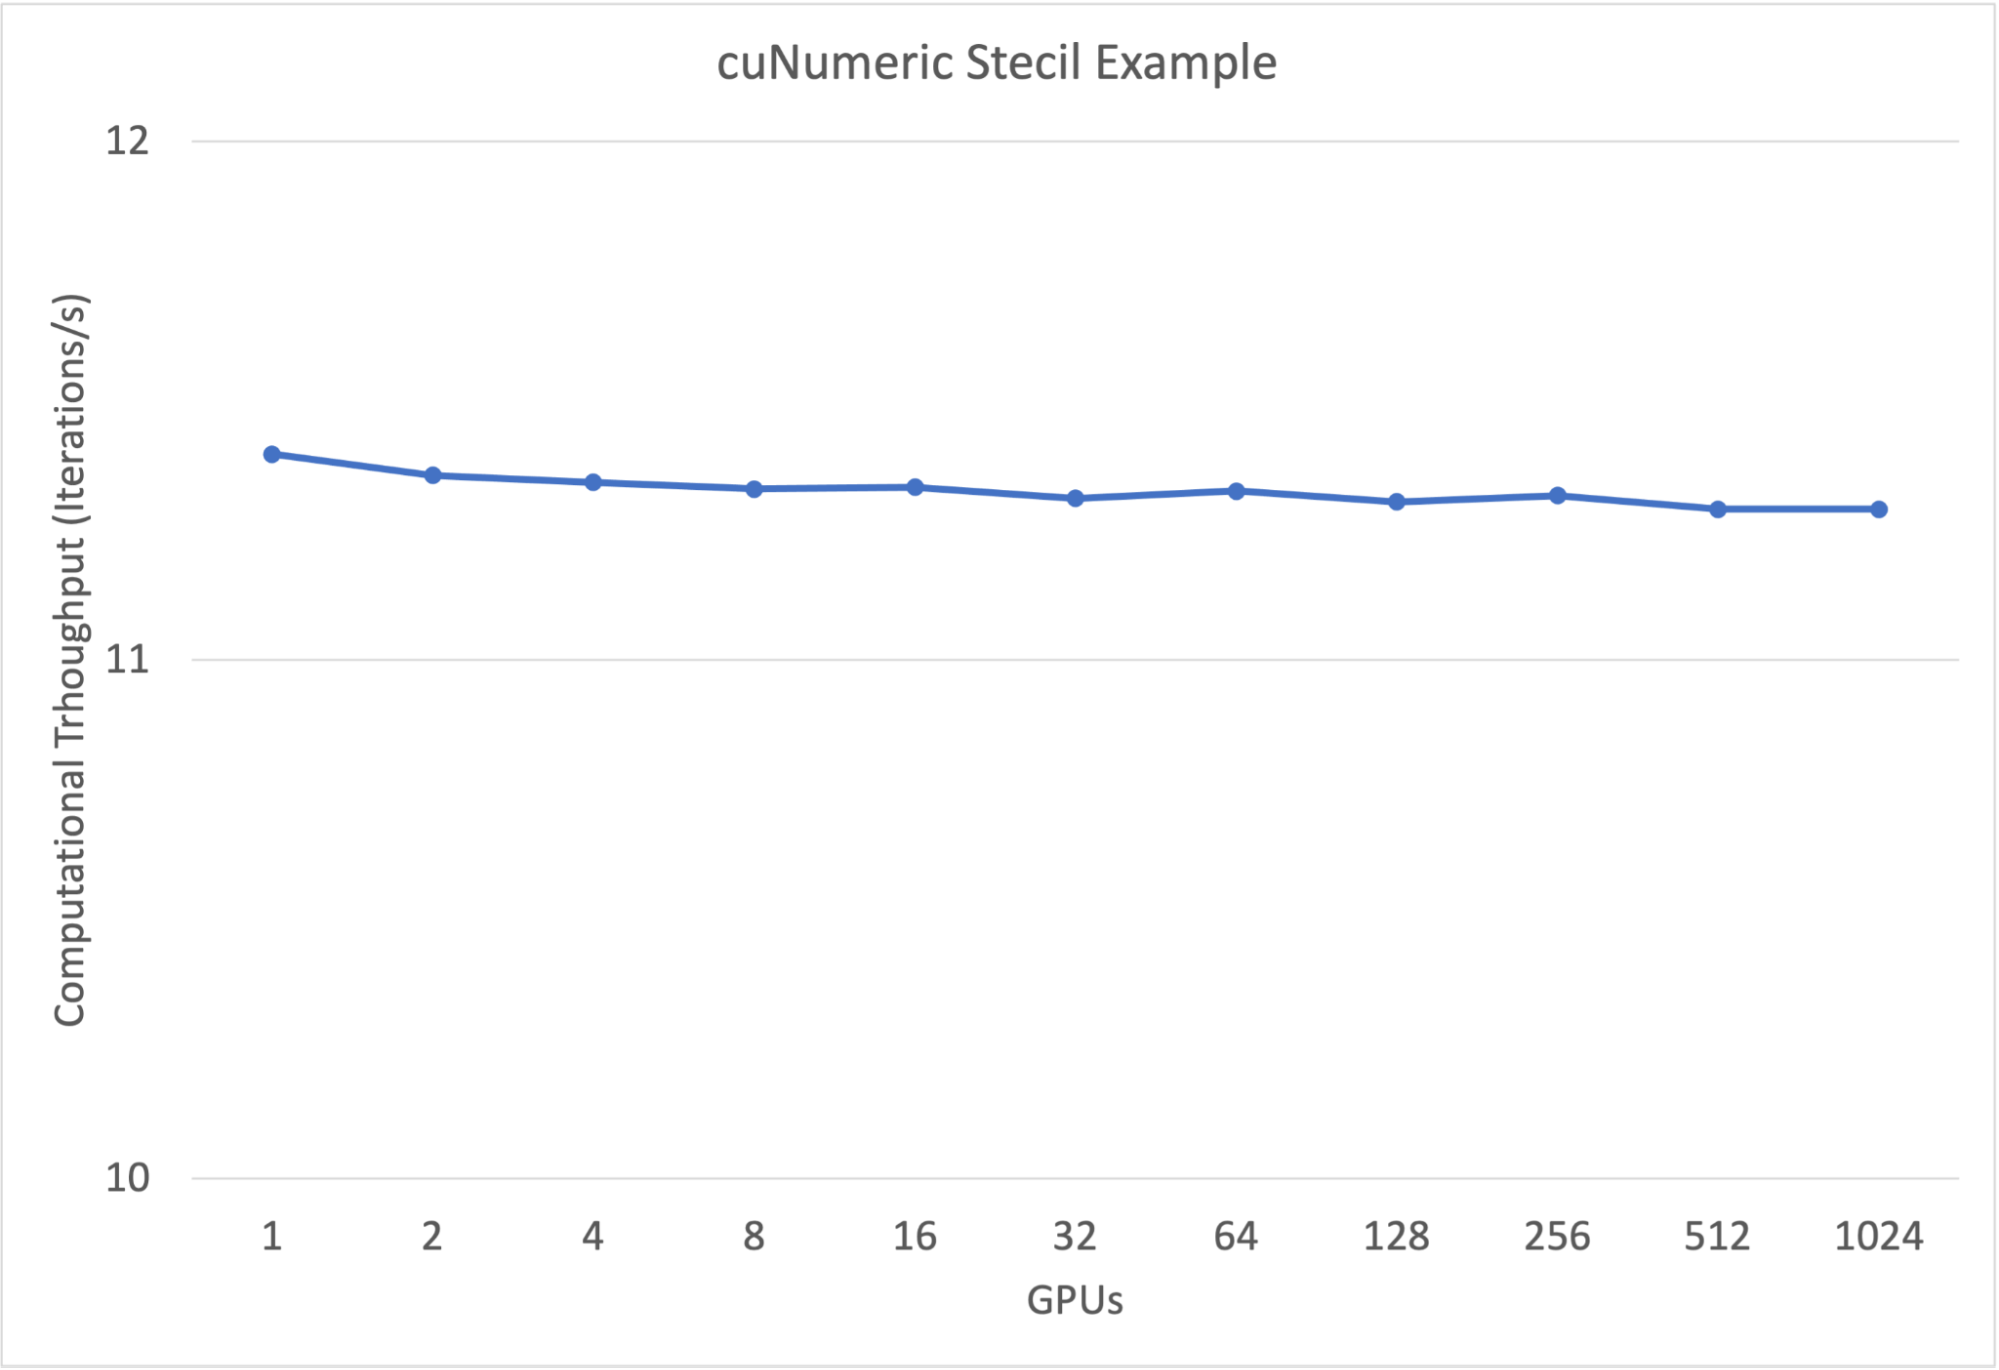
模具示例性能結果
圖 5 顯示了 Stencil 代碼的弱縮放結果。每個 GPU 的網格點數保持不變(每個 GPU 12264004 點),從而增加了問題的總大小。如圖所示,在沒有程序員幫助的情況下,示例在大型系統上幾乎可以完美縮放。
剖析 cuNumeric 代碼
開發功能 cuNumeric 應用程序后,通常需要對性能進行分析和調整。本節介紹分析 cuNumeric 代碼的不同選項。
Legate 教授
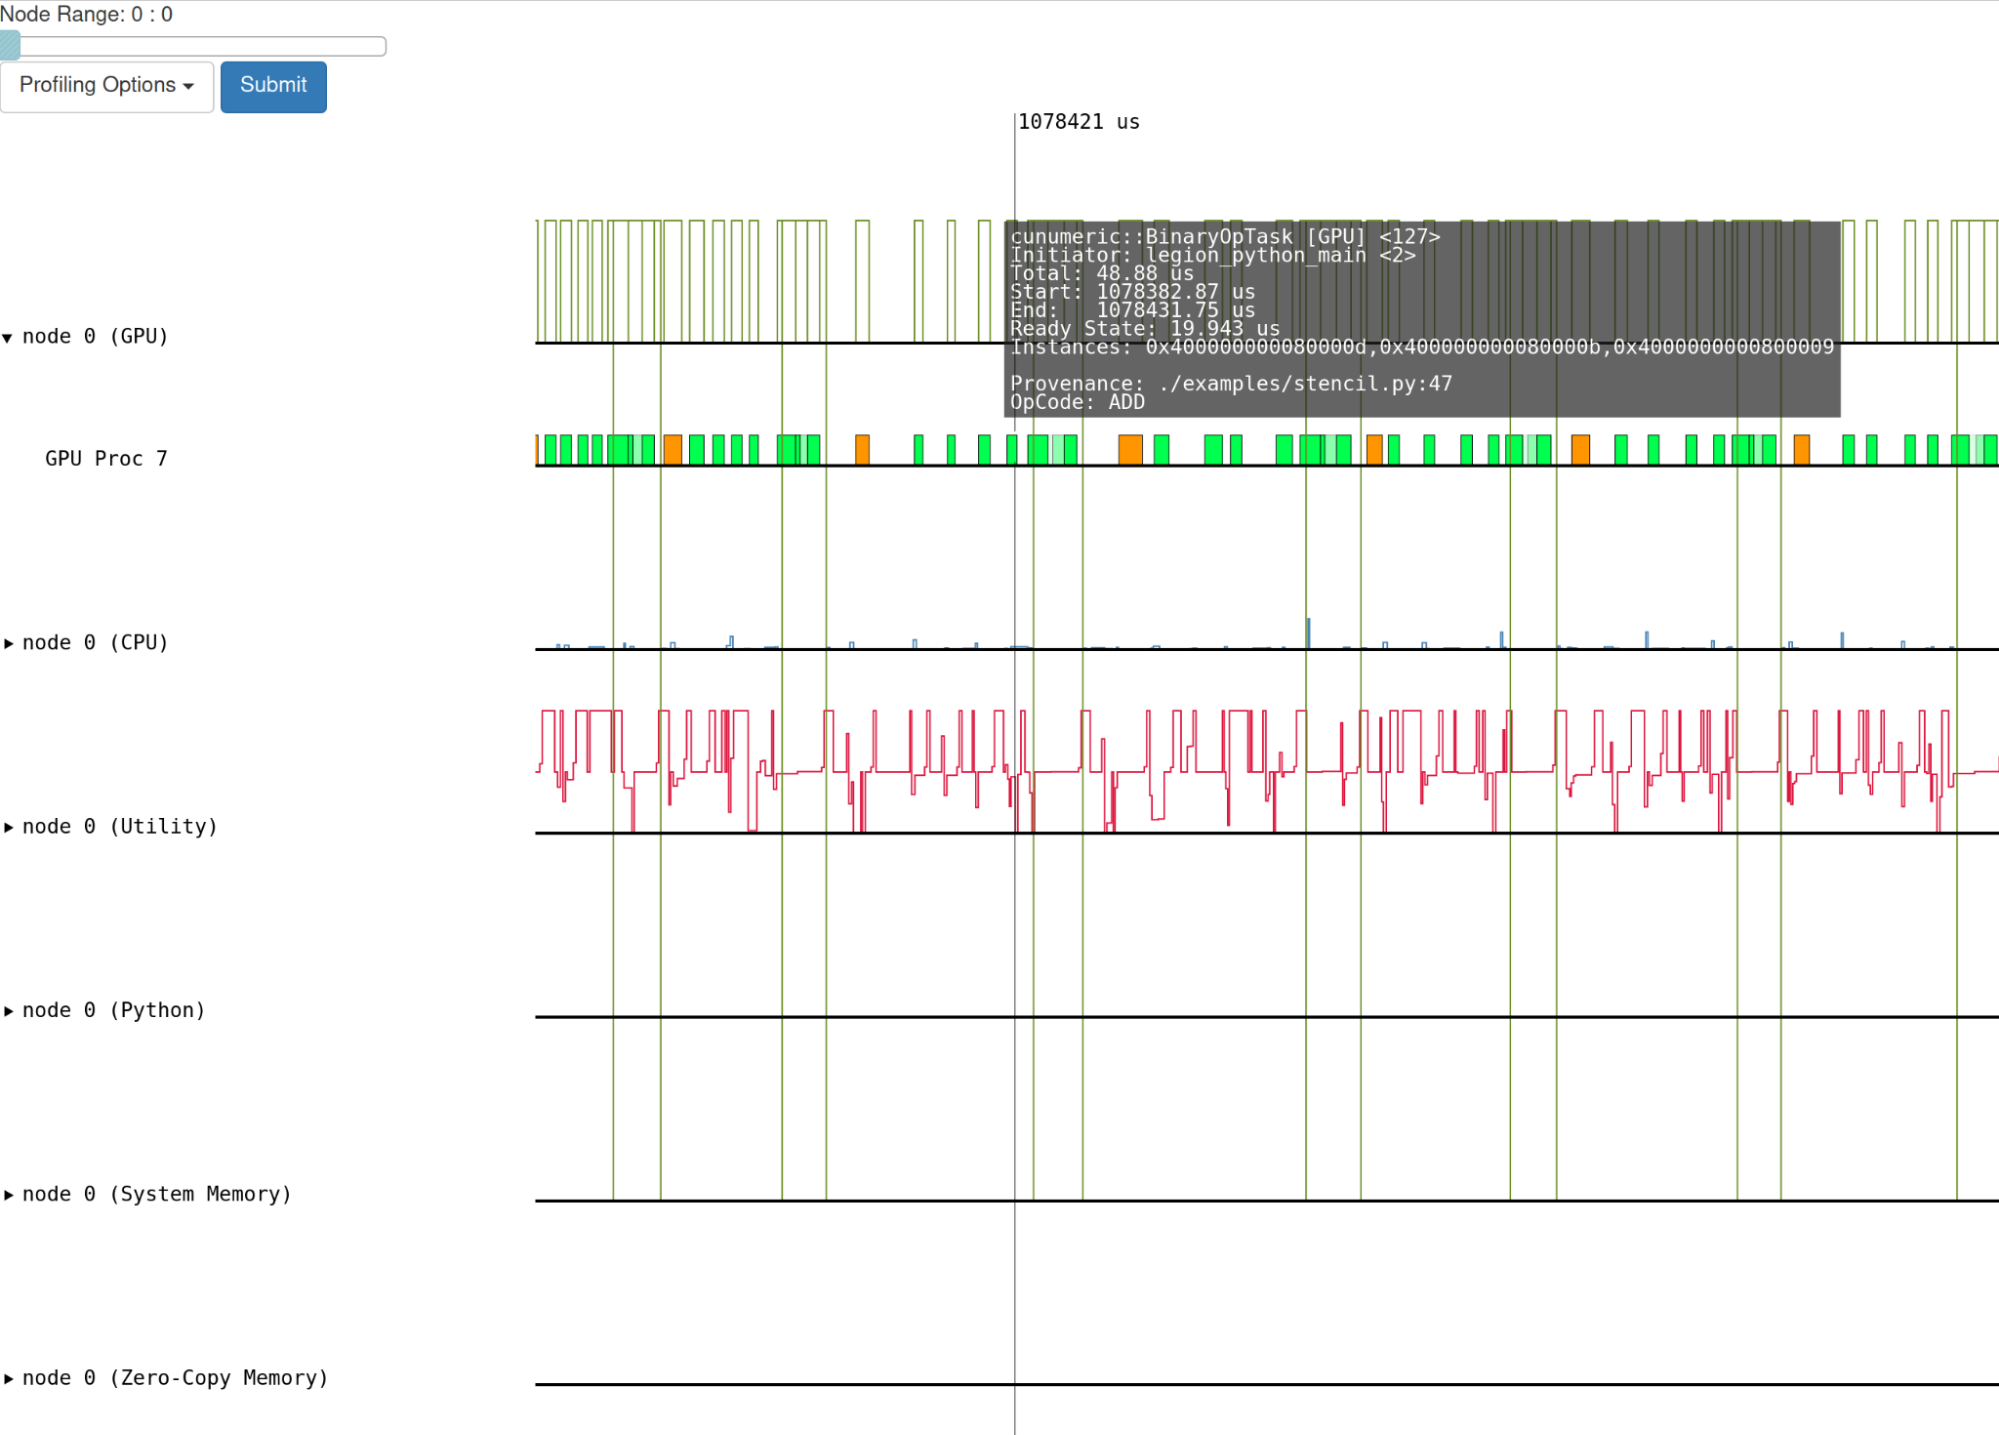
要獲得 Legion 級別的評測輸出,請在執行 cuNumeric 代碼時傳遞– profile 標志。在執行結束時,將創建 legate _ prof 目錄。此目錄包含一個網頁,可在顯示程序執行時間線的任何 web 瀏覽器中查看。請注意,如果您正在本地計算機上查看頁面(取決于瀏覽器),則可能需要執行 enable local JavaScript 。
圖 6 顯示了執行 Stencil 示例的概要輸出。
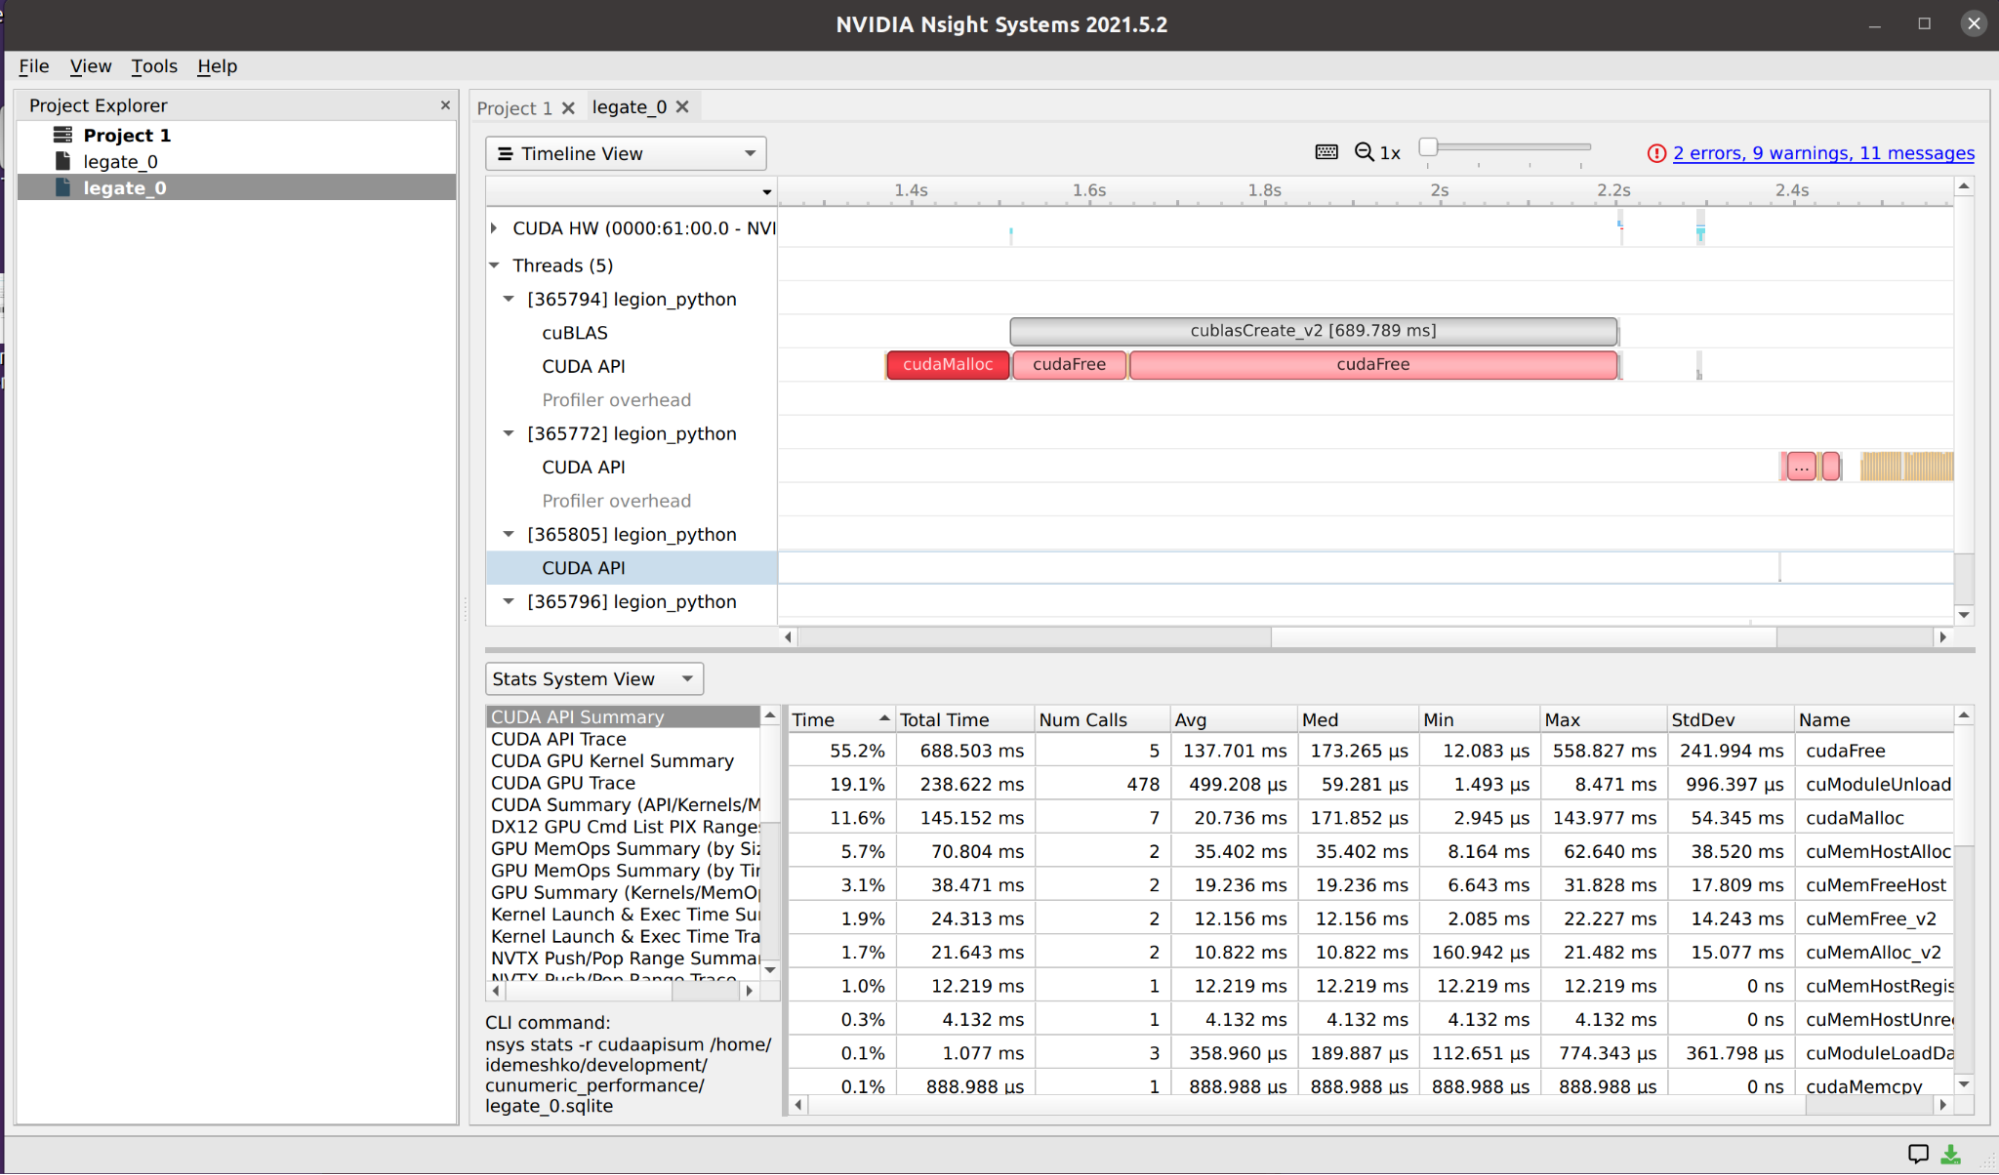
NVIDIA Nsight 系統
運行時標志用于獲取模具--nsys代碼 cuNumeric 的 NVIDIA Nsight Systems 探查器輸出。傳遞此標志后,將生成一個輸出文件,可將其加載到 Nsight Systems UI 中。 cuNumeric 生成的nsys文件的可視化如圖 7 所示。
調試 cuNumeric 代碼
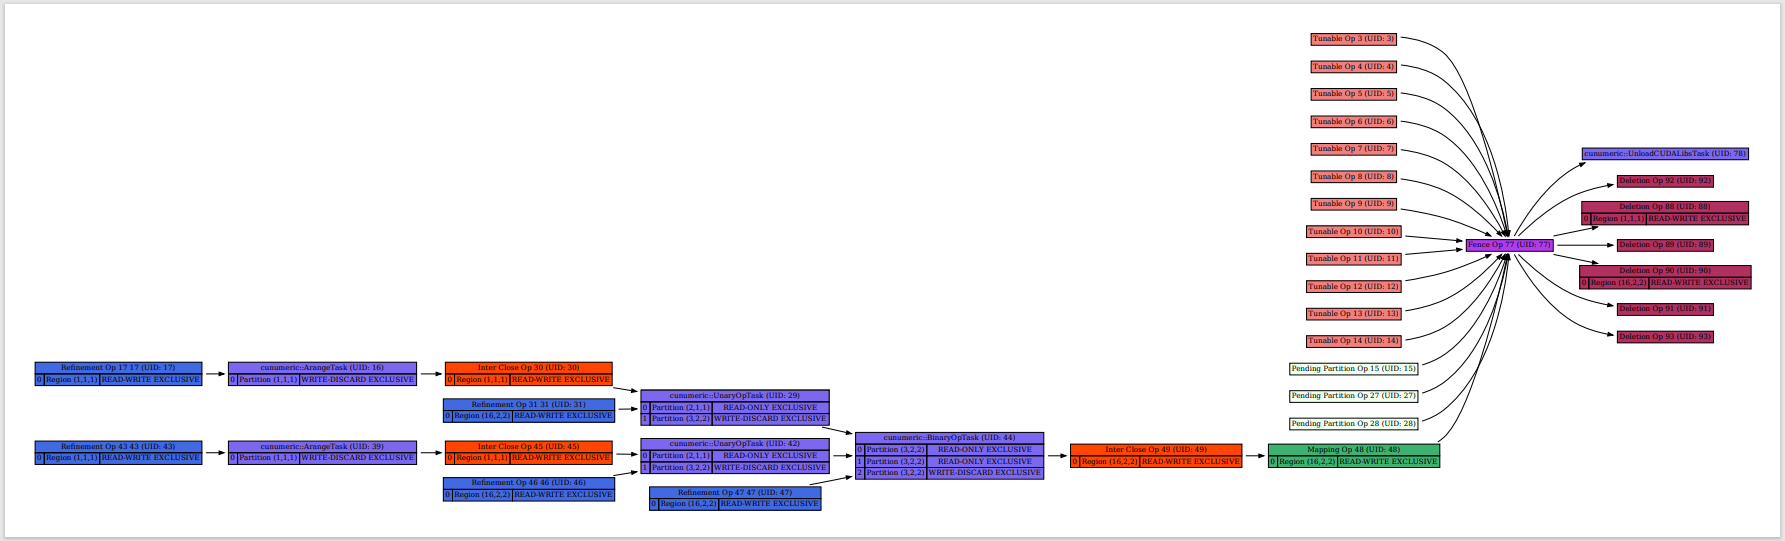
Legate 提供了在 cuNumeric 應用程序運行期間檢查 Legion 構建的數據流和事件圖的工具。構建這些圖需要在計算機上安裝 GraphViz 。
要為程序生成數據流圖,請將--dataflow標志傳遞給 legate腳本。運行完成后,庫將生成一個dataflow_legate PDF 文件,其中包含程序的數據流圖。要生成相應的事件圖,請將--event標志傳遞給legate.py腳本以生成event_graph_legate PDF 文件。
圖 6 和圖 7 顯示了在四個 GPUS 上執行使用 cuNumeric 一節中的簡單示例時生成的數據流和事件圖。
cuNumeric 現狀和未來計劃
cuNumeric 目前正在進行中。正在逐步增加對未實施 NumPy 運營商的支持。在 cuNumeric 的 alpha 版本和最新版本( v23.01 )之間, API 覆蓋率從 25% 增加到 60% 。對于當前不支持的 API ,將提供警告并調用規范 NumPy 。 API reference 中提供了可用功能的完整列表。
雖然 cuNumeric v23.01 為許多 cuNumeric 應用程序提供了良好的弱縮放結果,但眾所周知,某些改進將導致某些 API /用例的性能達到峰值。接下來的幾個版本將專注于提高性能,力爭在 2023 年實現 API 的全面覆蓋。
總結
本文介紹了 cuNumeric ,這是一個基于 Legion 編程系統的 NumPy 的替代品。它透明地加速 NumPy 程序并將其分發給任何規模和能力的機器,通常通過更改單個模塊導入語句。 cuNumeric 通過將 NumPy 應用程序接口轉換為 Legate 編程模型并利用 Legion 運行時的性能和可擴展性來實現這一點。
?