人工智能應用程序由機器學習模型提供動力,這些模型經過訓練,能夠根據圖像、文本或音頻等輸入數據準確預測結果。從頭開始訓練機器學習模型需要大量的數據和相當多的人類專業知識,這往往使這個過程對大多數組織來說過于昂貴和耗時。
遷移學習是從零開始構建定制模型和選擇現成的商業模型集成到 ML 應用程序之間的一種愉快的媒介。通過遷移學習,您可以選擇與您的解決方案相關的 pretrained model ,并根據反映您特定用例的數據對其進行再培訓。轉移學習在“定制一切”方法(通常過于昂貴)和“現成”方法(通常過于僵化)之間取得了正確的平衡,使您能夠用較少的資源構建定制的解決方案。
這個 NVIDIA TAO 工具包 使您能夠將轉移學習應用于預訓練的模型,并創建定制的、可用于生產的模型,而無需人工智能框架的復雜性。要訓練這些模型,必須有高質量的數據。 TAO 專注于開發過程中以模型為中心的步驟,而 Innotescus 專注于以數據為中心的步驟。
Innotescus 是一個基于網絡的平臺,用于注釋、分析和管理基于計算機視覺的機器學習的健壯、無偏見的數據集。 Innotecus 幫助團隊在不犧牲質量的情況下擴大運營規模。該平臺包括圖像和視頻的自動和輔助注釋、 QA 流程的共識和審查功能,以及用于主動數據集分析和平衡的交互式分析。 Innotecus 和 TAO 工具包使企業能夠在定制應用程序中成功應用遷移學習,從而在短時間內獲得高性能的解決方案,從而提高成本效益。
在這篇文章中,我們通過構建NVIDIA TAO 工具包與 NoNeTeSUS 來解決構建健壯的對象檢測模型的挑戰。此解決方案緩解了企業在構建和部署商業解決方案時遇到的幾個常見問題。
YOLO 目標檢測模型
您在本項目中的目標是使用 Innotecus 上整理的數據,將轉移學習應用于 TAO 工具包中的 YOLO 對象檢測模型。
目標檢測是利用圖像或視頻中的邊界框對目標進行定位和分類的能力。它是計算機視覺技術最廣泛的應用。目標檢測解決了許多復雜的現實挑戰,例如:
- 語境與場景理解
- 智能零售的自動化解決方案
- 自動駕駛
- 精準農業
你為什么要用 YOLO 來制作這個模型?傳統上,基于深度學習的對象檢測器通過兩個階段進行操作。在第一階段,模型識別圖像中的感興趣區域。在第二階段,對每個區域進行分類。
通常,許多區域被發送到分類階段,由于分類是一項昂貴的操作,兩級目標檢測器的速度非常慢。 YOLO 代表“你只看一次”顧名思義, YOLO 可以同時進行本地化和分類,從而獲得高度準確的實時性能,這對于大多數可部署解決方案至關重要。 2020 年 4 月, YOLO 的第四次迭代是 published 。它已經在許多應用程序和行業上進行了測試,并被證明是健壯的。
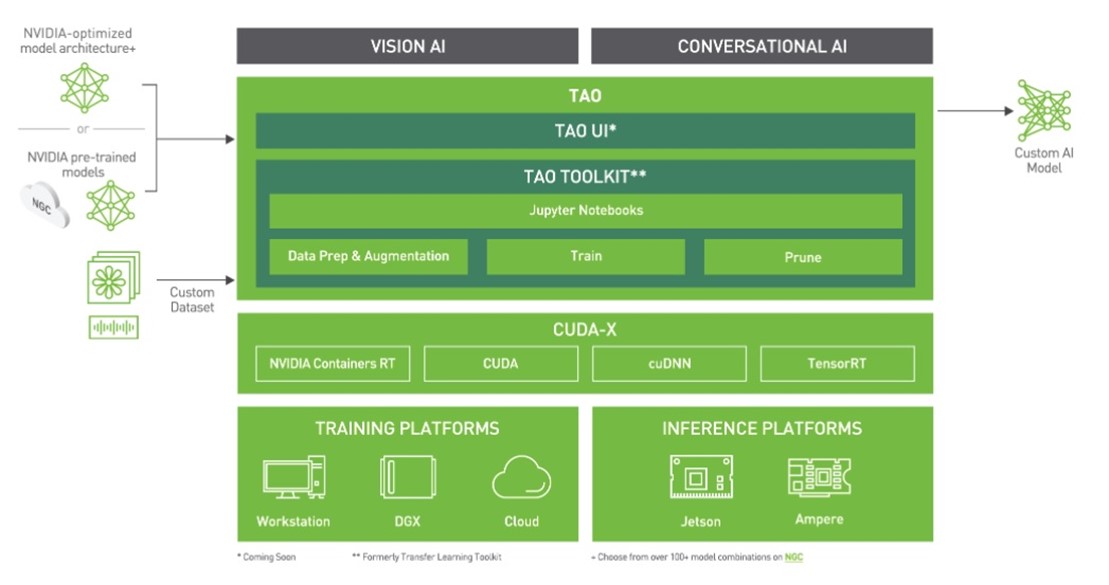
圖 1 顯示了訓練目標檢測模型的通用管道。對于這個更傳統的開發流程的每一步,我們都會討論人們遇到的典型挑戰,以及 TAO 和 Innotecus 的結合如何解決這些問題。

在開始之前,請安裝 TAO 工具包并驗證 Innotescus API 的實例。
安裝 TAO 工具包
TAO 工具包可以作為 CLI 或 Jupyter 筆記本運行。它只與 Python3 ( 3.6.9 和 3.7 )兼容,所以首先安裝必備軟件。
- 在 Linux 上,檢查 post-installation 步驟以確保 Docker 可以在沒有
sudo的情況下運行。 - Install nvidia-container-toolkit.
- 創建 NGC account 并生成用于身份驗證的 API 密鑰。
- 通過運行命令
docker login nvcr.io登錄 NGC Docker 注冊表,并輸入認證憑據。
先決條件安裝完成后,安裝 TAO 工具包。 NVIDIA 建議使用 virtualenvwrapper 在虛擬環境中安裝該軟件包。要安裝 TAO 啟動器 Python 軟件包,請運行以下命令:
pip3 install nvidia-pyindex
pip3 install nvidia-tao
通過運行tao --help檢查您是否正確完成了安裝。
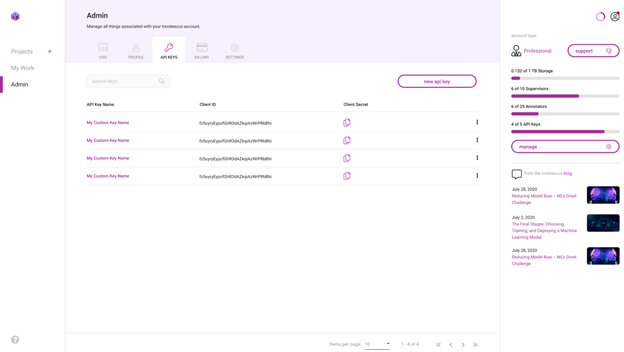
訪問 Innotecus API
Innotecus 可以作為基于 web 的應用程序訪問,但您也可以使用其 API 演示如何以編程方式完成相同的任務。首先,安裝 Innotecus 庫。
pip install innotescus
接下來,使用從平臺檢索的client_id和client_secret值對 API 實例進行身份驗證。
from innotescus import client_factory
client = client_factory(client_id=’client_id’, client_secret=’client_secret’)
現在,您已經準備好通過 API 與平臺進行交互,您將在接下來的管道中完成每一步。
數據收集
你需要數據來訓練模型。盡管數據收集經常被忽視,但可以說是開發過程中最重要的一步。收集數據時,你應該問自己幾個問題:
- 培訓數據是否充分代表了每個感興趣的對象?
- 您是否考慮了預期部署模型的所有場景?
- 你有足夠的數據來訓練模型嗎?
你不能總是完整地回答這些問題,但是有一個全面的數據收集計劃可以幫助你在開發過程的后續步驟中避免問題。數據收集是一個耗時且昂貴的過程。由于 TAO 提供的模型是經過預培訓的,因此再培訓的數據要求要小得多,為組織節省了這一階段的大量資源。
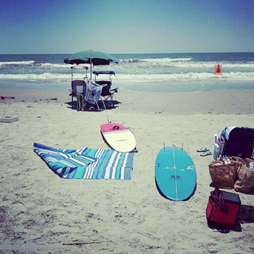
在本實驗中,使用 MS COCO 驗證 2017 數據集 中的圖像和注釋。這個數據集有 5000 張包含 80 個不同類別的圖像,但您只使用包含至少一個人的 2685 張圖像。
%matplotlib inline
from pycocotools.coco import COCO
import matplotlib.pyplot as plt dataDir=’Your Data Directory’
dataType=’val2017’
annFile=’{}/annotations/instances_{}.json’.format(dataDir,dataType) coco=COCO(annFile) catIds = coco.getCatIds(catNms=[‘person’]) # only using ‘person’ category
imgIds = coco.getImgIds(catIds=catIds) for num_imgs in len(imgIds): img = coco.loadImgs(imgIds[num_imgs])[0] I = io.imread(img[‘coco_url’])

使用 Innotescus 客戶端的已驗證實例,開始設置一個項目并上傳以人為中心的數據集。
#create a new project
client.create_project(project_name)
#upload data to the new project
client.upload_data(project_name, dataset_name, file_paths, data_type, storage_type)
data_type:此數據集保存的數據類型。接受值:DataType.IMAGEDataType.VIDEO
storage_type:數據的來源。接受值:StorageType.FILE_SYSTEMStorageType.URL
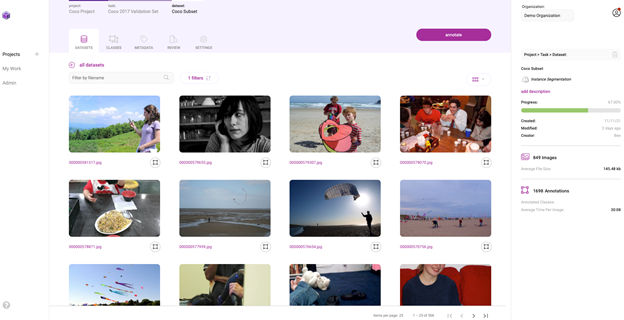
該數據集現在可以通過 Innotescus 用戶界面訪問。
數據整理
既然你有了最初的數據集,開始整理它以確保數據集的平衡。研究反復表明,這個過程的這一階段花費了機器學習項目 80% 左右的時間。
使用 TAO 和 Innotescus ,我們重點介紹了預注釋和審閱等技術,這些技術可以在不犧牲數據集大小或質量的情況下節省時間。
預注釋
Pre annotation 使您能夠使用模型生成的注釋來刪除準確標記 2685 圖像子集所需的大量時間和手動工作。您使用的 YOLOv4 與您正在重新培訓的模型相同,以生成預注釋,供注釋者進行細化。
因為預注釋可以在注釋任務的簡單部分上節省大量時間,所以可以將注意力集中在模型尚無法處理的更難的示例上。
YOLOv4 包含在 TAO 工具包中,支持 k 均值聚類、訓練、評估、推理、修剪和導出。要使用該模型,必須首先創建一個 YOLOv4 spec 文件,該文件包含以下主要組件:
yolov4_configtraining_configeval_confignms_configaugmentation_configdataset_config
spec 文件是protobuf文本(prototxt)消息,其每個字段可以是基本數據類型,也可以是嵌套消息。
接下來,下載帶有預訓練權重的模型。 TAO 工具箱 Docker 容器提供了對預訓練模型庫的訪問,這些模型是訓練深層神經網絡的一個很好的起點。由于這些模型托管在 NGC 目錄中,因此必須首先下載并安裝 NGC CLI 。有關更多信息,請參閱 NGC documentation 。
安裝 CLI 后,可以在 NGC repo 上查看預訓練計算機視覺模型列表,并下載預訓練模型。
ngc registry model list nvidia/tao/pretrained_*
ngc registry model download-version /path/to/model_on_NGC_repo/ -dest /path/to/model_download_dir/
下載模型并更新規范文件后,現在可以通過運行推斷子任務來生成預注釋。
tao yolo_v4 inference [-h] -i /path/to/imgFolder/ -l /path/to/annotatedOutput/ -e /path/to/specFile.txt -m /path/to/model/ -k $KEY
推理子任務的輸出是一系列 KITTI 格式的注釋,保存在指定的輸出目錄中。圖 6 顯示了這些注釋的兩個示例:
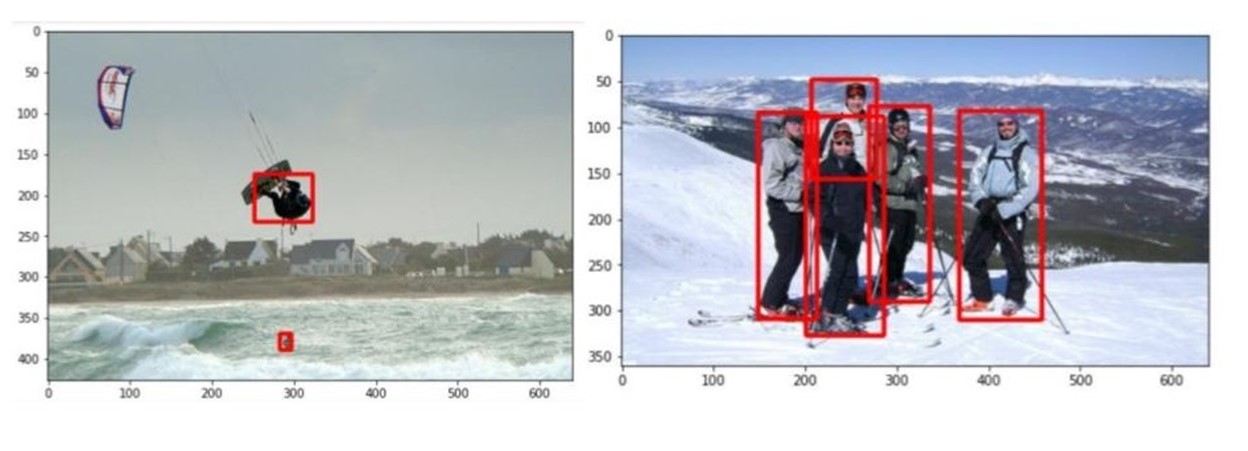
通過基于 web 的用戶界面或使用 API 手動將預先說明上傳到 Innotescus 平臺。由于 KITTI 格式是 Innotecus 接受的眾多格式之一,因此不需要預處理。
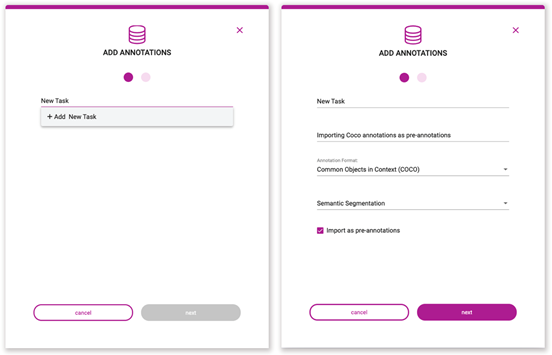
#upload pre-annotations generated by YOLOv4
Response = client.upload_annotations(project_name, dataset_name, task_type, data_type, annotation_format, file_paths, task_name, task_description, overwrite_existing_annotations, pre_annotate)
project_name:包含受影響數據集和任務的項目的名稱。dataset_name:要應用這些注釋的數據集的名稱。task_type:使用這些注釋創建的注釋任務的類型。TaskType類的可接受值:CLASSIFICATIONOBJECT_DETECTIONSEGMENTATIONINSTANCE_SEGMENTATION
data_type:注釋對應的數據類型。接受值:DataType.IMAGEDataType.VIDEO
annotation_format:存儲這些注釋的格式。AnnotationFormat類中接受的值:COCOKITTIMASKS_PER_CLASSPASCALCSVMASKS_SEMANTICMASKS_INSTANCEINNOTESCUS_JSONYOLO_DARKNETYOLO_KERAS
file_paths:包含要上載的注釋文件的文件路徑列表。task_name:這些注釋所屬任務的名稱;如果該任務不存在,則會創建該任務并使用這些注釋填充它。task_description:正在創建的任務的描述,如果該任務尚不存在。overwrite_existing_annotations:如果任務已經存在,則此標志允許您覆蓋現有批注。pre_annotate:允許您將批注作為預批注導入。
將預注釋導入平臺并節省大量初始注釋工作后,進入 Innotecus 以進一步更正、細化和分析數據。
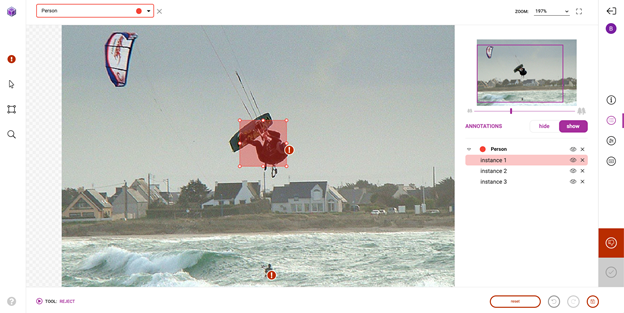
審查和糾正
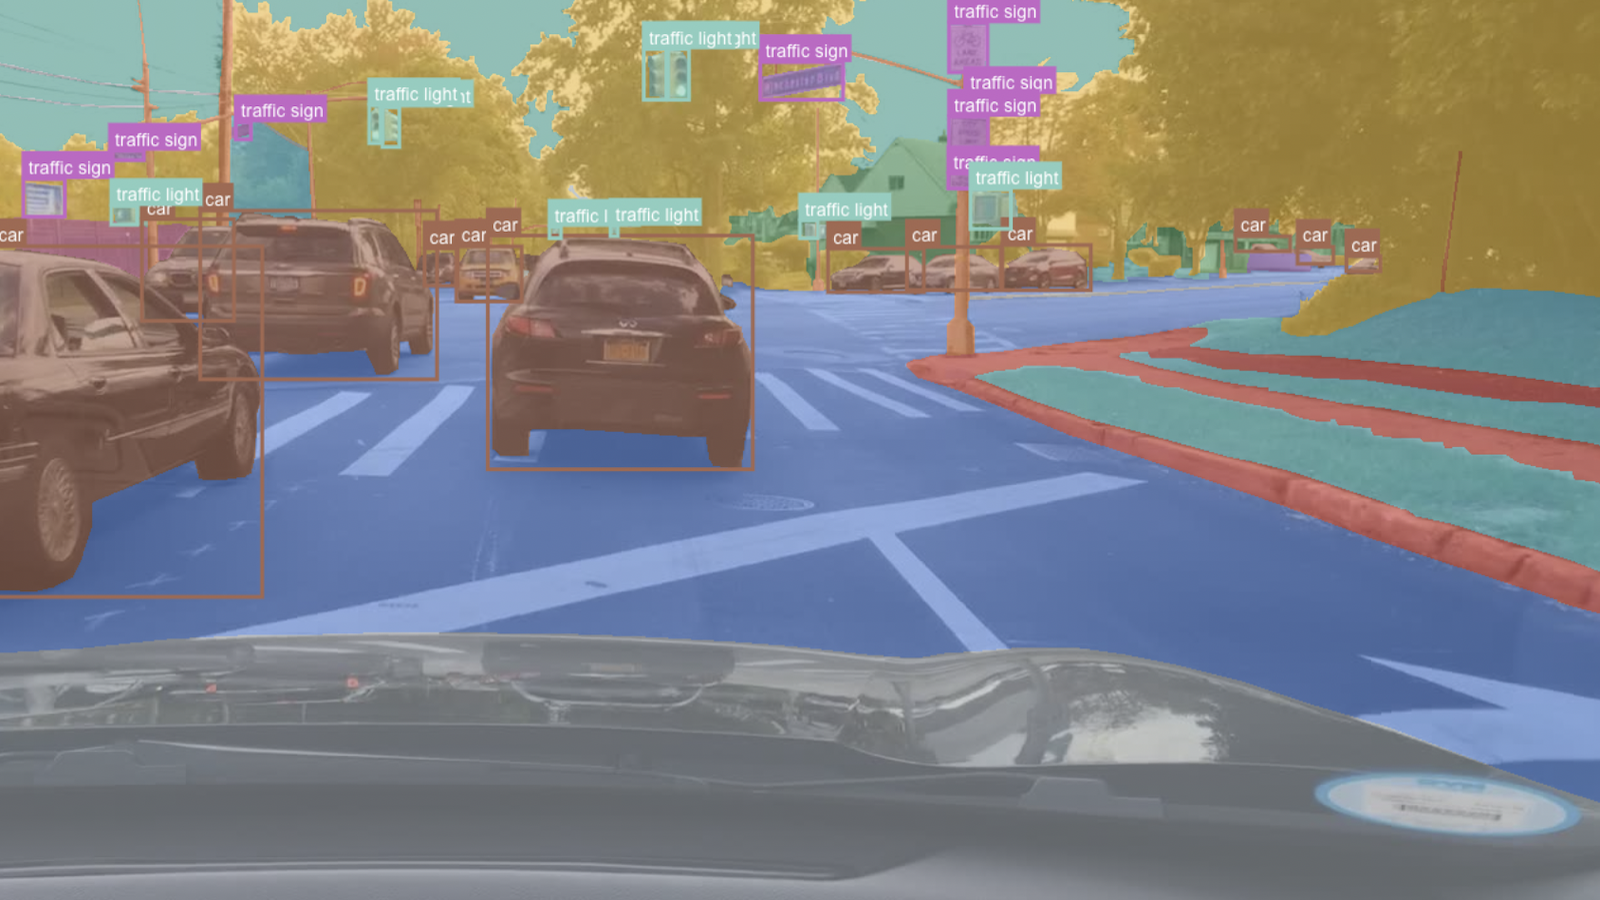
成功導入預注釋后,前往平臺對預注釋進行檢查和更正。雖然預訓練模型節省了大量的注釋時間,但它仍然不夠完美,需要一些人在回路中的交互來確保高質量的訓練數據。圖 8 顯示了您可能進行的典型更正的示例。
除了第一次修復和提交預注釋外, Innotecus 還可以對圖像和注釋進行更集中的采樣,以便進行多階段審查。這使大型團隊能夠系統高效地確保整個數據集的高質量。
探索性數據分析
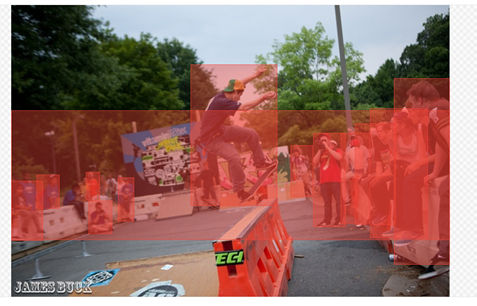
探索性數據分析( EDA )是從多個統計角度調查和可視化數據集的過程,以全面了解數據中存在的潛在模式、異常和偏差。在深思熟慮地解決數據集包含的統計不平衡之前,這是一個有效且必要的步驟。
Innotecus 提供預先計算的指標,用于理解數據和注釋的類別、顏色、空間和復雜性分布,并使您能夠在圖像和注釋元數據中添加自己的信息層,以將特定于應用程序的信息納入分析。
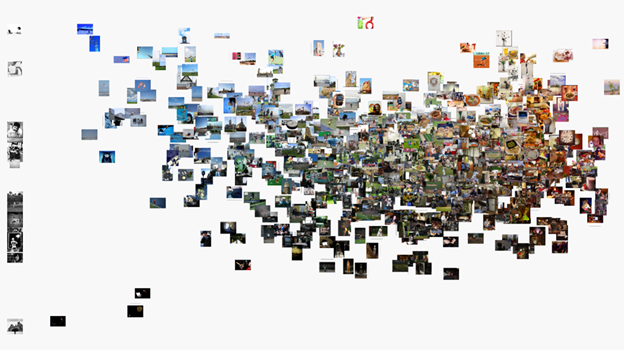
以下是如何使用 Innotecus 的潛水可視化來理解數據集中存在的一些模式和偏差。下面的散點圖顯示了圖像熵在數據集中沿 x 軸的分布,圖像熵是圖像中的平均信息或隨機程度。你可以看到一個清晰的模式,但你也可以發現異常,比如低熵或信息含量的圖像。
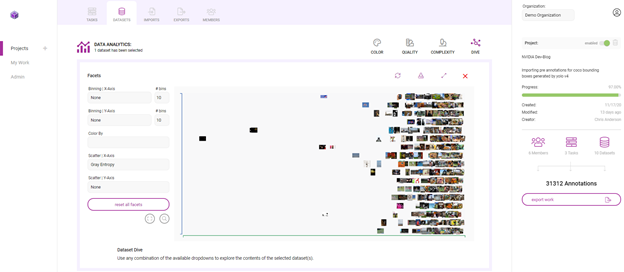
這樣的異常值引發了如何處理數據集中異常的問題。識別異常可以讓你提出一些關鍵問題:
- 您是否希望模型在部署時會遇到低熵輸入?
- 如果是這樣,您是否需要在培訓數據集中添加更多此類示例?
- 如果不是,這些示例是否會對培訓有害,是否應該將其從培訓數據集中刪除?
在另一個例子中,查看每個注釋的區域,相對于它所在的圖像。
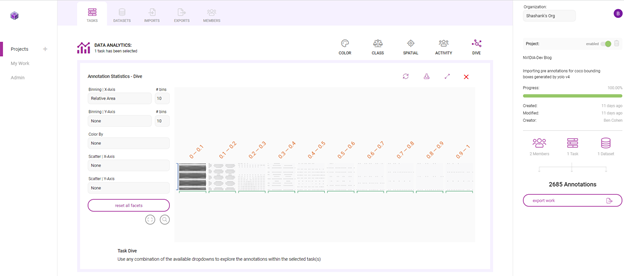
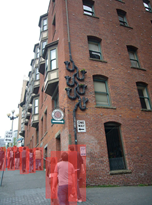
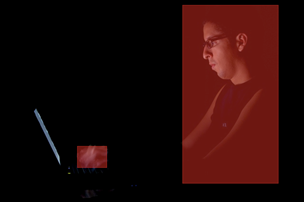
在圖 13 中,這兩幅圖像顯示了數據集中注釋大小的變化。雖然一些注釋捕捉了占據大量圖像的人,但大多數注釋顯示的是遠離相機的人。
在這里,很大一部分注釋在各自圖像大小的 0% 到 10% 之間。這意味著數據集偏向于小對象,或遠離相機的人。那么,您是否需要在訓練數據中添加更多具有更大注釋的示例,以表示離攝像機更近的人?以這種方式理解數據分布有助于您開始考慮數據擴充計劃。
通過 Innotescus , EDA 變得直觀。它為您提供了所需的信息,以便對數據集進行強大的擴充,并在開發過程的早期消除偏見。
利用數據集擴充實現集群再平衡
集群再平衡的增強背后的想法是強大的。 這方法?顯示了在最近的數據中心 AI 競賽由 Andrew Ng 和深入學習的 21% 的性能提升。人工智能。
為每個數據點(每個邊界框注釋)生成 N 維特征向量,并將所有數據點聚集在更高維空間中。當使用相似的特征對對象進行聚類時,可以擴充數據集,使每個聚類具有相同的表示形式。
我們選擇使用[red channel mean, green channel mean, blue channel mean, gray image std, gray image entropy, relative area]作為 N 維特征向量。這些指標是從 Innotecus 導出的, Innotecus 會自動計算這些指標。您還可以使用預訓練模型生成的嵌入來填充特征向量,這可能會更健壯。
您使用 k – 均值聚類, k = 4 作為聚類算法,使用 UMAP 將維度減少到兩個,以便可視化。下面的代碼示例生成顯示 UMAP 圖的圖形,用這四個簇進行顏色編碼。
import umap
from sklearn.decomposition import PCA
from sklearn.cluster import KMeans # k-means on the feature vector
kmeans = KMeans(n_clusters=4, random_state=0).fit(featureVector) # UMAP for dim reduction and visualization
fit = umap.UMAP(n_neighbors=5, min_dist=0.2, n_components=2, metric=’manhattan’) u = fit.fit_transform(featureVector) # Plot UMAP components
plt.scatter(u[:,0], u[:,1], c=(kmeans.labels_))
plt.title(‘UMAP embedding of kmeans colours’)
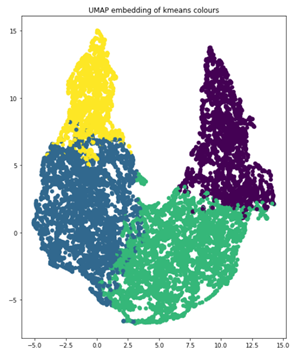
當您查看每個集群中對象的數量時,您可以清楚地看到不平衡,這將告訴您應該如何增加數據以進行再培訓。這四個簇分別代表 854 、 1523 、 1481 和 830 幅圖像。如果一個圖像的對象位于多個簇中,請將該圖像與其大多數對象分組以進行增強。
clusters = {} for file, cluster in zip(filename, kmeans.labels_): if cluster not in clusters.keys(): clusters[cluster] = [] clusters[cluster].append(file) else: clusters[cluster].append(file) for numCls in range(0, len(clusters)): print(‘Cluster {}: {} objects, {} images’.format(numCls+1, len(clusters[numCls]), len(list(set(clusters[numCls])))))
輸出:
Cluster 1: 2234 objects, 854 images
Cluster 2: 3490 objects, 1523 images
Cluster 3: 3629 objects, 1481 images
Cluster 4: 1588 objects, 830 images
定義好集群后,可以使用 imgaug Python 庫引入增強技術來增強訓練數據:平移、圖像亮度調整和縮放增強。您可以進行擴展,使每個集群包含 2000 個圖像,總計 8000 個。在增強圖像時,imgaug確保注釋坐標也得到適當更改。
import imgaug as ia
import imgaug.augmenters as iaa # augment images
seq = iaa.Sequential([ iaa.Multiply([1.1, 1.5]), # change brightness, doesn’t affect BBs iaa.Affine( translate_px={“x”:60, “y”:60}, scale=(0.5, 0.8) ) # translate by 60px on x/y axes & scale to 50-80%, includes BBs
]) # augment BBs and images
image_aug, bbs_aug = seq(image=I, bounding_boxes=boundingBoxes)
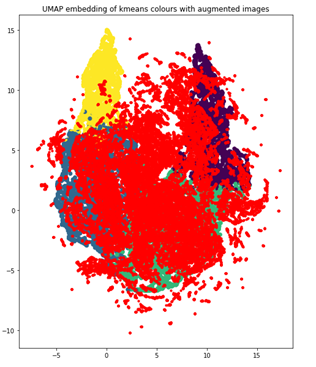
使用相同的 UMAP 可視化技術,增加的數據點現在為紅色,您可以看到數據集現在更加平衡,因為它更像高斯分布。
模特訓練
利用平衡良好、高質量的訓練數據,最后一步是訓練模型。
YOLOv4 TAO 工具包再培訓
要開始重新訓練模型,首先確保 spec 文件包含感興趣的類,以及預訓練模型和訓練數據的正確目錄路徑。在training_config部分更改訓練參數。保留 30% 的擴充數據集作為測試數據集,以比較預訓練模型和再訓練模型的性能。
ttraining_config { batch_size_per_gpu: 8 num_epochs: 80 enable_qat: false checkpoint_interval: 10 learning_rate { soft_start_cosine_annealing_schedule { min_learning_rate: 1e-7 max_learning_rate: 1e-4 soft_start: 0.3 } } regularizer { type: L1 weight: 3e-5 } optimizer { adam { epsilon: 1e-7 beta1: 0.9 beta2: 0.999 amsgrad: false } } pretrain_model_path: “path/to/model/model.hdf5”
}
運行訓練命令。
tao yolo_v4 train -e /path/to/specFile.txt -r /path/to/result -k $KEY
后果
如您所見,平均精度提高了 14.93% ,比預訓練模型的地圖提高了 21.37% :
| Model | mAP50 |
| Yolov4 pretrained model | 69.86% |
| Yolov4 retrained model with cluster-rebalanced augmentation | 84.79% |
總結
使用 NVIDIA TAO 工具包進行預注釋和模型培訓,使用 Innotecus 進行數據細化、分析和整理,您將 YOLOv4 在 person 類上的平均精度提高了 20% 以上。你不僅提高了所選課程的成績,而且比沒有遷移學習的顯著好處時,你所用的時間和數據更少。
遷移學習是在資源有限的環境中生成高性能、特定于應用程序的模型的一種好方法。使用 TAO 工具包和 Innotecus 等工具,可以讓各種規模和背景的團隊都能使用。
你自己試試吧
有興趣使用 Innotescus 來增強和完善您自己的數據集嗎?注冊 free trial . 使用 TAO 工具包開始 下載示例資源 的人工智能模型培訓。
?