字符串數據的高效處理對于許多數據科學應用至關重要。為了從字符串數據中提取有價值的信息, RAPIDS libcudf 提供了加速字符串數據轉換的強大工具。 lib cuDF 是一個 C ++ GPU DataFrame 庫,用于加載、連接、聚合和過濾數據。
在數據科學中,字符串數據表示語音、文本、遺傳序列、日志記錄和許多其他類型的信息。在為機器學習和特征工程處理字符串數據時,必須經常對數據進行規范化和轉換,然后才能將其應用于特定用例。 lib cuDF 提供了通用 API 和設備端實用程序,以支持廣泛的自定義字符串操作。
本文演示了如何使用 lib cuDF 通用 API 巧妙地轉換字符串列。您將獲得關于如何使用自定義內核和 lib cuDF 設備端實用程序解鎖峰值性能的新知識。本文還向您介紹了如何最好地管理 GPU 內存和有效地構造 lib cuDF 列以加快字符串轉換的示例。

介紹字符串列的箭頭格式
lib cuDF 使用 Arrow format 將字符串數據存儲在設備內存中,它將字符串列表示為兩個子列: chars and offsets (圖 1 )。
chars列將字符串數據保存為 UTF-8 編碼的字符字節,并連續存儲在內存中。
offsets列包含遞增的整數序列,這些整數是字節位置,用于標識字符數據數組中每個單獨字符串的開頭。最后一個 offset 元素是 chars 列中的字節總數。這意味著第i行的單個字符串的大小定義為(offsets[i+1]-offsets[i])。
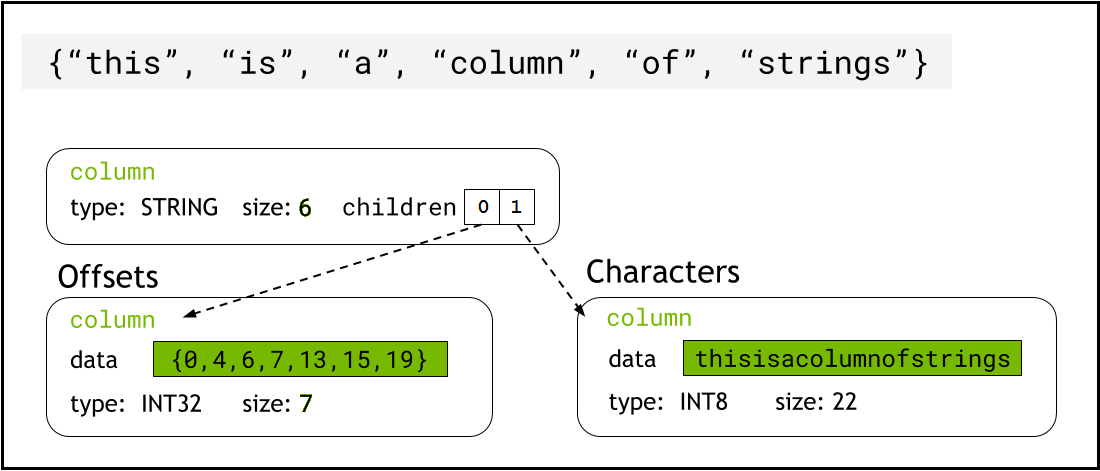
chars和offsets子列表示字符串列的示意圖字符串編校函數示例
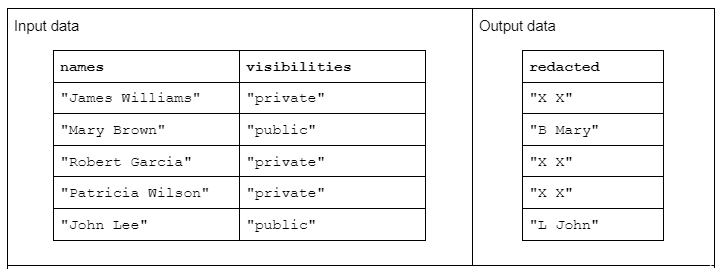
要演示字符串轉換的示例,請考慮一個函數,該函數接收兩個輸入字符串列,并生成一個經過修訂的輸出字符串列。
輸入數據的格式如下:一個“名稱”列包含由空格分隔的名字和姓氏,另一個“可見性”列包含“公共”或“私有”狀態
我們建議使用“ redact ”函數對輸入數據進行操作,以生成由姓氏的首字母加上空格和整個名字組成的輸出數據。但是,如果相應的可見性列為“ private ”,則輸出字符串應完全修訂為“ X X ”
使用 lib cuDF API 轉換字符串
首先,可以使用 libcudf strings API 完成字符串轉換。通用 API 是比較性能的良好起點和基線。
API 函數操作整個字符串列,每個函數至少啟動一個內核,每個字符串分配一個線程。每個線程跨 GPU 并行處理一行數據,并輸出一行作為新輸出列的一部分。
要使用通用 API 完成修訂示例函數,請執行以下步驟:
- 使用
contains將“可見性”字符串列轉換為布爾列 - 每當布爾列中相應的行條目為“ false ”時,通過復制“ X X ”從名稱列創建新的字符串列
- 將“修訂”列拆分為名字和姓氏列
- 將姓氏的第一個字符切成姓氏首字母
- 通過用空格(“”)分隔符連接最后一個縮寫列和第一個名字列來構建輸出列。
// convert the visibility label into a boolean
auto const visible = cudf::string_scalar(std::string("public"));
auto const allowed = cudf::strings::contains(visibilities, visible);

// redact names
auto const redaction = cudf::string_scalar(std::string("X X"));
auto const redacted = cudf::copy_if_else(names, redaction, allowed->view());

// split the first name and last initial into two columns
auto const sv = cudf::strings_column_view(redacted->view())
auto const first_last  = cudf::strings::split(sv);
auto const first = first_last->view().column(0);
auto const last  = first_last->view().column(1);
auto const last_initial = cudf::strings::slice_strings(last, 0, 1);

// assemble a result column
auto const tv = cudf::table_view({last_initial->view(), first});
auto result = cudf::strings::concatenate(tv, std::string(" "));
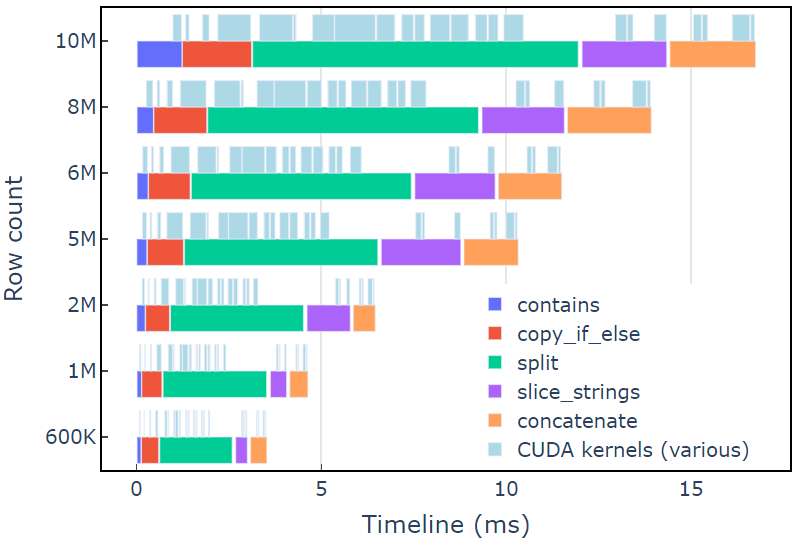
在具有 600K 行數據的 A6000 上,此方法大約需要 3.5 毫秒。本例使用contains、copy_if_else, split, slice_strings和concatenate完成自定義字符串轉換。使用 Nsight Systems 進行的分析表明,split函數花費的時間最長,其次是和concatenate。
圖 2 顯示了修訂示例的 Nsight Systems 的分析數據,顯示了每秒最多 6 億個元素的端到端字符串處理。這些區域對應于與每個功能相關聯的 NVTX 范圍。淺藍色范圍對應 CUDA 內核運行的周期。
使用自定義內核轉換字符串
lib cuDF strings API 是一個快速高效的字符串轉換工具包,但有時性能關鍵型函數需要運行得更快。 lib cuDF strings API 中額外工作的一個關鍵來源是在全局設備內存中為每個 API 調用創建至少一個新的字符串列,這為將多個 API 調用合并到自定義內核提供了機會。
內核 malloc 調用的性能限制
首先,我們將構建一個自定義內核來實現編校示例轉換。在設計這個內核時,我們必須記住 lib cuDF strings 列是不可變的。
不能就地更改字符串列,因為字符字節是連續存儲的,對字符串長度的任何更改都會使偏移量數據無效。因此,redact_kernel自定義內核通過使用 lib cuDF 列工廠來構建offsets和chars子列,從而生成一個新的字符串列。
在第一種方法中,使用內核內的 malloc 調用在 dynamic device memory 中創建每行的輸出字符串。自定義內核輸出是一個指向每行輸出的設備指針向量,該向量用作字符串列工廠的輸入。
自定義內核接受 cudf::column_device_view 以訪問字符串列數據,并使用element方法返回 cudf::string_view 表示指定行索引處的字符串數據。內核輸出是一個cudf::string_view類型的向量,它保存指向設備內存的指針,其中包含輸出字符串和該字符串的字節大小。
cudf::string_view類類似于 std :: string _ view 類,但它是專門為 lib cuDF 實現的,并將固定長度的字符數據包裝在編碼為 UTF-8 的設備內存中。它與std對應物具有許多相同的特性(例如find和[EZX 43]函數)和限制(無空終止符)。cudf::string_view表示存儲在設備內存中的字符序列,因此我們可以在這里使用它來記錄輸出向量的 malloc 內存。
麥芽糖核
// note the column_device_view inputs to the kernel

__global__ void redact_kernel(cudf::column_device_view const d_names,
                              cudf::column_device_view const d_visibilities,
                              cudf::string_view redaction,
                              cudf::string_view* d_output)
{
  // get index for this thread
  auto index = threadIdx.x + blockIdx.x * blockDim.x;
  if (index >= d_names.size()) return;

  auto const visible = cudf::string_view("public", 6);

  auto const name = d_names.element<cudf::string_view>(index);
  auto const vis  = d_visibilities.element<cudf::string_view>(index);
  if (vis == visible) {
    auto const space_idx    = name.find(' ');
    auto const first        = name.substr(0, space_idx);
    auto const last_initial = name.substr(space_idx + 1, 1);
    auto const output_size  = first.size_bytes() + last_initial.size_bytes() + 1;

    char* output_ptr = static_cast<char*>(malloc(output_size));

    // build output string
    d_output[index]  = cudf::string_view{output_ptr, output_size};
    memcpy(output_ptr, last_initial.data(), last_initial.size_bytes());
    output_ptr += last_initial.size_bytes();
    *output_ptr++ = ' ';
    memcpy(output_ptr, first.data(), first.size_bytes());
  } else {
    d_output[index] = cudf::string_view{redaction.data(), redaction.size_bytes()};
  }
}

__global__ void free_kernel(cudf::string_view redaction, cudf::string_view* d_output, int count)
{
  auto index = threadIdx.x + blockIdx.x * blockDim.x;
  if (index >= count) return;

  auto ptr = const_cast<char*>(d_output[index].data());
  if (ptr != redaction.data()) free(ptr); // free everything that does match the redaction string
}
在測量內核性能之前,這似乎是一種合理的方法。在具有 600K 行數據的 A6000 上,這種方法大約需要 108 毫秒,比上面使用 lib cuDF 字符串 API 提供的解決方案慢 30 倍以上。
redact_kernel         60.3ms
free_kernel           45.5ms
make_strings_column    0.5ms
這里的主要瓶頸是兩個內核中的malloc/free調用。 CUDA 動態設備內存需要同步內核中的malloc/free調用,導致并行執行退化為順序執行。
預先分配工作內存以消除瓶頸
在啟動內核之前,用預先分配的工作內存替換內核中的malloc/free調用,從而消除malloc/free瓶頸。
對于編校示例,此示例中每個字符串的輸出大小不應大于輸入字符串本身,因為邏輯只刪除字符。因此,可以使用與輸入緩沖區大小相同的單個設備內存緩沖區。使用輸入偏移定位每行位置。
訪問字符串列的偏移量涉及使用cudf::strings_column_view包裝cudf::column_view并調用其 offsets_begin方法。也可以使用chars_size方法訪問chars子列的大小。然后在調用內核以存儲字符輸出數據之前預先分配rmm::device_uvector。
auto const scv = cudf::strings_column_view(names);
auto const offsets = scv.offsets_begin();
auto working_memory = rmm::device_uvector<char>(scv.chars_size(), stream);
預分配內核
__global__ void redact_kernel(cudf::column_device_view const d_names,
                              cudf::column_device_view const d_visibilities,
                              cudf::string_view redaction,
                              char* working_memory,
                              cudf::offset_type const* d_offsets,
                              cudf::string_view* d_output)
{
  auto index = threadIdx.x + blockIdx.x * blockDim.x;
  if (index >= d_names.size()) return;

  auto const visible = cudf::string_view("public", 6);

  auto const name = d_names.element<cudf::string_view>(index);
  auto const vis  = d_visibilities.element<cudf::string_view>(index);
  if (vis == visible) {
    auto const space_idx    = name.find(' ');
    auto const first        = name.substr(0, space_idx);
    auto const last_initial = name.substr(space_idx + 1, 1);
    auto const output_size  = first.size_bytes() + last_initial.size_bytes() + 1;

    // resolve output string location
    char* output_ptr = working_memory + d_offsets[index];
    d_output[index]  = cudf::string_view{output_ptr, output_size};

    // build output string into output_ptr
    memcpy(output_ptr, last_initial.data(), last_initial.size_bytes());
    output_ptr += last_initial.size_bytes();
    *output_ptr++ = ' ';
    memcpy(output_ptr, first.data(), first.size_bytes());
  } else {
    d_output[index] = cudf::string_view{redaction.data(), redaction.size_bytes()};
  }
}
內核輸出cudf::string_view對象的矢量,該矢量被傳遞給 cudf::make_strings_column 工廠功能。此函數的第二個參數用于標識輸出列中的空條目。本文中的示例沒有空條目,因此使用了 nullptr 占位符cudf::string_view{nullptr,0}。
auto str_ptrs = rmm::device_uvector<cudf::string_view>(names.size(), stream);

redact_kernel<<<blocks, block_size, 0, stream.value()>>>(*d_names,
                                                         *d_visibilities,
                                                         d_redaction.value(),
                                                         working_memory.data(),
                                                         offsets,
                                                         str_ptrs.data());

auto result = cudf::make_strings_column(str_ptrs, cudf::string_view{nullptr,0}, stream);
在具有 600K 行數據的 A6000 上,此方法大約需要 1.1 毫秒,因此比基線高出 2 倍以上。大致細分如下:
  redact_kernel            66us
make_strings_column 400us剩余時間花在cudaMalloc, cudaFree, cudaMemcpy,上,這是管理rmm::device_uvector臨時實例的典型開銷。如果保證所有輸出字符串的大小都與輸入字符串相同或更小,則此方法很有效。
總的來說,使用 RAPIDS RMM 切換到批量工作內存分配是一個顯著的改進,也是自定義字符串函數的一個很好的解決方案。
優化列創建以加快計算時間
有沒有辦法進一步改進這一點?現在的瓶頸是cudf::make_strings_column工廠函數,它從cudf::string_view對象的矢量構建兩個字符串列組件offsets和chars。
在 libcudf 中,包含了許多工廠函數來構建字符串列。前面示例中使用的工廠函數獲取cudf::string_view對象的cudf::device_span,然后通過對底層字符數據執行gather來構造列,以構建偏移量和字符子列。rmm::device_uvector可自動轉換為cudf::device_span,而無需復制任何數據。
但是,如果直接構建字符矢量和偏移矢量,則可以使用不同的工廠函數,它只需創建字符串列,而不需要聚集來復制數據。
sizes_kernel首先傳遞輸入數據,以計算每個輸出行的確切輸出大小:
Optimized kernel: Part 1
__global__ void sizes_kernel(cudf::column_device_view const d_names,
                             cudf::column_device_view const d_visibilities,
                             cudf::size_type* d_sizes)
{
  auto index = threadIdx.x + blockIdx.x * blockDim.x;
  if (index >= d_names.size()) return;

  auto const visible = cudf::string_view("public", 6);
  auto const redaction = cudf::string_view("X X", 3);

  auto const name = d_names.element<cudf::string_view>(index);
  auto const vis  = d_visibilities.element<cudf::string_view>(index);

  cudf::size_type result = redaction.size_bytes(); // init to redaction size
  if (vis == visible) {
    auto const space_idx    = name.find(' ');
    auto const first        = name.substr(0, space_idx);
    auto const last_initial = name.substr(space_idx + 1, 1);

    result = first.size_bytes() + last_initial.size_bytes() + 1;
  }

  d_sizes[index] = result;
}
然后,通過執行就地exclusive_scan將輸出大小轉換為偏移量。請注意,offsets矢量是用names.size()+1元素創建的。最后一項是字節總數(所有大小加在一起),而第一項是 0 。這兩項都由exclusive_scan調用處理。從offsets列的最后一個條目檢索chars列的大小,以構建字符矢量。
// create offsets vector
auto offsets = rmm::device_uvector<cudf::size_type>(names.size() + 1, stream);

// compute output sizes
sizes_kernel<<<blocks, block_size, 0, stream.value()>>>(
  *d_names, *d_visibilities, offsets.data());

thrust::exclusive_scan(rmm::exec_policy(stream), offsets.begin(), offsets.end(), offsets.begin());
redact_kernel邏輯仍然非常相同,只是它接受輸出d_offsets矢量來解析每行的輸出位置:
優化內核:第 2 部分
__global__ void redact_kernel(cudf::column_device_view const d_names,
                              cudf::column_device_view const d_visibilities,
                              cudf::size_type const* d_offsets,
                              char* d_chars)
{
  auto index = threadIdx.x + blockIdx.x * blockDim.x;
  if (index >= d_names.size()) return;

  auto const visible = cudf::string_view("public", 6);
  auto const redaction = cudf::string_view("X X", 3);

  // resolve output_ptr using the offsets vector
  char* output_ptr   = d_chars + d_offsets[index];

  auto const name = d_names.element<cudf::string_view>(index);
  auto const vis = d_visibilities.element<cudf::string_view>(index);
  if (vis == visible) {
    auto const space_idx    = name.find(' ');
    auto const first        = name.substr(0, space_idx);
    auto const last_initial = name.substr(space_idx + 1, 1);
    auto const output_size  = first.size_bytes() + last_initial.size_bytes() + 1;

    // build output string
    memcpy(output_ptr, last_initial.data(), last_initial.size_bytes());
    output_ptr += last_initial.size_bytes();
    *output_ptr++ = ' ';
    memcpy(output_ptr, first.data(), first.size_bytes());
  } else {
    memcpy(output_ptr, redaction.data(), redaction.size_bytes());
  }
}
從d_offsets列的最后一個條目檢索輸出d_chars列的大小,以分配字符矢量。內核使用預先計算的偏移量向量啟動,并返回填充的字符向量。最后, lib cuDF strings 列工廠創建輸出字符串列。
這 cudf::make_strings_column factory 函數構建 strings 列而不復制數據。offsets數據和 chars數據已經采用了正確的預期格式,該工廠只需從每個矢量中移動數據并圍繞它創建列結構。完成后,offsets和chars的rmm::device_uvectors為空,它們的數據已移動到輸出列中。
cudf::size_type output_size = offsets.back_element(stream);
auto chars = rmm::device_uvector<char>(output_size, stream);

redact_kernel<<<blocks, block_size, 0, stream.value()>>>(
    *d_names, *d_visibilities, offsets.data(), chars.data());


// from pre-assembled offsets and character buffers
auto result = cudf::make_strings_column(names.size(), std::move(offsets), std::move(chars));
在具有 600K 行數據的 A6000 上,此方法需要大約 300 us ( 0.3 ms )的時間,比以前的方法提高了 2 倍多。您可能會注意到sizes_kernel和redact_kernel共享很多相同的邏輯:一次測量輸出的大小,然后再次填充輸出。
從代碼質量的角度來看,將轉換重構為由大小和編校內核調用的設備函數是有益的。從性能的角度來看,您可能會驚訝地看到轉換的計算成本是原來的兩倍。
內存管理和更高效的列創建的好處往往超過兩次執行轉換的計算成本。
表 2 顯示了本文討論的四種解決方案的計算時間、內核計數和處理的字節數。“內核啟動總數”反映了啟動的內核總數,包括計算內核和輔助內核。“處理的總字節數”是累積的 DRAM 讀寫吞吐量,“處理的最小字節數”為測試輸入和輸出的平均每行 37.9 字節。理想的“內存帶寬受限”情況假設 768 GB / s 帶寬,即 A6000 的理論峰值吞吐量。
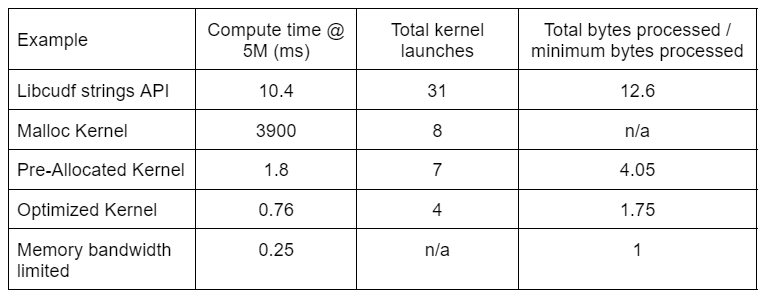
由于內核啟動次數減少,處理的總字節數減少,“優化內核”提供了最高的吞吐量。有了高效的自定義內核,內核的總啟動次數從 31 次減少到 4 次,處理的總字節數從輸入加輸出大小的 12.6 倍減少到 1.75 倍。
因此,定制內核的吞吐量比用于編校轉換的通用字符串 API 高出 10 倍以上。
峰值性能分析
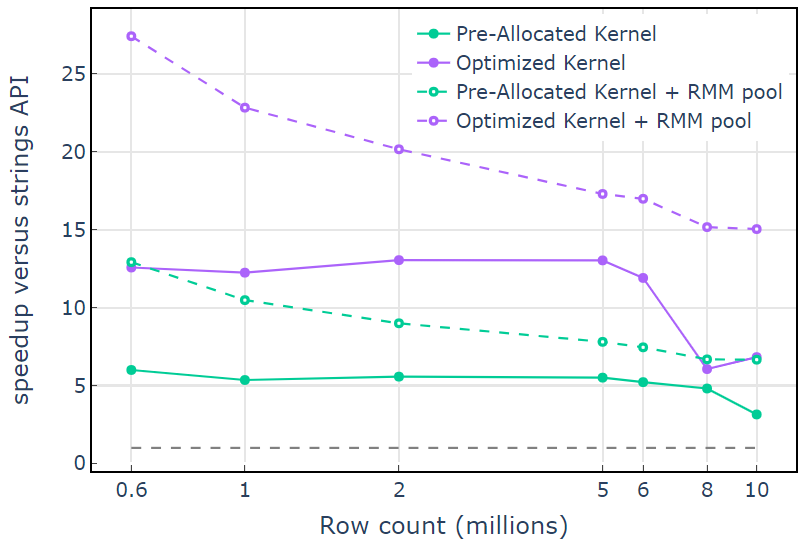
RAPIDS Memory Manager (RMM) 中的池內存資源是另一個可用于提高性能的工具。上述示例使用默認的“ CUDA 內存資源”分配和釋放全局設備內存。然而,分配工作內存所需的時間增加了字符串轉換步驟之間的延遲。 RMM 中的“池內存資源”通過預先分配一個大的內存池,并在處理過程中根據需要分配子分配來減少延遲。
對于 CUDA 內存資源,“ Optimized Kernel ”顯示了 10×15 倍的加速,由于分配大小的增加,在較高的行數時開始下降(圖 3 )。使用池內存資源可以緩解這種影響,并比 lib cuDF stringsAPI 方法保持 15x-25 倍的速度提升。
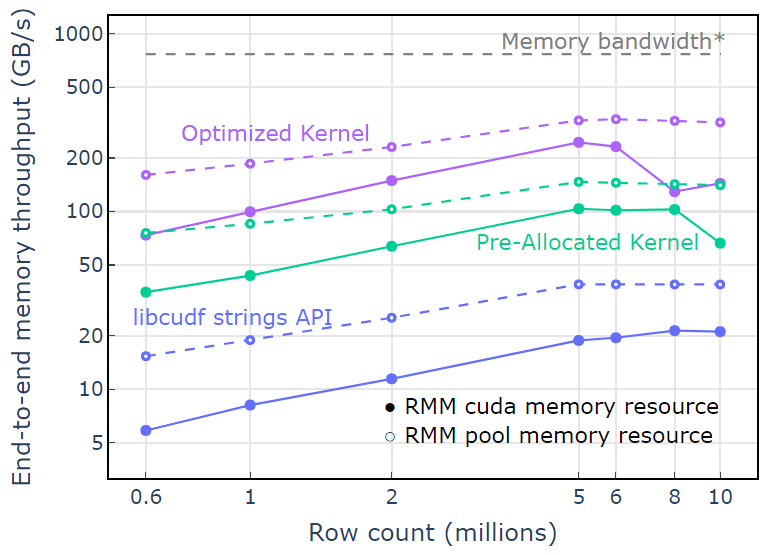
利用池內存資源,兩遍算法的端到端內存吞吐量接近理論極限。“優化內核”的吞吐量達到 320-340 GB / s ,使用輸入大小加上輸出大小和計算時間進行測量(圖 4 )。
兩遍法首先測量輸出元素的大小,分配內存,然后用輸出設置內存。給定兩遍處理算法,“優化內核”中的實現性能接近內存帶寬限制。“端到端內存吞吐量”定義為輸入加輸出大小( GB )除以計算時間* RTX A6000 內存帶寬( 768 GB / s )。
關鍵要點
本文演示了在 libcudf 中編寫高效字符串數據轉換的兩種方法。 lib cuDF 通用 API 對于開發人員來說是快速而直接的,并且提供了良好的性能。 lib cuDF 還提供了設計用于自定義內核的設備端實用程序,在本例中,解鎖性能提高了 10 倍以上。
應用您的知識
要開始使用 RAPIDS cuDF ,請訪問 rapidsai/cudf GitHub 回購。如果您尚未嘗試使用 cuDF 和 lib cuDF 來處理字符串處理工作負載,我們鼓勵您測試最新版本。 Docker containers 是為發行版和夜間構建提供的。 Conda packages 也可用于簡化測試和部署。如果您已經在使用 cuDF ,我們鼓勵您通過訪問 GitHub 上的 rapidsai/cudf/tree/HEAD/cpp/examples/strings 來運行新的字符串轉換示例。
?