大語言模型(LLMs)的領域自適應預訓練(DAPT)是構建特定領域模型的重要步驟。與現成的開放或商用模型相比,這些模型在特定領域任務中表現出更出色的功能。
最近,NVIDIA 發表了一篇關于 ChipNeMo 的論文,這是一系列面向工業芯片設計應用的基礎模型。ChipNeMo 模型是通過在專有數據和公開可用的特定領域數據的語料庫上對 Llama 2 系列模型進行持續預訓練的結果。
本文將以 ChipNeMo 數據集為例,介紹使用 NVIDIA NeMo Curator 從各種公開來源收集訓練數據集的過程。
NeMo Curator
NeMo Curator 是一個 GPU 加速的數據 curation 庫,通過準備用于預訓練和自定義的大規模、高質量數據集來提高生成式 AI 模型的性能。
NeMo Curator 通過擴展到多節點多 GPU (MNMG) 來縮短數據處理時間,并支持大型預訓練數據集的準備。它提供了從 Common Crawl、Wikipedia 和 arXiv 等開箱即用的各種公共來源下載和整理數據的工作流程。
它還為您提供了自定義數據采集流程的靈活性,以滿足它們獨特的要求,并創建自定義數據集。
有關基本構建塊的更多信息,請參閱“使用 NVIDIA NeMo Curator 為 LLM 訓練整理自定義數據集”的教程。
ChipNeMo
ChipNeMo 的大部分訓練語料庫包括來自 Wikipedia、開源 GitHub 資源庫以及 arXiv 出版物的數據。
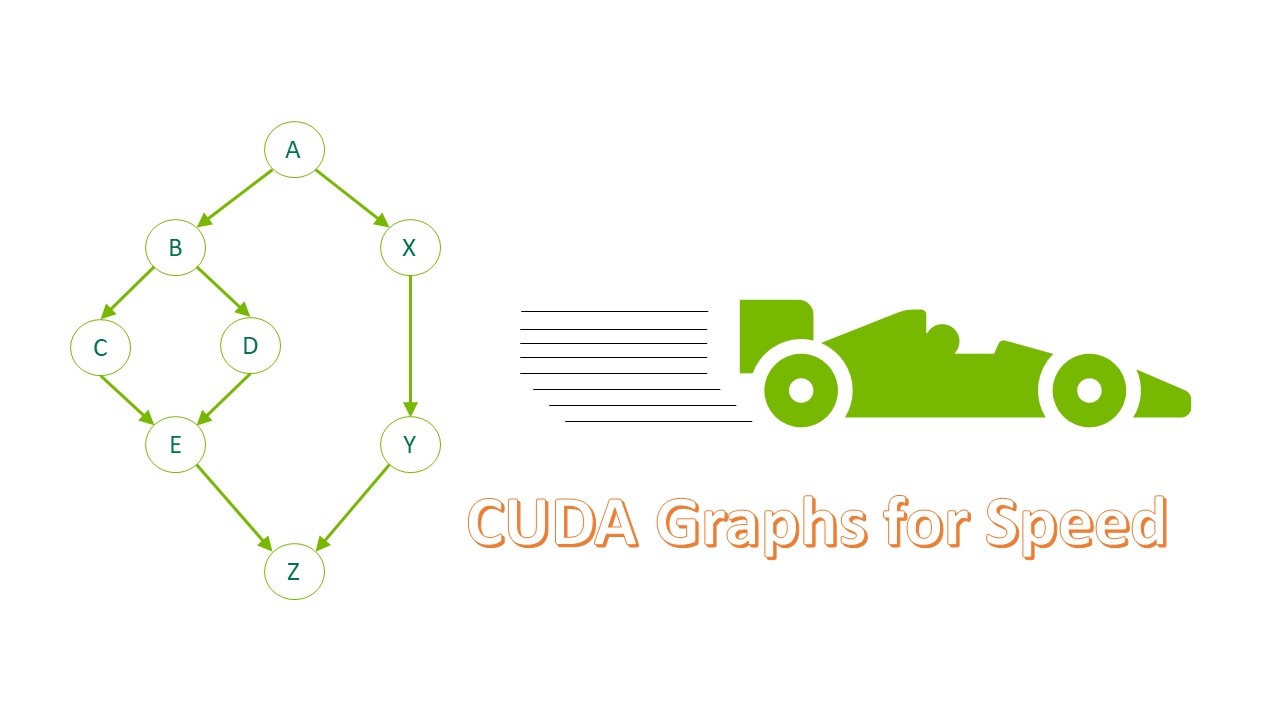
圖 1 顯示數據 curation 管道涉及以下高級步驟:
- Acquiring data:
- 下載相關的維基百科文章,并將其轉換為JSONL文件。
- 克隆相關的 GitHub 資源庫,確定所有相關的源代碼文件,并將其轉換為 JSONL 文件。
- 從 arXiv 下載 PDF 格式的論文,并將其轉換為 JSONL 文件。
- 使用現有工具統一 Unicode 表征和特殊字符。
- 定義自定義過濾器以刪除過短、過長、重復或不相關的記錄。
- 從數據集中編輯所有個人身份信息(PII)。
- 根據元數據整理數據,并將結果寫入磁盤。
- (可選) 混合和混洗數據。

要訪問本教程的完整代碼,請參閱 NVIDIA/NeMo-Curator GitHub 資源庫。
預備知識
開始之前,請按照 NeMo Curator 的 GitHub README 文件中的說明安裝 NeMo Curator。
本教程還依賴于 Tesseract 庫來啟用 PDF 解析功能,您可以通過獲取二進制文件或操作系統的包管理器來安裝該功能。
之后,在終端運行以下命令以驗證安裝。此外,安裝后續操作所需的依賴項
$ sudo apt install tesseract-ocr # For Debian-based Linux distros$ pip install nemo-curator$ python -c "import nemo_curator; print(nemo_curator);"$ pip3 install -r requirements.txt |
數據采集
我們提供了 ChipNeMo 訓練語料庫中使用的 Wikipedia 文章、GitHub 資源庫和 arXiv 出版物的列表,并演示了如何將這些數據轉換為 JSONL。
轉換過程因數據源而異:
- 對于維基百科文章,請解析網頁以提取主要內容。
- 對于 arXiv 出版物,請將 PDF 文件解析為純文本。
- 對于 GitHub 資源庫,請識別相關的源代碼文件,并忽略不相關的數據。
如前文教程所述,整理數據集的第一步是實現可下載并迭代數據集的文檔構建器。
要使用 Dask 的并行性,請將文檔構建器實現插入 NeMo Curator 提供的 download_and_extract 輔助程序。這輔助程序使用 Dask 工作器并行下載和解析數據,從而在處理多個數據源時顯著加快該過程。
文檔構建器實現
首先,實現 DocumentDownloader 類,該類獲取數據集的 URL 并使用 requests 庫進行下載。目前,重點關注下載和解析 GitHub 資源庫的任務。您稍后也可以類似地獲取 Wikipedia 和 arXiv 數據。
要高效獲取 GitHub 資源庫,請將其下載為 .zip 存檔,而不是通過 git 命令進行克隆。此方法速度更快,并且節省了磁盤空間,因為您可以直接處理 .zip 文件。
要下載 .zip 版本的資源庫,請確定該資源庫的主分支的名稱。在生產流水線中,最好直接查詢 GitHub API,并為每個資源庫找出主分支。由于 API 通常受速率限制并需要身份驗證,因此我們展示了如何嘗試一些不同的常見分支名稱,以查看哪些分支有效:例如,嘗試 “main”、”master” 或 “develop” 等。
import requestsfrom nemo_curator.download.doc_builder import DocumentDownloaderclass GitHubDownloader(DocumentDownloader): """ A class for downloading repositories from GitHub. """ def __init__(self, github_root_dir: str): """ Initializes the DocBuilder object. Args: github_root_dir: The root directory for GitHub repositories. """ super().__init__() # The path under which the repositories will be cloned. self.clone_root_dir = os.path.join(github_root_dir, "repos") os.makedirs(github_root_dir, exist_ok=True) os.makedirs(self.clone_root_dir, exist_ok=True) def download(self, url: str) -> str: """ Download a repository as a zip file. Args: url (str): The URL of the repository. Returns: str: The path to the downloaded zip file, or None if the download failed. """ repo_name = os.path.basename(url) zip_file = os.path.join(self.clone_root_dir, repo_name + ".zip") if os.path.exists(zip_file): print(f"Repository '{repo_name}' already exists, skipping download.") return zip_file # Try the common branch names first. A better way to do this would be to # query the GitHub API to get the default branch, but that is subject to rate limits. success = False for branch in ["master", "main"]: # Send a GET request to the URL response = requests.get(zip_url) # Check if the request was successful if response.status_code == 200: # Write the content of the response to a file with open(zip_file, "wb") as file: file.write(response.content) # No need to try other branches success = True break if not success: print( f"Failed to clone repository '{repo_name}' from '{url}' (error code {response.status_code})." ) return None return zip_file |
解析和迭代數據集
實施 DocumentIterator 和 DocumentExtractor 類,以遍歷數據源并解析所有相關源文件。在迭代器實現中,您可以添加任何其他相關元數據或限制所解析的文件。
以下實現將打開每個存儲庫的 .zip 文件,并遍歷所有文件,同時跳過所有隱藏文件和目錄。它通過擴展名確定相關文件,并使用 cchardet 庫確定每個文件的編碼。除了每個文件的內容外,此實現還存儲了一些有用的元數據,并將其返回給調用方。
提取器實現將返回文件的解析內容。
import osfrom zipfile import ZipFile, ZipInfoimport cchardet as chardetfrom nemo_curator.download.doc_builder import DocumentIteratorclass GitHubIterator(DocumentIterator): """ GitHub document iterator. Will go through the files and parse the supported ones. """ # Mapping from file extensions to categories. # Will also be used to to ignore irrelevant files. SUPPORTED_EXTENSIONS_TO_CATEGORY = { ".v": "VerilogVHDL", ".vh": "VerilogVHDL", ".vhdl": "VerilogVHDL", ".va": "VerilogAnalog", ".c": "CPP", ".cpp": "CPP", ".h": "CPP", ".hpp": "CPP", ".py": "Python", ".config": "Config", ".mk": "Makefile", "makefile": "Makefile", "makeppfile": "Makefile", ".pm": "Perl", ".pl": "Perl", ".tcl": "Tcl", ".spec": "Spec", ".yaml": "Yaml", ".yml": "Yaml", ".sp": "Spice", ".cir": "Spice", ".cmd": "Spice", ".spf": "Spice", ".spice": "Spice", ".txt": "text", ".json": "text", ".xml": "text", ".html": "text", ".pdf": "text", ".md": "text", "": "text", # No extension } def parse_file(self, zip_ref: ZipFile, file_info: ZipInfo): """ Parses a file from a zip archive and extracts its metadata and content. Args: zip_ref: The zip archive object. file_info: Information about the file in the zip archive. Returns: A tuple containing the metadata and the content of the file. The metadata is a dictionary. If the file extension or filename is not supported, or if the file cannot be decoded, None is returned. """ zip_path = zip_ref.filename input_fp = file_info.filename full_path = os.path.join(zip_path, input_fp) # Extract the file name and extension in lower case. filename = os.path.basename(input_fp) filename_no_ext, ext = os.path.splitext(filename) filename_no_ext = filename_no_ext.lower() ext = ext.lower() # If neither the file extension nor the filename is supported, return None if ext not in GitHubIterator.SUPPORTED_EXTENSIONS_TO_CATEGORY: if filename_no_ext not in GitHubIterator.SUPPORTED_EXTENSIONS_TO_CATEGORY: return None # The filename is there, but the extension is not. The category is determined by the filename. category = GitHubIterator.SUPPORTED_EXTENSIONS_TO_CATEGORY[filename_no_ext] else: category = GitHubIterator.SUPPORTED_EXTENSIONS_TO_CATEGORY[ext] # Open the file and read its content. Determine the encoding using cchardet. Skip over binary files. with zip_ref.open(file_info, "r") as file: content = file.read() # Determine the encoding of the file encoding = chardet.detect(content)["encoding"] if not encoding: return None try: content = content.decode(encoding) except UnicodeDecodeError: # If the file cannot be decoded, return None return None # Extract the metadata line_count = content.count("\n") + 1 size_in_bytes = file_info.file_size if category == "text": file_type = "text" else: file_type = "code" metadata = { # Use the file path as the unique ID "id": full_path, "file_extension": ext, "file_type": file_type, "category": category, "line_count": line_count, "size_in_bytes": size_in_bytes, "path": full_path, } return metadata, content def iterate(self, file_path: str): """ Iterates over the files in a zip archive and yields the parsed content of each file. Args: file_path: The path to the zip archive. Yields: Parsed content of each file in the zip archive. """ if not file_path: return with ZipFile(file_path, "r") as zip_ref: for file_info in zip_ref.infolist(): filename = file_info.filename # Skip directories and hidden files if file_info.is_dir() or any( part.startswith(".") for part in filename.split(os.sep) ): continue parsed = self.parse_file(zip_ref, file_info) if parsed: yield parsedclass GitHubExtractor(DocumentExtractor): def extract(self, content: str): # Just return the content. return {}, content |
下載數據集
將上述已實現的組件插入 NeMo Curator 助手程序,以從所有可用來源獲取數據。
以下代碼示例演示了 GitHub 資源庫的此過程。download_and_extract 函數獲取數據集源的列表并將其轉發給下載器。然后,它會在每個下載的源上運行迭代器和提取器實現,以獲取解析后的數據。
output_format 字典用于向底層的 Dask 模塊提供有關每個提取字段的類型信息,從而避免類型推理的運行時懲罰。
from nemo_curator.download.doc_builder import download_and_extractdownloader = GitHubDownloader(output_dir)iterator = GitHubIterator()extractor = GitHubExtractor()output_format = { "text": str, "id": str, "file_extension": str, "category": str, "line_count": int, "size_in_bytes": int, "path": str,}dataset = download_and_extract( urls=urls, output_paths=[ os.path.join(output_jsonl_dir, os.path.basename(url)) for url in urls ], downloader=downloader, iterator=iterator, extractor=extractor, output_format=output_format, keep_raw_download=True,) |
download_and_extract 函數需要每個數據集源的輸出路徑,該路徑用于以 JSONL 格式存儲已解析的數據集,從而無需多次下載和提取源。
完成后,此函數將返回 DocumentDataset 實例。
使用文檔構建器加載數據集
在 NeMo Curator 中,數據集表示為 DocumentDataset 類型的對象。本類提供了從磁盤加載各種格式的數據集的助手。以 JSONL 格式創建數據集后,您可以使用以下代碼進行加載并開始使用它:
from nemo_curator.datasets import DocumentDataset# define `code_files` to be the path to the JSONL file created above.dataset_code = DocumentDataset.read_json(code_files, add_filename=True)# define `text_files` to be the path to the JSONL file created from text sources.dataset_text = DocumentDataset.read_json(text_files, add_filename=True) |
考慮到這些數據來自不同來源,因此可能更容易存儲兩個獨立的數據集實例,一個用于存儲來自文本來源(例如 Wikipedia 或 arXiv 論文)的數據,另一個用于存儲來自代碼來源(例如 GitHub 資源庫)的數據。這使您能夠定義特定于源的處理流程,例如對文本來源應用 PII 編輯,以及為代碼來源刪除許可文本。
您現在擁有了定義自定義數據集 curation 管道和準備數據所需的一切。
Unicode 格式和文本統一
通常,最好修復數據集中的所有 Unicode 問題,因為從在線來源抓取的文本可能存在不一致或 Unicode 問題。
為修改文檔,NeMo Curator 提供了一個 DocumentModifier 接口以及 Modify 輔助程序,用于定義如何修改每個文檔中的給定文本。有關實現您自己的自定義文檔修飾符的更多信息,請參閱“使用 NVIDIA NeMo Curator 進行 LLM 參數高效微調來管理自定義數據集”教程中的“文本清理和統一”部分。
在這里,只需對數據集應用 NeMo Curator UnicodeReformatter 修飾符即可。
此外,您還可以修改數據集中的所有引號,并確保沒有角度引號變體。您可以通過使用所需邏輯實現 DocumentModifier 接口來做到這一點。
考慮到每條記錄都有多個字段,請僅將操作應用于數據集中的相關字段(在本例中為“text”)。使用Sequential類將這些操作鏈式關聯在一起:
Sequential([ Modify(QuotationUnifier(), text_field="text"), Modify(UnicodeReformatter(), text_field="text"),]) |
數據集過濾
統一數據集中的所有文本后,請為數據集應用一些過濾器,以確保文檔符合特定的標準;例如,它們都應有合理的長度,并且 URL 或其他重復文本不應過多。
NeMo Curator 提供了許多此類濾鏡。你還可以通過實現 DocumentFilter 接口來創建自己的自定義濾鏡。有關更多信息,請參閱“Curating Custom Datasets for LLM Parameter-Efficient Fine-Tuning with NVIDIA NeMo Curator”教程中的“Designing custom dataset filters”部分。
以下代碼示例展示了適用于文本數據的各種過濾器的鏈式連接。
def filter_text(dataset: DocumentDataset) -> DocumentDataset: """ Filters the given dataset based on various criteria. Refer to the full list of all filters here: Args: dataset (DocumentDataset): The dataset to be filtered. Returns: DocumentDataset: The filtered dataset. """ filters = Sequential( [ # If a document contains a number of words not # within a specified range then discard ScoreFilter( WordCountFilter(min_words=50, max_words=100000), text_field="text", score_field="word_count", score_type=int, ), # If the document shrinks by > x% in terms of number of characters after # removing the top n-grams then discard. Source: Gopher (Rae et al., 2021) ScoreFilter( RepeatingTopNGramsFilter(n=2, max_repeating_ngram_ratio=0.2), text_field="text", score_type=float, ), ScoreFilter( RepeatingTopNGramsFilter(n=3, max_repeating_ngram_ratio=0.18), text_field="text", score_type=float, ), ScoreFilter( RepeatingTopNGramsFilter(n=4, max_repeating_ngram_ratio=0.16), text_field="text", score_type=float, ), ScoreFilter( RepeatedParagraphsFilter(max_repeated_paragraphs_ratio=0.7), text_field="text", score_type=float, ), # If more than 20% of the document is comprised of URLs then discard ScoreFilter( UrlsFilter(max_url_to_text_ratio=0.2), text_field="text", score_type=float, ), ] ) filtered_dataset = filters(dataset) return filtered_dataset |
PII 編輯
接下來,定義處理步驟,以編輯記錄中的所有個人身份信息(PII)。根據數據源(文本或代碼),確保將操作應用到適當的數據集和數據字段。此外,定義檢測到 PII 時應采取的操作。
以下代碼示例定義了兩個函數,分別用于文本源和代碼源,用于 PII 編輯。
def redact_pii(dataset: DocumentDataset) -> DocumentDataset: redactor = Modify( PiiModifier( supported_entities=[ "PERSON", "EMAIL_ADDRESS", ], anonymize_action="replace", device="gpu", ), text_field="extracted_comment", ) return redactor(dataset)def redact_code(dataset: DocumentDataset) -> DocumentDataset: # functions to extract comment lines from each row in a dataframe def func(row): return row["text"][row["text"].find("/*") : row["text"].find("*/") + 2] def func2(row): comment = row["text"][row["text"].find("/*") : row["text"].find("*/") + 2] return row["text"].replace(comment, str(row["extracted_comment"])) dataset.df["extracted_comment"] = dataset.df.apply(func, axis=1, meta=(None, str)) redacted_dataset = redact_pii(dataset) redacted_dataset.df["text"] = redacted_dataset.df.apply( func2, axis=1, meta=(None, str) ) redacted_dataset.df = redacted_dataset.df.drop(["extracted_comment"], axis=1) return redacted_dataset |
重復數據刪除
獲取的數據可能包含大量重復記錄。對于從 GitHub 抓取的代碼文件尤其如此。
定義處理步驟,在該步驟中檢測并刪除包含相同信息的文檔。這通常稱為精確去重復,適用于許多數據整理流程。
def dedupe(dataset: DocumentDataset) -> DocumentDataset: """ Remove exact duplicates from the given DocumentDataset. Args: dataset (DocumentDataset): The dataset containing documents. Returns: DocumentDataset: The deduplicated dataset. """ deduplicator = ExactDuplicates(id_field="id", text_field="text", hash_method="md5") # Find the duplicates duplicates = deduplicator(dataset) docs_to_remove = duplicates.df.map_partitions( lambda x: x[x._hashes.duplicated(keep="first")] ) # Remove the duplicates using their IDs. duplicate_ids = list(docs_to_remove.compute().id) dataset_df = dataset.df deduped = dataset_df[~dataset_df.id.isin(duplicate_ids)] return DocumentDataset(deduped) |
此函數為數據集中的每個文檔計算哈希簽名,并標記共享相同簽名以供刪除的那些文檔。
整合管護流程
現在,管護流程的每個步驟都已實施,現在可以集成所有內容,并按順序將每個操作應用到數據集。
使用 Sequential 類將策劃操作連接在一起。
# Define data curation steps for text and pdf files curation_steps_text = Sequential( [ clean_and_unify, ScoreFilter( TextLineCountFilter(), text_field="file_type_count", score_type=bool ), filter_text, dedupe, ] ) # Define data curation steps for code files curation_steps_code = Sequential( [ clean_and_unify, ScoreFilter( CodeLineCountFilter(), text_field="file_type_count", score_type=bool ), filter_code, dedupe, redact_code, ] )dataset_text = curation_steps_text(dataset_text).persist()dataset_code = curation_steps_text(dataset_code).persist()dataset_text.to_json(out_path, write_to_filename=True)dataset_code.to_json(out_path, write_to_filename=True)# Split the dataset by file category and save curated files (optional - to create blended datasets)separated_data_text = separate_by_metadata( dataset_text.df, out_path, "category").compute()separated_data_code = separate_by_metadata( dataset_code.df, out_path, "category").compute() |
在后端,NeMo Curator 使用 Dask 以分布式方式處理數據集。由于 Dask 操作是延遲評估的,因此只有在調用函數(如本例中的 .persist)時才開始計算。
將數據集保存到磁盤,并通過提供 write_to_filename=True 指示框架使用適當的文件名寫入每條記錄。
最后,如果您計劃執行可選的數據集混洗和混合,請按類別分割數據集。
數據集混合和混洗 (可選)
工作流的最后一步是將不同來源的數據集混合在一起,并對其進行混洗。離線混合和混洗通過集成各種數據,防止通過隨機數據暴露進行過擬合,增強了基礎LLM的泛化。
為此,請按照以下代碼示例中所示定義混合函數,并提供每個數據源、混合比率和目標大小,以定義數據集的最終大小。
def blend_and_shuffle( args: Any, dataset_paths: list, dataset_weights: list, target_size: int) -> None: """ Blend and shuffle curated data based on file paths for continued pre-training Args: args (Any): Command-line arguments. dataset_paths (list): List containing directory paths where the different JSONL files are stored. dataset_weights (list): List setting weights for each directory path target_size (int): Target number of data samples after blending """ root_path = os.path.join(DATA_DIR, "curated") output_path = root_path + "/data_blended" if os.path.isdir(output_path): shutil.rmtree(output_path) os.makedirs(output_path) # Blend the datasets datasets = [DocumentDataset.read_json(path) for path in dataset_paths] blended_dataset = nc.blend_datasets(target_size, datasets, dataset_weights) shuffle = nc.Shuffle(seed=42) blended_dataset = shuffle(blended_dataset) # Save the blend blended_dataset.to_json(output_path)# Function callroot_path = os.path.join(DATA_DIR, "curated")dataset_paths = [ root_path + "/CPP", root_path + "/VerilogVHDL", root_path + "/text", root_path + "/Python",]dataset_weights = [1.0, 4.0, 4.0, 1.0]blend_and_shuffle(dataset_paths, dataset_weights, target_size=20) |
調用后,精選數據集將保存在 output_path 下。
后續步驟
現在,您已學習如何使用 NeMo Curator 處理 DAPT 數據,現在可以開始嘗試了。獲取本教程的完整源代碼,調整代碼以根據您的領域定制數據,并開發功能強大的特定領域 LLMs。
您還可以申請搶先體驗 NVIDIA NeMo Curator 微服務,該服務為企業隨時隨地開始數據 curation 提供了最簡單的途徑,并提供精簡的性能和可擴展性,從而縮短上市時間。
如需申請,請訪問NeMo Curator微服務早期訪問版。
?