自帶容器模型在當今的現代計算平臺上得到廣泛支持。換句話說,您可以在自定義軟件環境中提供自己的容器映像。
然而,用戶提供的容器必須滿足每個平臺的獨特要求,這可能因平臺而異。例如,您可能需要:
- 使用特定的非 root 用戶。
- 將主目錄放在某個位置。
- 安裝依賴軟件包。
- 在指定端口上運行 web 應用程序。
保持容器圖像符合這些任意要求可能是一項挑戰。因此,我們迫切希望引入一個名為 Container Canary 的新開源工具來捕獲這些需求,并針對它們進行自動測試。 Container Canary 提供了一個規范,用于將這些需求記錄為可檢入版本控制的清單。然后,可以使用canary CLI 工具根據該清單驗證容器。
這在測試和持續集成( CI )環境中非常有用,可以避免容器中的回歸,同時允許容器開發人員快速移動。
$ canary validate --file somespec.yaml foo/bar:latest
Validating foo/bar: latest against somespec ?? Required packages are installed [passed] ?? Expected services are running [passed] ?? Your container is awesome [passed]
validation passed
安裝集 Container Canary
Container Canary 是用 Golang 編寫的,并以靜態二進制文件的形式分發,使其易于移植,易于在 CI 環境中安裝。
要安裝它,請轉到 releases page 并下載適合您系統的發行版。例如,使用 x86 _ 64 處理器的 Linux 用戶將使用canary_linux_amd64二進制文件。確保將以下命令中的VERSION替換為要安裝的版本。
$ curl -L https://github.com/NVIDIA/container-canary/releases/download/VERSION/canary_linux_amd64 > canary_linux_amd64
Container Canary 還提供 sha256 總和來驗證二進制文件。
$ curl -L https://github.com/NVIDIA/container-canary/releases/download/VERSION/canary_linux_amd64.sha256sum > canary_linux_amd64.sha256sum $ sha256sum --check --status canary_linux_amd64.sha256sum
現在,你可以把二進制文件放在你的路徑上。
$ chmod +x canary_linux_amd64 $ mv canary_linux_amd64 /usr/local/bin/canary
最后,驗證它是否有效。
$ canary version
Container Canary Version: VERSION ...
用 Kubeflow 示例驗證容器
安裝了 Container Canary 之后,就可以開始驗證容器了。 /examples/ GitHub 目錄包含一些流行容器平臺的清單,包括 Kubeflow example 。您可以使用這些清單立即開始。
Kubeflow 是設計、培訓和推斷 machine learning 模型的流行平臺。 Kubeflow Notebooks 服務使您能夠在 Kubeflow 內部啟動基于 web 的開發環境。雖然 Kubeflow 社區為運行 JupyterLab 、 RStudio 和 Visual Studio 代碼(代碼服務器) 等工具維護了默認容器,但您也可以使用自己的軟件環境選擇自己的容器映像。
要求清單 指定自定義容器必須滿足哪些條件才能在 Kubeflow 筆記本上正確運行。該列表如下所示:
Kubeflow 筆記本電腦要使用容器映像,映像必須:
- 在端口 8888 上公開 HTTP 接口:
- kubeflow 在運行時設置一個環境變量 NB _ PREFIX ,其中包含我們希望容器監聽的 URL 路徑
- kubeflow 使用 iFrame ,因此請確保您的應用程序集訪問控制允許源代碼:*在 HTTP 響應頭中
- 以名為 jovyan 的用戶身份運行:
- jovyan 的主目錄應該是/ home / jovyan
- 喬維安的 UID 應該是 1000
- 在/ home / jovyan 安裝一個空 PVC ,成功啟動:
- kubeflow 在/ home / jovyan 安裝了一個 PVC ,以在 Pod 重啟期間保持狀態
對于 Container Canary ,我們已經在示例清單中列出了這些要求。如果您曾經編寫過 Kubernetes 吊艙清單,那么您應該很熟悉這種語法。您可以看到,每個需求都以探針的形式寫出來,Container Canary 對著您的容器運行,以檢查是否滿足了需求。
該過程如以下示例所示:
apiVersion: container-canary.nvidia.com/v1
kind: Validator
name: kubeflow
description: Kubeflow notebooks
documentation: https://www.kubeflow.org/docs/components/notebooks/container-images/#custom-images
env: - name: NB_PREFIX value: /hub/jovyan/
ports: - port: 8888 protocol: TCP
volumes: - mountPath: /home/jovyan
checks: - name: user description: ?? User is jovyan probe: exec: command: - /bin/sh - -c - "[ $(whoami) = jovyan ]" - name: uid description: ?? User ID is 1000 probe: exec: command: - /bin/sh - -c - "id | grep uid=1000" - name: home description: ?? Home directory is /home/jovyan probe: exec: command: - /bin/sh - -c - "[ $HOME = /home/jovyan ]" - name: http description: ?? Exposes an HTTP interface on port 8888 probe: httpGet: path: / port: 8888 initialDelaySeconds: 10 - name: NB_PREFIX description: ?? Correctly routes the NB_PREFIX probe: httpGet: path: /hub/jovyan/lab port: 8888 initialDelaySeconds: 10 - name: allow-origin-all description: "?? Sets 'Access-Control-Allow-Origin: *' header" probe: httpGet: path: / port: 8888 responseHttpHeaders: - name: Access-Control-Allow-Origin value: "*" initialDelaySeconds: 10
既然有了清單,我就可以對容器進行測試了。首先,我選擇了一個我知道不會通過要求的公共形象,比如 流行的 web 服務器 NGINX 。
$ canary validate --file https://github.com/NVIDIA/container-canary/raw/main/examples/kubeflow.yaml nginx:latest Cannot find nginx:latest, pulling…
Validating nginx:latest against kubeflow ?? Home directory is /home/jovyan [failed] ?? User is jovyan [failed] ?? User ID is 1000 [failed] ?? Exposes an HTTP interface on port 8888 [failed] ?? Sets 'Access-Control-Allow-Origin: *' header [failed] ?? Correctly routes the NB_PREFIX [failed]
validation failed
毫不奇怪,這張圖片沒有通過驗證。
接下來,我嘗試了一款設計用于 Kubeflow 筆記本電腦的 官方 Kubeflow 圖片 。
$ canary validate --file https://github.com/NVIDIA/container-canary/raw/main/examples/kubeflow.yaml public.ecr.aws/j1r0q0g6/notebooks/notebook-servers/jupyter-pytorch-cuda:v1.5.0 Cannot find public.ecr.aws/j1r0q0g6/notebooks/notebook-servers/jupyter-pytorch-cuda:v1.5.0, pulling…
Validating public.ecr.aws/j1r0q0g6/notebooks/notebook-servers/jupyter-pytorch-cuda:v1.5.0 against kubeflow ?? Home directory is /home/jovyan [passed] ?? User is jovyan [passed] ?? User ID is 1000 [passed] ?? Sets 'Access-Control-Allow-Origin: *' header [passed] ?? Correctly routes the NB_PREFIX [passed] ?? Exposes an HTTP interface on port 8888 [passed]
validation passed
成功這張圖片通過了驗證。
如果要在 Kubeflow 上創建圖像,可以用同樣的方法驗證它們,并確信當其他用戶來運行它們時,所做的更改不會導致問題。
編寫自己的驗證清單
您還可以編寫自己的清單來驗證容器。 Container Canary 可以幫助您確保您的容器清單將在您自己的部署和第三方平臺中運行。它還幫助您在容器構建上運行單元測試。
每個清單都是一個以一些元數據開頭的 YAML 文件。
# Manifest versioning
apiVersion: container-canary.nvidia.com/v1
kind: Validator # Metadata
name: foo # The name of the platform that this manifest validates for
description: Foo runs containers for you # Optional, A description of that platform
documentation: https://example.com # Optional, A link to the documentation that defines the container requirements in prose
接下來,您可以為容器配置一些運行時選項。當 Container Canary 啟動圖像進行驗證時,將使用這些選項,并應模仿在目標平臺上設置的選項。其中包括環境變量、要公開的端口和要連接的卷。
env: - name: NB_PREFIX value: /hub/jovyan/
ports: - port: 8888 protocol: TCP
volumes: - mountPath: /home/jovyan
然后,指定支票。檢查是針對容器運行的測試,以確保其符合要求。每個檢查都包含一個與容器交互的探針。這些交互包括運行命令、發出 HTTP 請求和 ping TCP 套接字。
Container Canary 中的探針是 庫伯內特斯的那些 的超集,因此如果您以前使用過這些探針,應該對它們很熟悉。
checks: - name: mycheck # Name of the check description: Ensuring a thing # Description of what is being checked (will be used in output) probe: ... # A probe to run
exec檢查會在正在運行的容器中運行命令。如果命令以 0 退出,則檢查通過。
checks: - name: uid description: User ID is 1234 probe: exec: command: - /bin/sh - -c - "id | grep uid=1234"
HTTP Get檢查對您的容器執行HTTP GET請求。如果響應代碼< 300 且可選響應標題匹配,則檢查通過。
checks: - name: http description: Exposes an HTTP interface on port 80 probe: httpGet: path: / port: 80 httpHeaders: # Optional, headers to set in the request - name: Foo-Header value: "myheader" responseHttpHeaders: # Optional, headers that you expect to see in the response - name: Access-Control-Allow-Origin value: "*"
有關更多信息,請參閱 驗證程序 API 參考 。
編寫清單后,可以使用canary來測試帶有清單的容器。
$ canary validate --file examples/awesome.yaml your/container:latest
Validating your/container:latest against awesome ?? Required packages are installed [passed] ?? Expected services are running [passed] ?? Your container is awesome [passed]
validation passed
使用 GitHub 操作自動化容器 Canary 的示例
現在,我已經介紹了安裝 Container Canary、驗證容器和編寫自己的清單,下面是一個快速的 CI 示例。
假設您想要構建一個容器,該容器應該在特定端口上運行 web 應用程序,并且還安裝了 fastapi 。在新的存儲庫中,您可以使用 Python 創建一個名為app.py的小型 Python web 應用程序。
from fastapi import FastAPI
import uvicorn app = FastAPI() @app.get("/")
def read_root(): return {"Hello": "World"} @app.get("/foo")
def foo(): return {"foo": "bar"} if __name__ == "__main__": uvicorn.run(app, host="0.0.0.0", port=5000, log_level="info")
然后可以創建Dockerfile將應用程序打包到容器中。
FROM python COPY app.py /app.py RUN pip install fastapi uvicorn[standard] EXPOSE 5000 CMD python /app.py
現在,編寫一個 Container Canary 驗證器清單,測試容器映像,確保它在端口 5000 上運行 web 服務器,并且安裝了 Python 。叫它canary-validator.yaml。
apiVersion: container-canary.nvidia.com/v1
kind: Validator
name: example
description: Container Canary CI Example
env: []
ports: - port: 5000 protocol: TCP
volumes: []
checks: - name: http description: Exposes an HTTP interface on port 5000 probe: httpGet: path: /foo port: 5000 failureThreshold: 30 - name: python description: Has Python installed probe: exec: command: - /bin/sh - -c - "which python"
最后,創建一個 GitHub Actions 配置來在 CI 中運行它。我們在本例中選擇 GitHub Actions 是因為它很受歡迎、免費且易于使用,但這種配置應該適用于所有 CI 系統。
創建一個名為.github/workflows/ci.yaml的文件。
name: ci on: push: pull_request: jobs: canary: runs-on: ubuntu-latest steps: - name: Checkout uses: actions/checkout@v2 - name: Install Container Canary run: | curl -L https://github.com/NVIDIA/container-canary/releases/download/v0.2.0/canary_linux_amd64 > /usr/local/bin/canary chmod +x /usr/local/bin/canary - name: Build Container run: docker build -t foo/canary-ci-example:latest . - name: Validate container run: canary validate --file canary-validator.yaml foo/canary-ci-example:latest
現在,當您將代碼推送到 GitHub 時, Actions runner 會簽出代碼,安裝容器 Canary ,構建容器映像,并使用canary validate對其進行驗證。
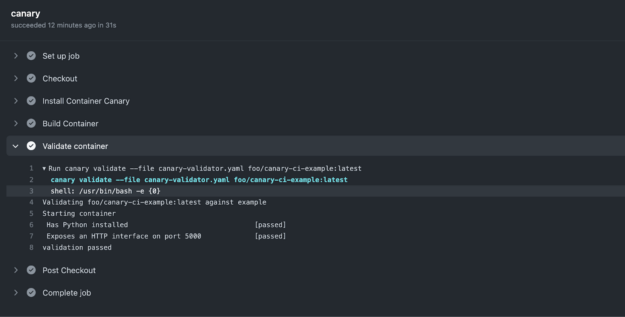
工作流程已經執行,我們的集裝箱圖像已經成功驗證——而且很快!有關更多信息,請參閱 /jacobtomlinson/canary-ci-example GitHub repo 中此示例的所有代碼。
應用你學到的東西
使用 Container Canary ,您可以為您的容器映像定義具體的接口,并驗證它們,以確保您構建的映像始終符合定義的規范。
如果您經常構建容器映像, Container Canary 在測試和 CI 環境中非常有用,因此它是測試工具包中的必備工具。容器開發人員可以成功地避免容器中的倒退,并更快地完成項目以節省時間。
?