在 第一部分 中,我們討論了如何訓練單語分詞器,并將其與預訓練 LLM 的分詞器合并,以形成多語言分詞器。在本文中,我們將向您展示如何將自定義分詞器集成到預訓練 LLM,以及如何在 NVIDIA NeMo 中實現這一目標。

準備工作
開始之前,請先導入以下庫:
import torch from nemo.collections.nlp.models.language_modeling.megatron_gpt_model import MegatronGPTModel from nemo.collections.nlp.parts.megatron_trainer_builder import MegatronTrainerBuilder from omegaconf import OmegaConf |
模型修改
合并后,組合分詞器的詞匯量大于 GPT-megatron-1.3 B 模型預訓練分詞器的詞匯量。這意味著您必須擴展 GPT – megatron – 1.3 B 模型的嵌入層,以適應組合分詞器 (圖 2)。
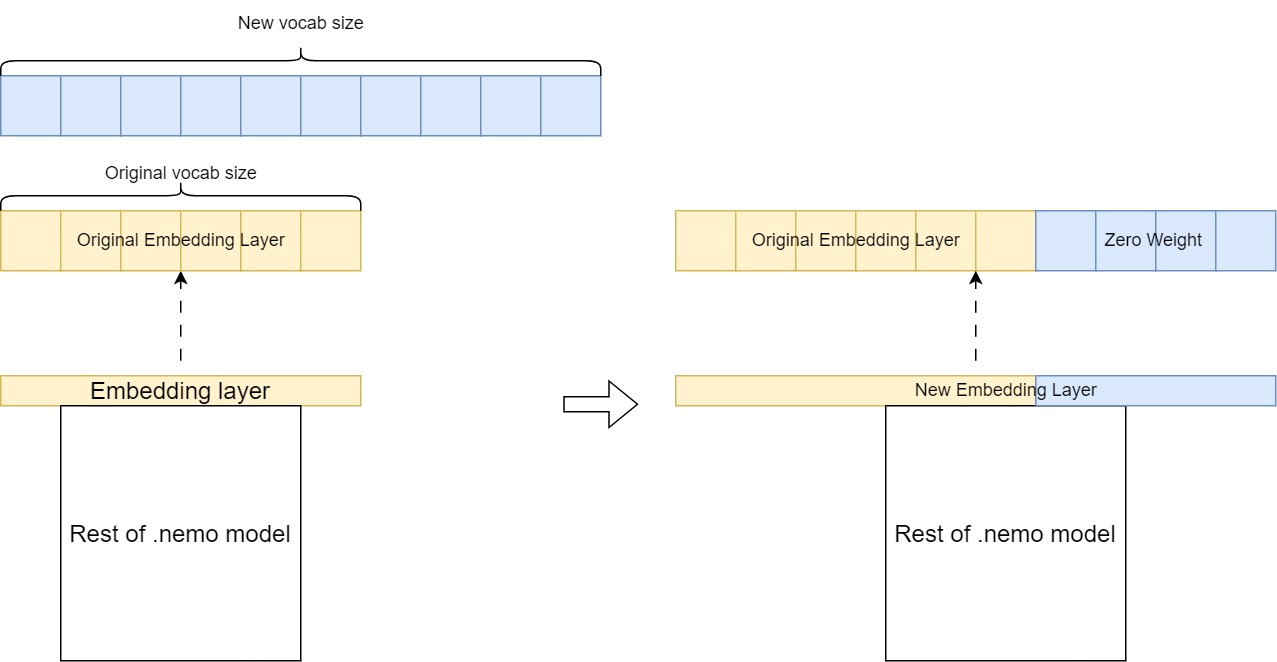
關鍵步驟包括以下內容:
- 使用所需增加的詞匯量創建新的嵌入層。
- 通過從原始嵌入層復制現有權重來初始化它。
- 將新詞表條目設置為零權重。
然后,此擴展嵌入層會替換預訓練模型中的原始層,使其能夠以新語言處理其他標記,同時保留在初始預訓練過程中學習的知識。
加載并提取嵌入層
運行以下代碼以加載 GPT-megatron-1.3 B.nemo 模型:
#Initializationtrainer_config = OmegaConf.load('/opt/NeMo/examples/nlp/language_modeling/conf/megatron_gpt_config.yaml')trainer_config.trainer.accelerator='gpu' if torch.cuda.is_available() else 'cpu'trainer = MegatronTrainerBuilder(trainer_config).create_trainer()#load gpt-megatron-1.3b.nemo and its confignemo_model = MegatronGPTModel.restore_from('./path_to_1.3B_nemo_model',trainer=trainer)nemo_config = OmegaConf.load('./path_to_1.3B_nemo_model_config.yaml') |
加載模型后,您可以從模型中提取嵌入層的權重,即 state_dict 參數。該嵌入層用于生成新的嵌入層。
#Extract original embedding layerembed_weight = nemo_model.state_dict()[f'model.language_model.embedding.word_embeddings.weight']print(f"Shape of original embedding layer: {embed_weight.shape}") |
生成新的嵌入層
現在,您必須計算新嵌入層和原始嵌入層之間的維度差異。根據此差異創建張量,并將其連接到原始嵌入層,以形成新的嵌入層。
差值基于以下內容計算得出:
- 組合分詞器詞匯量
- 原始嵌入層長度
- 一個參數:
model_config.yaml和model.make_vocab_size_divisible_by
以下是差值的方程:
![Diff = [\frac{N}{X}] \times X-O](https://s0.wp.com/latex.php?latex=Diff+%3D+%5B%5Cfrac%7BN%7D%7BX%7D%5D+%5Ctimes+X-O&bg=transparent&fg=000&s=1&c=20201002)
- 組合分詞器詞匯量 =
- 原始 NeMo 嵌入層長度 =
- model.make_vocab_size_divisible_by =


機制是,為了更大限度地提高計算效率,您需要將嵌入層填充到可被 8 的倍數整除的數字上。給定 tokenizer 詞匯量,模型預計會有一個帶填充的嵌入層。
如果您從頭開始訓練,此過程應該是自動的,但在這種情況下,您必須手動填充新的嵌入層。
tokenizer = AutoTokenizer.from_pretrained('./path_to_new_merged_tokenizer')if len(tokenizer)% nemo_config.make_vocab_size_divisible_by != 0: tokenizer_diff = (int(len(tokenizer)/nemo_config.make_vocab_size_divisible_by)+1) * nemo_config.make_vocab_size_divisible_by - embed_weight.shape[0]else: tokenizer_diff = tokenizer.vocab_size - embed_weight.shape[0] |
現在,您可以生成額外的張量作為新標記的初始權重。然后,此張量連接到之前提取的原始嵌入層,以形成新的嵌入層。
hidden_size = embed_weight.shape[1]random_embed = torch.zeros((tokenizer_diff, hidden_size)).to('cuda')new_embed_weight = torch.cat((embed_weight, random_embed), dim=0) |
修改并輸出新模型
在此步驟中,您將修改模型配置中與 tokenizer 相關的設置,以與新詞表保持一致。回想一下,新嵌入的形狀不同于原始嵌入層。如果直接替換原始模型中的嵌入層,您將遇到層大小不匹配錯誤。
加載包含更新的 tokenizer 配置的空模型實例,并將預訓練模型的值分配給其 state_dict,同時添加新的嵌入層。
最后,以 .nemo 格式保存此修改后的模型,以便對擴展的詞匯表進行持續預訓練。
state_dict = nemo_model.state_dict()state_dict[f'model.language_model.embedding.word_embeddings.weight'] = new_embed_weightNEW_TOKENIZER_PATH = './path_to_new_merged_tokenizer'nemo_config['tokenizer']['vocab_file'] = f"{NEW_TOKENIZER_PATH}/vocab.json"nemo_config['tokenizer']['merge_file'] = f"{NEW_TOKENIZER_PATH}/merges.txt"nemo_config['vocab_file'] = f"{NEW_TOKENIZER_PATH}/vocab.json"nemo_config['merges_file'] = f"{NEW_TOKENIZER_PATH}/merges.txt"new_nemo_model = MegatronGPTModel(nemo_config,trainer)new_nemo_model.load_state_dict(state_dict)new_nemo_model.save_to('./path_to_modified_nemo_model') |
運行以下代碼,檢查新模型在英語提示下是否表現良好:
python /opt/NeMo/examples/nlp/language_modeling/megatron_gpt_eval.py \ gpt_model_file='./path_to_modified_nemo_model' \prompts='ENTER YOUR PROMPT' \inference.greedy=True \inference.add_BOS=True \trainer.devices=1 \trainer.num_nodes=1 \tensor_model_parallel_size=-1 \pipeline_model_parallel_size=-1 |
數據預處理
為了確保數據的一致性,請重復運行數據預處理腳本以處理訓練、驗證和測試數據集。有關更多信息,請參閱 第 3 步:將數據拆分為訓練、驗證和測試。
替換 --json_key 參數,用于指定數據集中文檔文本的鍵值:
python /opt/NeMo/scripts/nlp_language_modeling/preprocess_data_for_megatron.py \ --input='./path_to_train/val/test_dataset' \--json-keys=text \--tokenizer-library=megatron \--vocab './path_to_merged_tokenizer_vocab_file'\--dataset-impl mmap \--tokenizer-type GPT2BPETokenizer \--merge-file './path_to_merged_tokenizer_merge_file' \--append-eod \--output-prefix='./path_to_output_preprocessed_dataset' |
持續預訓練
與您的模型相比,用于持續預訓練的默認配置文件可能具有不同的模型配置。運行以下代碼以覆蓋這些配置。并相應地更新 tokenizer 和 data prefix 參數。
ori_conf = OmegaConf.load('./path_to_original_GPT-1.3B_model/model_config.yaml')conf = OmegaConf.load('/opt/NeMo/examples/nlp/language_modeling/conf/megatron_gpt_config.yaml')for key in ori_conf.keys(): conf['model'][key] = ori_conf[key]# Set global_batch_size based on micro_batch_sizeconf['model']["global_batch_size"] = conf['model']["micro_batch_size"] * conf.get('data_model_parallel_size',1) * conf.get('gradient_accumulation_steps',1)# Reset data_prefix (dataset path)conf['model']['data']['data_prefix'] = '???'# Reset tokenizer config NEW_TOKENIZER_PATH = "./path_to_new_merged_tokenizer"conf['model']['tokenizer']['vocab_file'] = f"{NEW_TOKENIZER_PATH}/vocab.json"conf['model']['tokenizer']['merge_file'] = f"{NEW_TOKENIZER_PATH}/merges.txt"conf['model']['vocab_file'] = f"{NEW_TOKENIZER_PATH}/vocab.json"conf['model']['merges_file'] = f"{NEW_TOKENIZER_PATH}/merges.txt"OmegaConf.save(config=conf,f='/opt/NeMo/examples/nlp/language_modeling/conf/megatron_gpt_config.yaml') |
運行以下代碼以開始持續預訓練。應根據您的特定硬件和設置修改以下參數:
nproc_per_node:每個節點上的 GPU 數量。model.data.data_prefix:訓練、驗證和測試數據集的路徑,請參閱代碼示例以了解相關格式。exp_manager.name:輸出文件夾名稱,該名稱將用于保存中間檢查點,在./nemo_experiments/文件夾中。trainer.devices:每個節點的 GPU 設備數量。trainer.num_nodes:表示模型訓練的節點數。trainer.val_check_interval:在訓練過程中執行驗證檢查的頻率(以步數為單位)。trainer.max_steps:指定訓練過程的最大步長。model.tensor_model_parallel_size:對于 13B 模型,請繼續使用1。對于更大的模型,請使用更大的尺寸。model.pipeline_model_parallel_size:對于 13B 模型,建議保持為1。對于更大的模型,建議使用更大的尺寸。model.micro_batch_size:根據 GPU 的視頻隨機存取存儲器(vRAM)大小進行調整。model.global_batch_size:其值取決于micro_batch_size。欲了解更多信息,請參閱 批處理(Batching)。
DATA = '{train:[1.0,training_data_indexed/train_text_document], validation:[training_data_indexed/val_text_document], test:[training_data_indexed/test_text_document]}'!torchrun --nproc_per_node=1 \ /opt/NeMo/examples/nlp/language_modeling/megatron_gpt_continue_training.py \ "model.data.data_prefix={DATA}"\ name=megatron_gpt_ \ exp_manager.name=megatron_gpt_1 \ restore_from_path='./path_to_modified_nemo_model' \ trainer.devices=1 \ trainer.num_nodes=1 \ trainer.precision=16 \ trainer.val_check_interval=300 \ trainer.max_steps=1200 \ model.megatron_amp_O2=False \ model.tensor_model_parallel_size=1 \ model.pipeline_model_parallel_size=1 \ model.micro_batch_size=1 \ model.global_batch_size=1 \ ++model.use_flash_attention=False \++model.seq_len_interpolation_factor=null |
模型推理
在訓練期間,生成的中間文件將存儲在./nemo_experiments 文件夾中。在這里,您應該可以找到所需的模型 Checkpoint 文件和 hparams.yaml 文件。
使用以下代碼使用 Checkpoint 文件進行推理:
python /opt/NeMo/examples/nlp/language_modeling/megatron_gpt_eval.py \'checkpoint_dir="./path_to_checkpoint_folder"' \'checkpoint_name="name of checkpoint file in .ckpt format"' \'hparams_file="./path_to_hparams_file"' \prompts='ENTER YOUR PROMPT' \inference.greedy=True \inference.add_BOS=True \trainer.devices=1 \trainer.num_nodes=1 \tensor_model_parallel_size=-1 \pipeline_model_parallel_size=-1 |
表 1 比較了原始 GPT-megatron-1.3 B 模型和使用泰文維基百科數據訓練的 GPT-megatron-1.3 B 模型生成的句子輸出。在本文中,我們截斷了一些重復輸出標記。
| 提示 | GPT-megatron-1.3 B.nemo 的輸出 | 輸出經過訓練的 GPT-megatron-1.3 B-TH.nemo |
| 泰國的省會城市是 | 泰國的省會城市為曼谷。泰國的省會城市為曼谷。n nHistory n n 泰國的省會城市原名 Chiang Mai,意思是“太陽之城”。泰國的省會城市原名 Chiang Mai,意思是“太陽之城”。 | ? |
| ? | ? | ? |
訓練后,模型提高了對泰語的理解,盡管其英語性能降低。這是由于使用單語數據集持續預訓練導致模型遺忘。為避免這種情況,我們建議使用包含英語和目標語言的語料庫進行訓練。
結束語
通過遵循此工作流程,您可以有效地擴展基礎 LLM 的語言支持,使其能夠理解并生成多種語言的內容。此方法使用在初始預訓練期間學習的現有知識和表征,同時使模型能夠通過持續學習適應和獲得新的語言技能。
此過程的成功確實取決于用于分詞器訓練和持續預訓練的目標語言數據的質量和數量。為了確保最佳性能,尤其是減輕災難性的遺忘,仔細的訓練課程和訓練策略也是必要的。
要開始使用,請下載 NeMo 框架容器 或下載并設置 NVIDIA/NeMo 開源庫 在 GitHub 上。您可以在低資源語言上使用自己的精選數據集,并按照本文中的步驟在基礎語言模型(LLM)上添加所需的新語言支持。
作為 NeMo 微服務搶先體驗,您還可以請求訪問 NVIDIA NeMo 策展人 和 NVIDIA NeMo 定制器 微服務。這些微服務共同簡化了大語言模型(LLM)的數據管護和自定義,使您能夠更快地將解決方案推向市場。
?